Lab 3: GUI development
Overview
Today, you will be building a personal website. We will be working on implementing the front-end using Hypertext Markup Language (HTML) and Cascading Style Sheets (CSS). You will learn how to work with HTML & CSS and then back up your code to your git repository.
While modern LLMs like Claude and ChatGPT excel at building single page websites, it is important to understand what exactly is being generated. HTML is manipulated extensively in more complex scripts and a basic understanding of its syntax is crucial for you to move forward in this course. Please limit the use of GenAI to the prescribed amount in this lab to ensure the best learning outcomes.
To receive credit for this lab, you MUST show your work to the TA during the lab, and push it to the github before the deadline. Please note that submissions will be due on Wednesday at 11:59 p.m. in the following week.
Learning objectives
LO1. Learn about building websites with HTML
L02. Learn about organizing and presenting content with HTML
L03. Learn about CSS and apply style rules from a pre-built library to beautify a webpage
L04. Apply skills learnt from LO3 by using a CSS library not taught in class/lab
L05. Evaluate and revise AI-generated frontend code.
L06. Test a webpage for responsiveness and accessibility
Clone your GitHub repository
Github Classroom Assignment
- Using an SSH key
- Using a Personal Access Token (PAT)
git clone git@github.com:CUBoulder-CSCI-3308-Fall2026/cu-csci3308-fall2026-lab-3-gui-development-___YOUR_USER_NAME___.git
git clone https://github.com/CUBoulder-CSCI-3308-Fall2026/cu-csci3308-fall2026-lab-3-gui-development-___YOUR_USER_NAME___.git
Navigate to the repository on your system.
cd cu-csci3308-fall2026-lab-3-gui-development-___YOUR_USER_NAME___
Personal website
Build a responsive personal website that introduces you, your interests, your projects, and your experience. Your website must contain at least four connected pages:
- Home: An image and a short introduction
- Hobbies: At least three hobbies, each with an image and short description
- Projects: At least three projects, each with an image, description, and link to an additional resource when appropriate
- Resume: A resume created with HTML elements rather than an embedded PDF
You may add other pages or sections that help represent you. Do not include private information that you would not want classmates, course staff, or an online audience to see.
You may use generative AI as a coding assistant. You remain responsible for understanding, testing, and improving everything you submit.
Directory structure
Organize your submission as follows:
├── submission/
│   ├── sketches/
│   │   ├── <sketches you generate for each page>
│   ├── GenAI_Usage.txt
│   ├── testLayouts/
│   │   ├── <screenshots of the website in different layouts>
│   ├── personal_website_link.txt (only if you attempt extra credit)
├── views/
│   ├── home.html
│   ├── hobbies.html
│   ├── projects.html
│   └── resume.html
└── resources/
    ├── img/
    └── css/
        └── styles.css
Use relative paths for all pages, stylesheets, images, and other local resources.
Part A
Step 1: Plan before prompting
Before using generative AI, sketch or describe each of the four required pages. You may use a pen and paper or a digital tool to sketch the pages of your website. Preserve these sketches for submission.
Your design must include:
- A consistent page header
- A navigation bar linking all four pages
- The required content for that page
- A footer containing at least one appropriate social or professional link
While sketching your pages, consider the following questions:
- Who is the intended audience for your personal website?
- What should visitors learn about you?
- How should each page change on a phone?
- What common colors, typography, navigation, and layout choices will make the four pages feel like one website?
Add your sketches to the sketches folder in the submission folder.
There are resources attached at the end of this page that will help build your website.
Step 2: Build the HTML structure
Create home.html, hobbies.html, projects.html, and resume.html at the path mentioned in the directory structure. Across the website, your HTML must include:
- A valid HTML document structure
header,nav,main,section, andfooterelements- One primary heading on every page
- An image and short introduction on the Home page
- At least three hobby cards
- At least three project entries
- A resume built with appropriate HTML elements
- Meaningful alternative text for every informative image
- At least one list
- At least one link
- At least one button or button-styled link
Every page must include a consistent navigation bar and footer. For now, focus on content, structure, and working links rather than visual polish. The pages may not look like your sketches just yet.
At this stage, all the HTML files should be complete, with the required structures for each of the pages.
In your submission, using comments in the HTML files, identify one example of each of the following:
- An element
- An attribute
- A parent-child relationship
Step 3: Add custom CSS
Create resources/css/styles.css and connect it to all four HTML pages. Refer the Lecture Notes on CSS.
Your custom CSS must include:
- At least one element selector
- At least one class selector
- Custom colors and typography
- Margin and padding
- A border, shadow, or border radius
- At least one rule that overrides a Bootstrap default
Add comments identifying the required CSS rules.
/* Class selector and box-model properties */
.hobby-card {
  margin: 1rem;
  padding: 1.5rem;
}
At this point you should have a filled out styles.css. Remember to link it
to all the HTML pages.
Part B
Step 4: Add Bootstrap
Use Bootstrap to make all four pages responsive and visually consistent.
Your page must include:
- The Bootstrap stylesheet
- A consistent Bootstrap navigation bar
- A Bootstrap container
- A responsive grid with rows and columns
- At least two Bootstrap components
- At least three Bootstrap utility classes
- Hobby cards organized with the Bootstrap grid
- Project entries organized with the Bootstrap grid or accordion
- Layouts that work at mobile and desktop widths
Possible components include:
- Navbar
- Cards
- Alerts
- Badges
- Buttons
- Accordion
- Modal
Do not use Bootstrap components solely to satisfy the requirement. Each component should serve a clear purpose on your personal website.
Bootstrap annotation
Choose three Bootstrap classes in your code and explain what each one does. For example:
| Bootstrap class | Element using it | What it does |
|---|---|---|
container | Main content area | Centers the content and provides responsive spacing |
At this stage, your HTML files should be complete, have styles.css filled out, Bootstrap linked to your website and Bootstrap classes used in specific HTML elements to serve purposes like enhanced visual representation of content, responsiveness, accessibility etc.
In any one of the HTML files you use Bootstrap, you will record the three Bootstrap annotations requested above.
Step 5: Use generative AI
Begin by asking a generative AI tool for a barebones HTML structure, not a complete website. You may then ask for help with one specific problem at a time. For example:
- Generate an HTML skeleton without adding extra sections.
- Make the hobby cards responsive.
- Make the navigation consistent across the four pages.
- Suggest an accessible color palette.
- Add an accordion for project descriptions.
- Diagnose a layout problem.
Your prompt should state which parts you will add yourself and should request only code that you can inspect and explain.
Save the following information in GenAI-Usage.txt.
1. The AI tool
List the AI tool and variant you are using for this task.
2. Your prompt
Copy the prompt you gave the AI.
3. The AI's suggestion
Summarize the suggestion or include the relevant generated code.
4. Your evaluation
Answer the following questions:
- What did the AI produce correctly?
- What part did you need to change?
- How did you verify that the code worked?
- Choose one line of generated code and explain it in your own words.
5. Your revision
Make at least one meaningful change to the AI-generated result. Changing only text, colors, or variable names does not count.
Meaningful changes might include:
- Correcting the HTML structure
- Fixing a responsive-layout problem
- Simplifying unnecessary CSS
- Replacing duplicated CSS with Bootstrap utilities
- Customizing a Bootstrap component for your content and intended audience
You should have filled out the GenAI_Usage.txt file after this task.
Step 6: Test the page
Test your webpage at approximately:
- 375 px wide
- 768 px wide
- 1200 px wide
Confirm that:
- Text remains readable.
- Content does not overflow horizontally.
- Hobby cards and project entries reorganize appropriately.
- Links and buttons are easy to identify.
- Images have alternative text.
- Headings follow a logical order.
- Interactive components can be used with the keyboard.
- Navigation links correctly connect all four pages.
- The site still works after its folder is moved to another location.
Include screenshots of the mobile and desktop layouts for each page in the
testLayouts folder.
Extra Credit
You need to complete both tasks to get the extra credit point for this lab.
1. Hosting your website
- Create a public repository of your own on GitHub and upload the website files you created for this lab.
Note: It is imperative that your repository is public. Otherwise github will require you to set up an enterprise account.
- Go to the repository settings and enable GitHub Pages by selecting the main branch under the "Pages" section.
Resource: GitHub Pages Documentation
- Share the live link in a file called personal_website_link.txt within the lab repository
submissionfolder for extra credit.
2. Resume Download
Add a button on the Resume page that allows users to download your resume as a PDF file.
Submission Guidelines
Avoid using absolute paths like C:// or F:// in your work, as they won't function on other computers, such as the TA's, during grading. This can lead to broken links, images not loading correctly, and can negatively impact your grade.
Also, make sure that all the images used in your website are compressed.
Commit and upload your changes
-
Make sure you have all the files added in the directory structure specified.
-
Run the following commands inside the root of your lab's git directory.
git add .
git commit -m "Added files for lab 3"
git push
- Go to your repository on GitHub and ensure that all the files listed above are present in the "submission" folder.
You will be graded on the files that were present before the deadline. If the files are missing/not updated by the deadline, you could receive a grade as low as "Not attempted". This can be replaced by raising a regrade request once you successfully upload your work to Github.
Regrade Requests
Please use this link to raise a regrade request if you think you didn't receive a correct grade.
Grading specifications
This lab does not reward you simply for producing a polished webpage. It rewards your ability to plan, inspect, explain, modify, and test code even when generative AI helps create the initial version.
| Criteria | Not Attempted | Below Expectations | Meets Expectations |
|---|---|---|---|
| Overall Attempt | • Lab not attempted OR • Student did not attend the lab without prior approval | — | — |
| Attendance & TA Review | — | • Did not attend the full duration of the lab OR • Work was not reviewed by a TA OR • Attendance was not marked on Canvas | • Attended the full duration of the lab AND • Work was reviewed by a TA AND • Attendance was marked on Canvas |
| Interview Grading | — | • Did not attend interview with a TA OR • Could not demonstrate an understanding of the submitted work when asked to explain it. | • Attended interview with a TA AND • Clearly explained the work completed and demonstrates a solid understanding of the tools |
| Submission Presence | — | • Work was not uploaded to the repository OR • The repository does not follow the provided directory structure | • All required work was uploaded to the designated GitHub repository folder |
| HTML Structure and Content | • No functional website | • One or more pages, required sections, or structures are incomplete | • All four pages use valid HTML AND • contains the required personal website content |
| Custom CSS | • No custom CSS | • CSS is present, but several requirements are missing | • Includes all required selectors and styling techniques in an external CSS file |
| Navigation and Relative Paths | • Pages are not connected OR cannot be opened correctly | • Some navigation links or local resources are missing or broken | • All four pages are connected through consistent navigation, AND • local resources use correct relative paths |
| Bootstrap | • Bootstrap is not used | • Bootstrap is included but used incorrectly or minimally | • Correctly uses the Bootstrap grid, components, and utilities throughout the website |
| Responsive Design | • Website is not responsive | • One or more pages have minor overflow or layout problems | • All pages work correctly at mobile, tablet, and desktop widths |
| AI Evaluation | • AI use is undocumented | • AI use is documented, but the evaluation or revision is superficial | • Documents the prompt, evaluates the output, explains the generated code, and makes a meaningful revision |
| Resume Page | • Resume page is missing | • Required resume content is incomplete OR • is embedded only as a PDF | • Resume is built with appropriate HTML elements AND • renders correctly |
| Extra Credit - Creative Enhancements & Hosting | — | • Website is not hosted on GitHub Pages OR • Resume is not available as a downloadable file OR • Styling does not go beyond baseline requirements | • Meets all Meets Expectations criteria AND • Website hosted on GitHub Pages AND • Resume available as a downloadable file AND • Webpages demonstrate creative and thoughtful styling beyond baseline requirements |
Resources
References to HTML Documentation
Reference to CSS Documentation
Bootstrap
- Bootstrap is a free, open source framework to add style to your existing web pages.
- Bootstrap has ready-to-use customizations for the different components you may want to add to your web page.
- Bootstrap comes equipped with styles for common HTML elements like typography, code, tables, forms, and buttons.
How to add bootstrap to your HTML Page:
For this class we will be using Bootstrap: Use Bootstrap 5.3
- The official documentation for Bootstrap can be found here.
- Incorporate Bootstrap into your HTML files in the following manner
bootstrap_demo.html<!DOCTYPE html><html lang="en"><head><meta charset="utf-8" /><meta name="viewport" content="width=device-width, initial-scale=1" /><title>Bootstrap demo</title><linkhref="https://cdn.jsdelivr.net/npm/bootstrap@5.3.2/dist/css/bootstrap.min.css"rel="stylesheet"integrity="sha384-T3c6CoIi6uLrA9TneNEoa7RxnatzjcDSCmG1MXxSR1GAsXEV/Dwwykc2MPK8M2HN"crossorigin="anonymous"/></head><body><h1>Hello, world!</h1><scriptsrc="https://cdn.jsdelivr.net/npm/bootstrap@5.3.2/dist/js/bootstrap.bundle.min.js"integrity="sha384-C6RzsynM9kWDrMNeT87bh95OGNyZPhcTNXj1NW7RuBCsyN/o0jlpcV8Qyq46cDfL"crossorigin="anonymous"></script></body></html>
Bootstrap components in a sample web page:
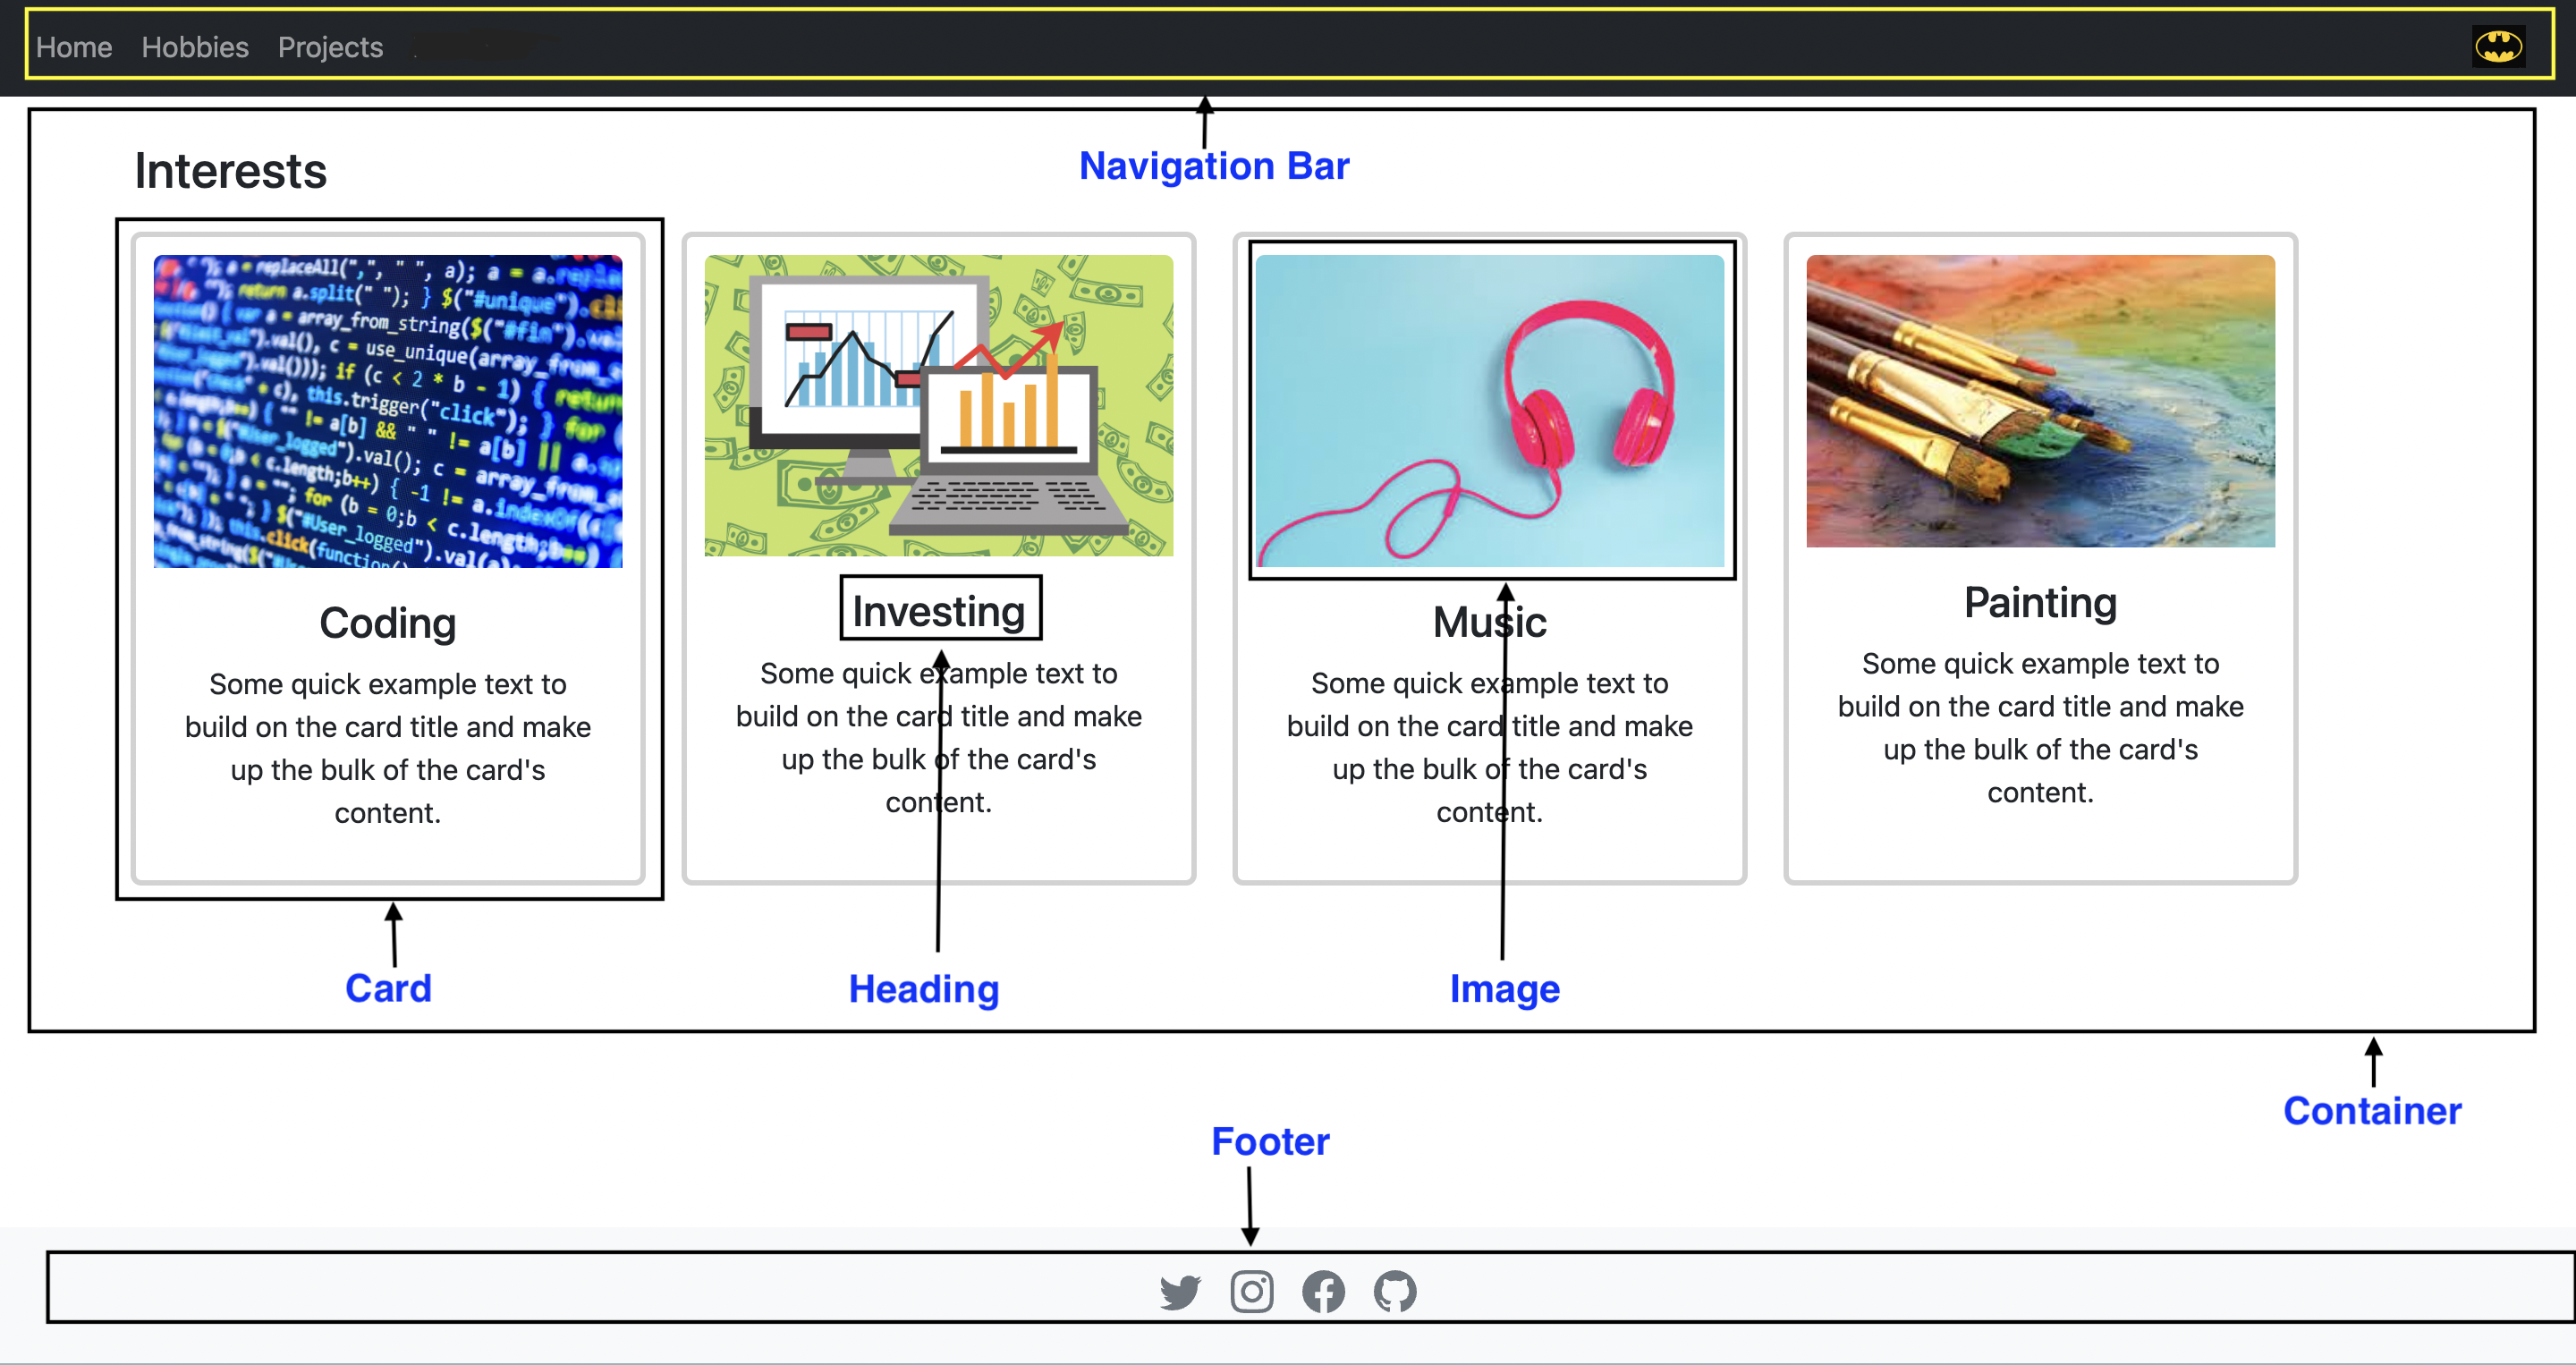
Download Bootstrap code examples if you want to explore some more: https://getbootstrap.com/docs/5.3/examples/
** Bootstrap Components that you will need to build your website: **
Navigation Bar: NavBar BootstrapContainer: - Content of your webpage : Use the Container class to include all the content of your webpage.Cards: Use the Cards component that support a wide variety of content, including images, text, list groups, links, and more.Footer: You can create a Footer for your webpages that usually includes links to social media platforms and additional information based on your website. Here's another resource on footers that may also be useful.Carousel: Bootstrap 5.3 has really great carousel documentation that can be used in your website for the projects page.Grid: Grid documentation which has series of rows, and columns to layout and align content that can be used for the resume page.