Lab 6: Application Server
Overview
In this lab, you will be learning about building and working with application servers. We will be using NodeJS and Postgres to for this purpose.
To receive credit for this lab, you MUST show your work to the TA during the lab, and push it to the github before the deadline. Please note that submissions will be due on Wednesday at 11:59 p.m. in the following week.
Learning Objectives
L01. Understand the basics of client server systemsL02. Learn how NodeJS is used for building web applications
L03. Implement database queries with NodeJS and PostgreSQL
L04. Develop proficiency in using Postman for API testing
Part A
Clone your GitHub repository
Github Classroom Assignment
- Using an SSH key
- Using a Personal Access Token (PAT)
git clone git@github.com:CU-CSCI3308-Spring2026/lab-6-application-server-<YOUR_USER_NAME>.git
git clone https://github.com/CU-CSCI3308-Spring2026/lab-6-application-server-<YOUR_USER_NAME>.git
Navigate to the repository on your system.
cd lab-6-application-server-<YOUR_USER_NAME>
Directory structure
For this lab, your directory structure should be as shown below. The submission folder should also be structured the same way.
|--init_data
  |--create.sql
|--index.js
|--lab-6-postman.json
|--.gitignore
|--docker-compose.yaml
|--package.json
|--README.md
API Routes
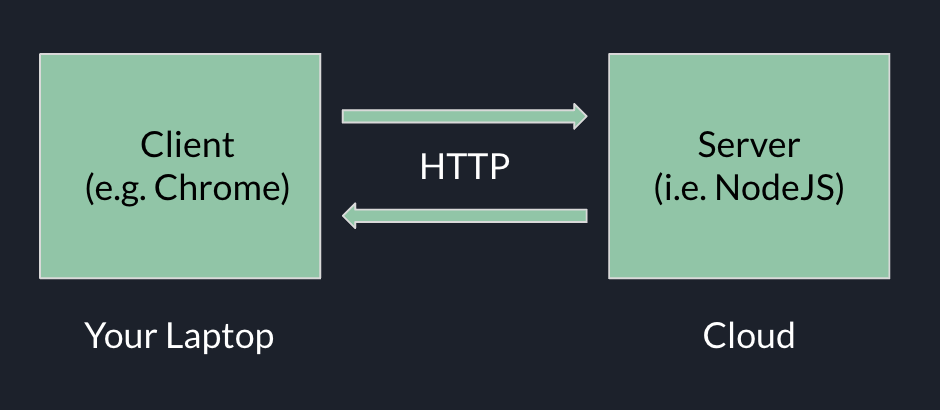
We can use HTTP Requests to send/retrieve data to/from our server.
HTTP Requests are made by a client (e.g. your web browser) in order to access some resource on the server. In order to do so, the client specifies:
- A URL (Uniform Resource Locator) -- For example: “/register”
- A series of HTTP headers
- Optionally, a request body
The server can accept this request and send a response, which may consist of a web page (HTML/CSS/JS), or a JSON object. You need to specify the nature of the content in the HTTP header of the response.
Given that we will be using NodeJS to set up our application server, we will now learn more about NodeJS and set up a server with routes for various operations.
package.json
package.json is a crucial configuration file in a Node.js project that defines metadata, dependencies, scripts, and project settings. It ensures consistency across environments and simplifies package management.
Find more information on package.json - here
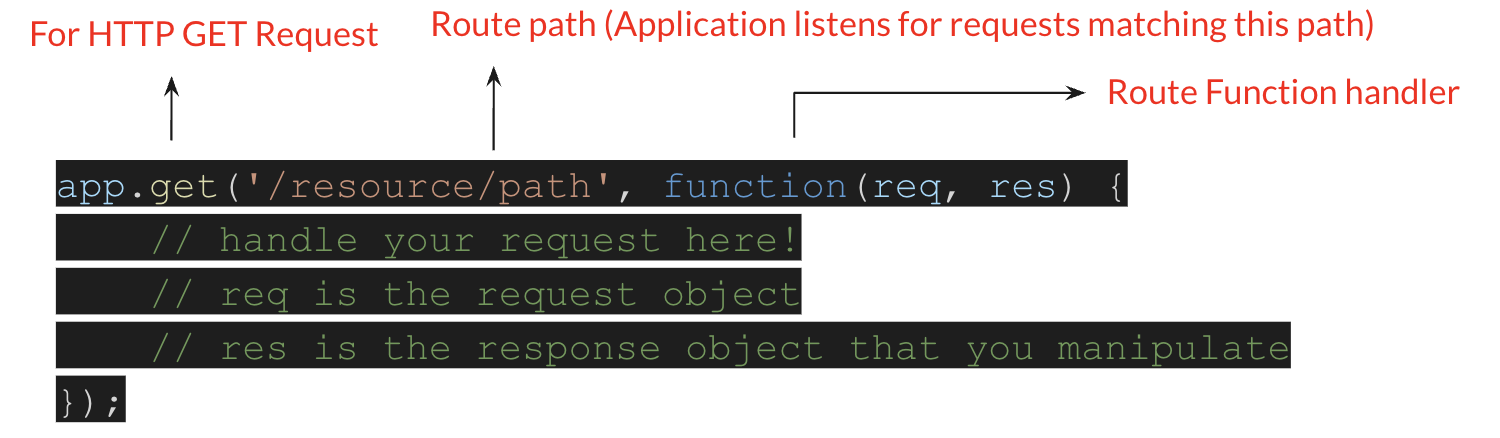
Express
Express is a NodeJS framework that allows us to build web applications and APIs by defining HTTP routes and their callback functions(also called 'handler functions'). The application “listens” for requests that match the specified route(s) and method(s), and when it detects a match, it calls the specified callback function.
Following is an example of a basic route.
Async/Await
Why do we use async/await?
Node.js is an asynchronous event-driven JavaScript runtime and is the most effective when building scalable network applications. Node.js is free of locks, so there’s no chance to dead-lock any process.
Async
Asynchrony, in software programming, refers to events that occur outside of the primary program flow and methods for dealing with them. External events such as signals or activities prompted by a program that occur at the same time as program execution without causing the program to block and wait for results are examples of this category. Asynchronous input/output is an example of the latter case, and allows programs to issue commands to storage or network devices that can process these requests while the processor continues executing.
Await
In an async, you can await any Promise or catch its rejection cause. In ECMAScript 2017, the async and await keywords were introduced. These features make writing asynchronous code easier and more readable in the long run. They aid in the transition from asynchronicity to synchronism by making it appear more like classic synchronous code, so they’re well worth learning.

To get more information on different syntax and applications of async/await, you can reference this article
Example:
Lets take the following code snippet to understand aync/await.
const foo = async (req, res) => {
  let response = await request.get('http://localhost:3000');
  if (response.err) {
    console.log('error');
  } else {
    console.log('fetched response');
  }
};
Here, the await keyword waits for the asynchronous action(request.get()) to finish before continuing the function. It’s like a ‘pause until done’ keyword. The await keyword is used to get a value from a function where you would normally use .then(). Instead of calling .then() after the asynchronous function, you would simply assign a variable to the result using await. Then you can use the result in your code as you would in your synchronous code.
node_modules
Explore the package.json file provided to you and you will notice that there are dependencies that are declared. These dependencies vary based on the project at hand and the libraries that are needed for it.
These dependencies are installed when the node project is set up. You may use the npm install command to download these dependencies. The node_modules/ directory is where Node.js stores all the dependencies installed via npm (Node Package Manager) or yarn. It contains the actual code for the libraries and packages specified in package.json.
It is important that this folder not be manually modified as it may mess with other dependencies.
.gitignore
A .gitignore file is used in Git to specify files and directories that should be ignored by version control. This helps prevent unnecessary files, such as compiled binaries, temporary files, or sensitive data, from being tracked and committed to a repository. The .gitignore file follows a pattern-matching syntax, allowing users to exclude files based on specific rules.
In the context of Node .gitignore helps avoid tracking dependencies (node_modules/) that can be large, vary by environment and can be restored quickly by running the npm install command on a developer machine.
You can read more about it in the git-scm documentation
Reading input data in API routes in Node
request.body
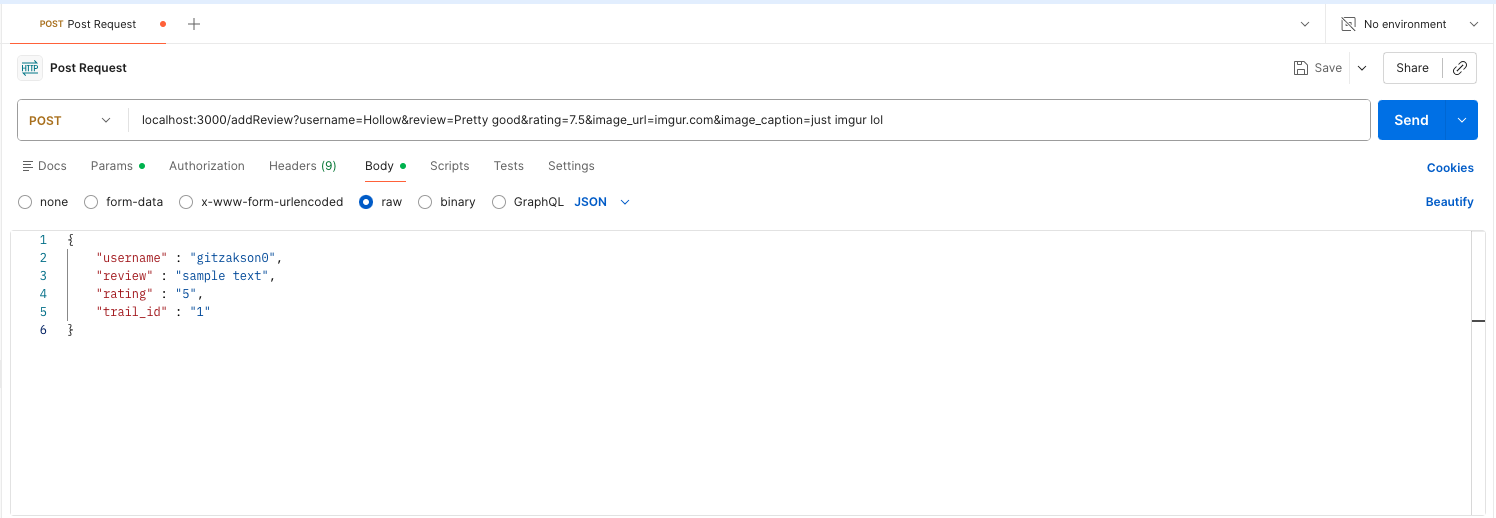
Generally used in POST/PUT requests. Use it when you want to send sensitive data(eg. form data) or lengthy JSON data to the server.
Example that works with request.bodyrequest.params
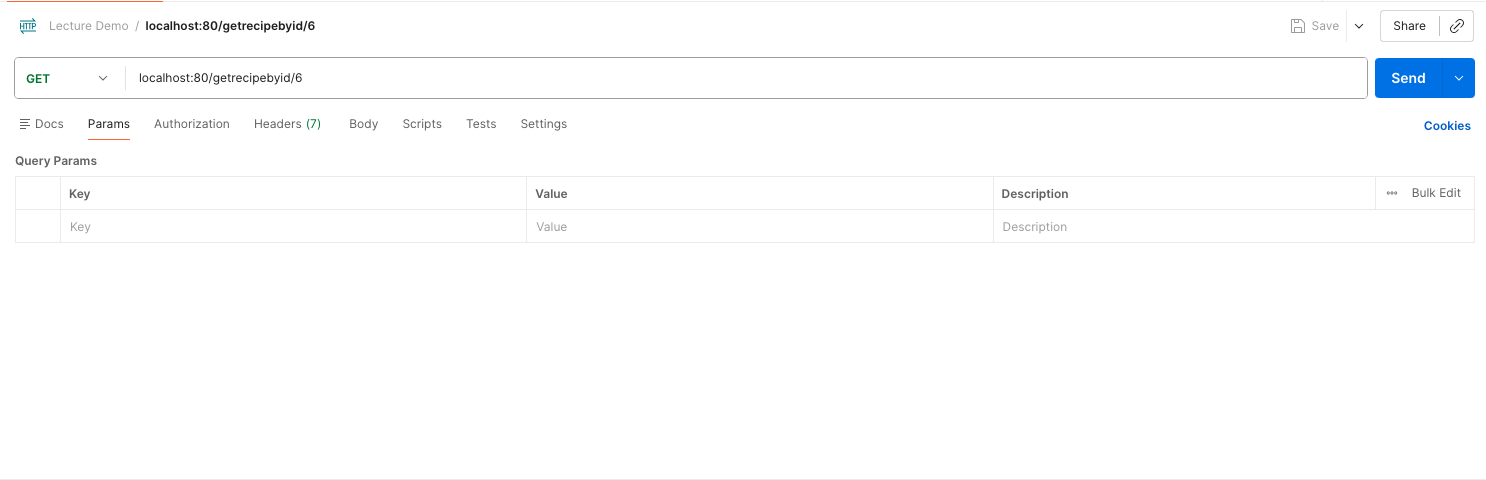
These are properties attached to the url i.e named route parameters. You prefix the parameter name with a colon(:) when writing your routes.
Example that works with request.paramsrequest.query
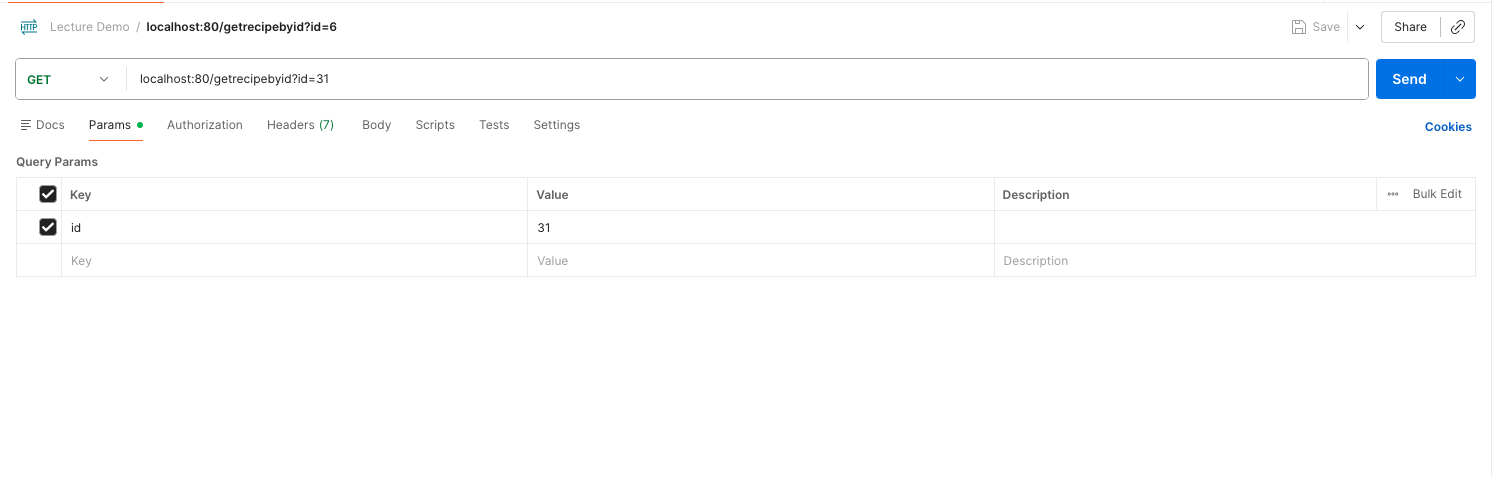
It is mostly used for searching, sorting, filtering, pagination, etc. Say for instance you want to query an API but only want to get data from page 10, this is what you'd generally use. It is appended to the request URL as <key> = <value>.
Querying the Database from a Node server
We will use aync/await, in place of promises, to run queries on the Postgres database set up for this lab. Here is the article you read for the quiz in case you need a refresher on the concepts of async/await and promises.
There are several packages within Node that allow you to connect to the different types of database management systems like Postgres, MySQL, MongoDB etc.
Since we are working with Postgres in this course, we will be using the pg-promise library.
Before we can query the database, we need to establish a connection with it. So we'll start with defining a configuration object that provides the node server the metadata about the database.
Connection Object
const dbConfig = {
  host: 'db', //location of where the postgres db is runnning
  port: 5432, //network port to access the postgres service
  database: process.env.POSTGRES_DB, //name of the database
  user: process.env.POSTGRES_USER, // credentials to access the database
  password: process.env.POSTGRES_PASSWORD, // credentials to access the database
};
The next step is to instantiate an object of the pg-promise library and pass it the connection object to initialize it.
let db = pgp(dbConfig);
Now that we have the db object, we are ready to make calls to the database. There are several methods of the db object that can be used depending on, either, the number of queries to be executed or the output of the queries. We'll look at some of the commonly used ones.
You will notice, in the examples below, that we are using arrow functions, () => {}, to declare functions instead of function(){}. This is the ES6 standard for function notation. You can read more about that in the documentation.
Always use try/catch when using await to prevent unhandled promise rejections.
db.one()
When you expect the database query to return ONLY one row, you can use the db.one() method of the pg-promise library in Node. If the query returns more than one row, it will throw an error.
Example:
app.get('/routeName', async (req, res) => {
  var query = `SELECT * FROM userInfo WHERE user_id = ${req.query.userid};`;

  try {
    let results = await db.one(query);
    res.status(200).json({
      data: results,
    });
  } catch (err) {
    res.status(400).json({
      error: err,
    });
  }
});
db.any()
When you expect any number of rows to be returned for the query in execution, you can use db.any().
Example:
app.get('/routeName', async (req, res) => {
  var query = `SELECT * FROM userInfo;`;

  try {
    let results = await db.any(query);
    res.status(200).json({
      data: results,
    });
  } catch (err) {
    res.status(400).json({
      error: err,
    });
  }
});
db.task()
When you would like to execute multiple queries in the same operation, you can use db.task()
Example:
app.get('/routeName', async (req, res) => {
  var username = req.query.username;
  var city = req.query.city;

  // Multiple queries using templated strings
  var current_user = `select * from userinfo where username = '${username}';`;
  var city_users = `select * from userinfo where city = '${city}';`;

  try {
    // use task to execute multiple queries
    const results = await db.task(async t => {
      const current_user_results = await t.any(current_users);
      const city_user_results = await t.any(city_users);
      res.status(200).json({
        query1results: current_user_results,
        query2results: city_user_results,
      });
    });
  } catch (err) {
    res.status(400).json({
      error: err,
    });
  }
});
Setting up your environment
Today we'll be using Docker Compose with a slightly modified configuration from lab 1.
In this lab, we will be using 2 containers, one for PostgreSQL and one for Node.js. If you need a refresher on the details of Docker Compose, please refer to lab 1.
1. In your repository, you will find a docker-compose.yaml file with the following contents:
services:
  db:
    image: postgres
    env_file: .env
    expose:
      - '5432'
    volumes:
      - lab-6-nodejs:/var/lib/postgresql
      - ./init_data:/docker-entrypoint-initdb.d

  web:
    image: node:lts
    working_dir: /home/node/app
    environment:
      - NODE_ENV=development
    depends_on:
      - db
    ports:
      - '3000:3000'
    volumes:
      - ./:/home/node/app
    command: '#TODO ENTER THE COMMAND TO START YOUR SERVER'
# This defines our volume(s), which will persist throughout startups.
# If you want to get rid of a hanging volume, e.g. to test your database init,
# run `docker-compose rm -v`. Note that this will remove ALL of your data, so
# be extra sure you've made a stable backup somewhere.
volumes:
  lab-6-nodejs:
2. Set up .env file
Create a .env file in the root (lab6-nodejs-<your_username>) folder to store environment variables to setup postgres.
If you look at the connection object we set up for connecting to the database, you will notice the usage of process.env variables. The values for those environment variables are stored in this .env file. The values for these environment variables change depending on where the server is hosted. In lab 13, when we host the project website on the cloud, we will learn more about environments.
# database credentials
POSTGRES_USER="postgres"
POSTGRES_PASSWORD="pwd"
POSTGRES_DB="hiking_db"
You should not commit this file to GitHub (it is in the .gitignore file, so this is automatic.)
3. Start the docker container with the docker-compose.yaml file:
docker-compose up -d
Nodemon
Nodemon is a tool that helps develop Node.js based applications by automatically restarting the node application when file changes in the directory are detected. nodemon does not require any additional changes to your code or method of development. nodemon is a replacement wrapper for node. To use nodemon, replace the word node on the command line when executing your script.
We have included nodemon in the package.json. The package.json file is a key part of any Node.js project and serves several important purposes. It contains metadata about the project, defines dependencies, and includes scripts for running various tasks.
"scripts": {
  "start": "nodemon index.js"
}
If you are using a Windows/Linux OS and you see the following error:
nodemon: command not found
Then replace the "start" script in the package.json as shown below. Remember to replace <Github_Username> with your Username.
"scripts": {
  "start": "./node_modules/nodemon/bin/nodemon.js lab6-nodejs-<Github_Username>"
}
If you find that nodemon is not able to detect your changes, add -L option to the the "start" script in the package.json as shown below.
"scripts": {
  "start": "./node_modules/nodemon/bin/nodemon.js -L lab6-nodejs-<Github_Username>"
}

or

"scripts": {
  "start": "nodemon -L index.js"
}
4. Shutting down containers
Now that we've learned how to start docker compose, let's cover how to shutdown the running containers. As long as you're still in the same directory, the command is as follows.
docker-compose down
5. Restarting Containers
For development purposes, it's often preferable to just restart the containers.
docker-compose up -d
And that's it!
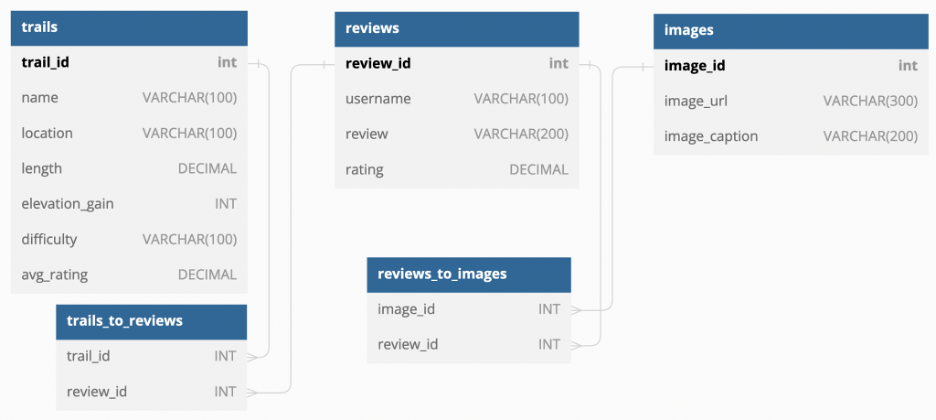
ER Diagram of the Hiking Database
We've set up the tables shown below and you can find the SQL for it in the create.sql file in the init_data folder. You are not required to import that file into the db container. In the docker-compose.yaml, we have already mapped the db container's volume to the init_data folder. When starting up, the db container will read the create.sql file and initialize the hiking database.
Postman
TAs will show you how to use the more commonly used features within Postman to make calls to API routes.
Later, you may refer to the appendix to recall the usage of the various features within Postman.
Implementing API routes and testing from Postman
For this lab, we do not prescribe the usage of Gen AI tools. Please attempt this lab by yourself. If you choose to use Gen AI, follow the guidelines in the syllabus or from the GenAI section in Lab 1 to appropriately cite your usage. Failure to do so will result in a 0 on the entire lab.
In this section, you will
- Implement GET and PUT endpoints.
- Test them using the imported Postman collection.
Before we begin, let us first take a look at the provided code skeleton in index.js in the lab repository. The code is partitioned into 4 sections.
- Section 1 : Add all the dependencies needed to build your application
- Section 2 : Initialization (e.g Database connection)
- Section 3 : Part B - You will work along on implementing an endpoint during the lab
- Section 4 : Part C - You will add the implementation of 2 more endpoints.
- Section 5 : Extra Credit
- Section 6 : Keeping the server actively listening for client requests
// ************************************************
// Section 1 : Dependencies
// ************************************************

// importing the dependencies
// Express is a NodeJS framework that, among other features, allows us to create HTML templates.
const express = require('express');
const bodyParser = require('body-parser');
const pgp = require('pg-promise')();
require('dotenv').config();

// ************************************************
//  Section 2 : Initialization
// ************************************************

// defining the Express app
const app = express();
// using bodyParser to parse JSON in the request body into JS objects
app.use(bodyParser.json());
// Database connection details
const dbConfig = {
  host: 'db',
  port: 5432,
  database: process.env.POSTGRES_DB,
  user: process.env.POSTGRES_USER,
  password: process.env.POSTGRES_PASSWORD,
};
// Connect to database using the above details
const db = pgp(dbConfig);

// ************************************************
//  Section 3 : Part B
// ************************************************

// Endpoint 1 :  GET Endpoint Implementation (Default)
const message = 'Hey there!';
app.get('/', (req, res) => {
  res.send(message);
});

// Endpoint 2 : GET Endpoint Implementation
app.get('/getReviewsByTrailID', async (req, res) => {});

// Endpoint 3 : GET Endpoint Implementation
app.get('/getTop3Trails', async (req, res) => {});

// ************************************************
//  Section 4 : Part C
// ************************************************

// Endpoint 4 : GET Endpoint Implementation
app.get('/getTrails', async (req, res) => {});

// Endpoint 5 : POST Endpoint Implementation
app.post('/addReview', async (req, res) => {});

// ************************************************
//  Section 4 : Extra Credit
// ************************************************

// Endpoint 6 : PUT Endpoint Implementation
app.put('/updateReview', async (req, res) => {});

// Endpoint 7 : DELETE Endpoint Implementation
app.delete('/deleteReview', async (req, res) => {});

// ************************************************
//  Section 6 : Keeping the server actively listening for client requests
// ************************************************
// starting the server and keeping the connection open to listen for more requests
app.listen(3000, () => {
  console.log('listening on port 3000');
});
Start server
To start the server, modify the command within the docker-compose.yaml file to
command: 'npm start'
Note that this server starts because nodemon executes the index.js file(Take a closer look at your package.json).
Start Docker Desktop and run the docker compose up -d command. This should have your server running in the background. The web and db containers should be running.
Please make sure you are familiar with the hiking database before you start implementing the endpoints.
You can refer to the create.sql for the inputs for while calling the endpoint.
Endpoint 1 is the default endpoint. You don't need to implement it.
Make sure you don't modify any of the route paths in the provided file as they will be used for testing.
Endpoint 2: GET /getReviewsByTrailID
Step 1: Modify the GET API route function handler to show reviews for a selected trail based on trail_id. trail_id must be sent as an input parameter from Postman.
TAs will work with you during the lab to implement this route and test with postman. More instructions and hints are provided in the index.js file.
Step 2: Test the route from Postman
Endpoint 3: GET /getTop3Trails
Step 1: Modify the GET API route function handler to return the top 3 trails in "california" based on rating and a 200 status code. The location must be sent as an input parameter from Postman.
Step 2: Test the route from Postman
Part B
Endpoint 4: GET /getTrails
Step 1: Modify the GET API route function handler to allow users to search for different trails based on filters - difficulty and location. The request may contain any or both filters. The request may look as follows:
localhost:3000/getTrails?difficulty=1&location=california
OR
localhost:3000/getTrails?difficulty=1
OR
localhost:3000/getTrails?location=california
You need to parse the difficulty and convert it into strings - "easy" , "moderate", "difficult", "very_difficult".
For example, difficulty = 1 needs to be converted into "easy", difficulty = 2 needs to be converted into "moderate", and so on.
You can use either if-else statements or switch-case to accomplish the same.
Step 2: Test the route from Postman
Endpoint 5: POST /addReview
Step 1: Modify the POST API route function handler to add a new review. From the hiking_db schema, you will notice that we have separate tables for reviews and images and these are linked using mapping table i.e. reviews_to_images.
The user should be able to submit a review with or without image details. Your endpoint must therefore handle both cases. The request must also include information about the trail the review belongs to.
If the user provides image details along with the review:
- Insert a record into the
reviewstable - Insert a record into the
imagestable - Create the corresponding mapping in
reviews_to_images
- Insert a record into the
Adding a review must also create a record in the
trails_to_reviewstable.To execute multiple queries in a single operation, use
db.task(). Refer to this example.After successfully adding the review, the route should return:
- Message:
Data added successfully review_idimage_id(only if image details were provided)- HTTP status code 201
- Message:
Save the response values, as
review_idandimage_idwill be used in Endpoint 6 and Endpoint 7.
Step 2: Test the route from Postman
1. Commit and push your updated index.js to the repository.
2. Commit and push the exported postman collection
Extra Credit
Endpoint 6: PUT /updateReview
Step 1: Modify the PUT API route function handler to allow a user to update a review they posted.
The user should be able to update the review text, the image, or both. The route must check whether the request contains new text data, a new image, or both, and update the appropriate tables accordingly.
The user will send
review_idandimage_id(use the values obtained from the previous POST request) when making thisPUTrequest.After successfully updating the review, the route should return:
- Message:
Data updated successfully - HTTP status code 201
- Message:
You can refer this to learn if-else and Null check in javascript
Step 2: Test the route from Postman
Endpoint 7: DELETE /deleteReview
Step 1: Modify the DELETE API route function handler to allow an admin to delete a review.
You can delete a review using
review_id,username, orrating.After the review is deleted, the route should:
- Return the message
Data deleted successfully - Return HTTP status code 200
- Return the message
Also ensure that the corresponding entry in the
reviews_to_imagestable is deleted.
Step 2: Test the route from Postman
1. Commit and push your updated `index.js` to the repository
2. Commit and push the exported postman collection
Implement a filter for your calendar
Imagine your calendar from Lab 4 is now a complete web application backed by a database. You’ve added a ‘filter by category’ button, where the user selects a category (e.g., academic, personal, meeting). The calendar should then display only the events that match the chosen category.
We won’t worry about how the filtered events are displayed in the UI yet — first, we need to make sure the server can return the correct events based on the user’s input.
Task:
Describe your database in terms of tables and columns (make reasonable assumptions).
Based on this schema, write a Node.js function that queries the database and returns only the events for the selected category.
You don’t need to create or insert events into the database, but your function should work correctly if the database were in place.
Reflection
Please make sure that the answers to the following questions are YES before you assume you are done with your work for this lab. Go in the sequence as asked and, if applicable, fix errors in that order.
- Did you test all your work thoroughly?
- Are all the files you created for this lab in the
submissionfolder? - Is the
submissionfolder structured as directed at the beginning of this lab? - Did you grade your work against the specifications listed at the end of this writeup?
- Did you add the code for all the endpoints in the index.js file? Did you include the postman collection?
- Do you meet expectations for all criteria?
Submission Guidelines
Commit and upload your changes
1. Make sure you copy your files for submission into your local git directory for this lab, within a "submission" folder that you need to create.
2. Run the following commands at the root of your local git directory, i.e., outside of the "submission" folder.
git add .
git commit -m "add submission"
git push
You will be graded on the files that were present before the deadline. If the files are missing/not updated by the deadline, you could receive a grade as low as "Not attempted". This can be replaced by raising a regrade request once you successfully upload your work to Github.
Regrade Requests
Please use this link to raise a regrade request if you think you didn't receive a correct grade.Grading specifications
| Criteria | Not Attempted | Below Expectations | Meets Expectations | Exceeds Expectations |
|---|---|---|---|---|
| Overall Attempt | • Lab not attempted OR • Student did not attend the lab without prior approval | — | — | — |
| Attendance & TA Review | — | • Did not attend full duration OR • Work not reviewed by TA OR • Attendance not marked on Canvas | • Attended full duration AND • Work reviewed by TA AND • Attendance marked on Canvas | — |
| Submission Presence | — | • Work not uploaded to GitHub OR • Missing required files OR • Files not representative of student effort | • Work uploaded to submission folder in GitHub repository | — |
| GET /getReviewsByTrailID | — | • Route missing, incorrect, or not testable | • Correctly retrieves reviews for a given trail_id AND• verified via Postman collection | — |
| GET /getTop3Trails | — | • Route missing, incorrect, or not testable | • Returns top three California trails based on rating AND • verified via Postman collection | — |
| GET /getTrails | — | • Filtering not implemented correctly OR • Not testable | • Filtered search implemented AND • verified via Postman collection | — |
| POST /addReview | — | • Request body not processed correctly OR • Review not inserted properly OR • Not testable | • Successfully creates new review entry with and without images AND • verified via Postman collection | — |
| Extra Credit – PUT /updateReview | — | — | — | • Correctly updates existing records using PUT AND • verified via Postman collection |
| Extra Credit – DELETE /deleteReview | — | — | — | • Correctly deletes resource with proper validation AND • verified via Postman collection |
| Extra Credit – Calendar Filtering Design | — | — | — | • Includes coherent ER diagram or schema description AND • Fully functional calendar filtering endpoint consistent with the design |
Appendix
Postman
Installation instructions for postman are here
Let's look at some useful features of Postman. The different buttons and tabs are numbered in the image below. You can find their usages and explanations below the image.

- New – This is where you will create a new request, collection or environment.
- Import – This is used to import a collection or environment. There are options such as import from file, folder, link or paste raw text.
- Runner – Automation tests can be executed through the Collection Runner. This will be discussed further in the next lesson.
- Open New – Open a new tab, Postman Window or Runner Window by clicking this button.
- My Workspace – You can create a new workspace individually or as a team.
- Invite – Collaborate on a workspace by inviting team members.
- History – Past requests that you have sent will be displayed in History. This makes it easy to track actions that you have done.
- Collections – Organize your test suite by creating collections. Each collection may have subfolders and multiple requests. A request or folder can also be duplicated as well.
- Request tab – This displays the title of the request you are working on. By default, “Untitled Request” would be displayed for requests without titles.
- HTTP Request – Clicking this would display a dropdown list of different requests such as GET, POST, COPY, DELETE, etc. In Postman API testing, the most commonly used requests are GET and POST.
- Request URL – Also known as an endpoint, this is where you will identify the link to where the API will communicate with.
- Save – If there are changes to a request, clicking save is a must so that new changes will not be lost or overwritten.
- Params – This is where you will write parameters needed for a request such as key values.
- Authorization – In order to access APIs, proper authorization is needed. It may be in the form of a username and password, bearer token, etc.
- Headers – You can set headers such as content type JSON depending on the needs of the organization.
- Body – This is where one can customize details in a request commonly used in POST request.
- Pre-request Script – These are scripts that will be executed before the request. Usually, pre-request scripts for the setting environment are used to ensure that tests will be run in the correct environment.
- Tests – These are scripts executed during the request. It is important to have tests as it sets up checkpoints to verify if response status is ok, retrieved data is as expected and other tests.
Testing routes from Postman
Creating Postman Requests
Here are the steps you need to follow to create GET, POST, PUT and DELETE requests in Postman for the corresponding endpoint implementations in index.js:
Open Postman: Start by opening the Postman application.
Create a New Request: Click on the "New" button in the top-left corner of the Postman window and select "Request".
Enter Request Details: Give your request a name that describes what it does, like "GET Request for User Data".
Choose Request Method: Under the request name, you'll see a dropdown menu labeled "GET". This is where you choose the HTTP method for your request. For a GET request, you don't need to change anything, as it's already selected by default.
Enter Request URL: In the box next to the dropdown menu, enter the URL of the API endpoint you want to send the request to.
Send the Request: You can use the
Paramstab below the request URL to add query parameters to a GET Request. Click onParams, then enter the parameter key and value. Once you've filled in all the necessary details, click the "Send" button to send the GET request.Repeat for POST, PUT, DELETE: To create requests for other HTTP methods, like POST, PUT and DELETE, follow the same steps as above, but make sure to select the appropriate method from the dropdown menu in step 4.
Add Request Body (for POST and PUT): For POST and PUT requests, you may need to include a request body with data. You can do this by clicking on the "Body" tab below the request URL and selecting the format (e.g., JSON) and entering the data you want to send.
Send the Request: Once you've filled in all the necessary details, click the "Send" button to send the request.
Check Response: After sending the request, you'll see the response from the server in the lower part of the Postman window. Make sure to check the response to ensure that your request was successful.
That's it!
Examples of sending requests from Postman:
GET request when sending data in the request query
GET request when sending data in the param list
POST request when sending data in the body
Exporting the Postman Collection to JSON
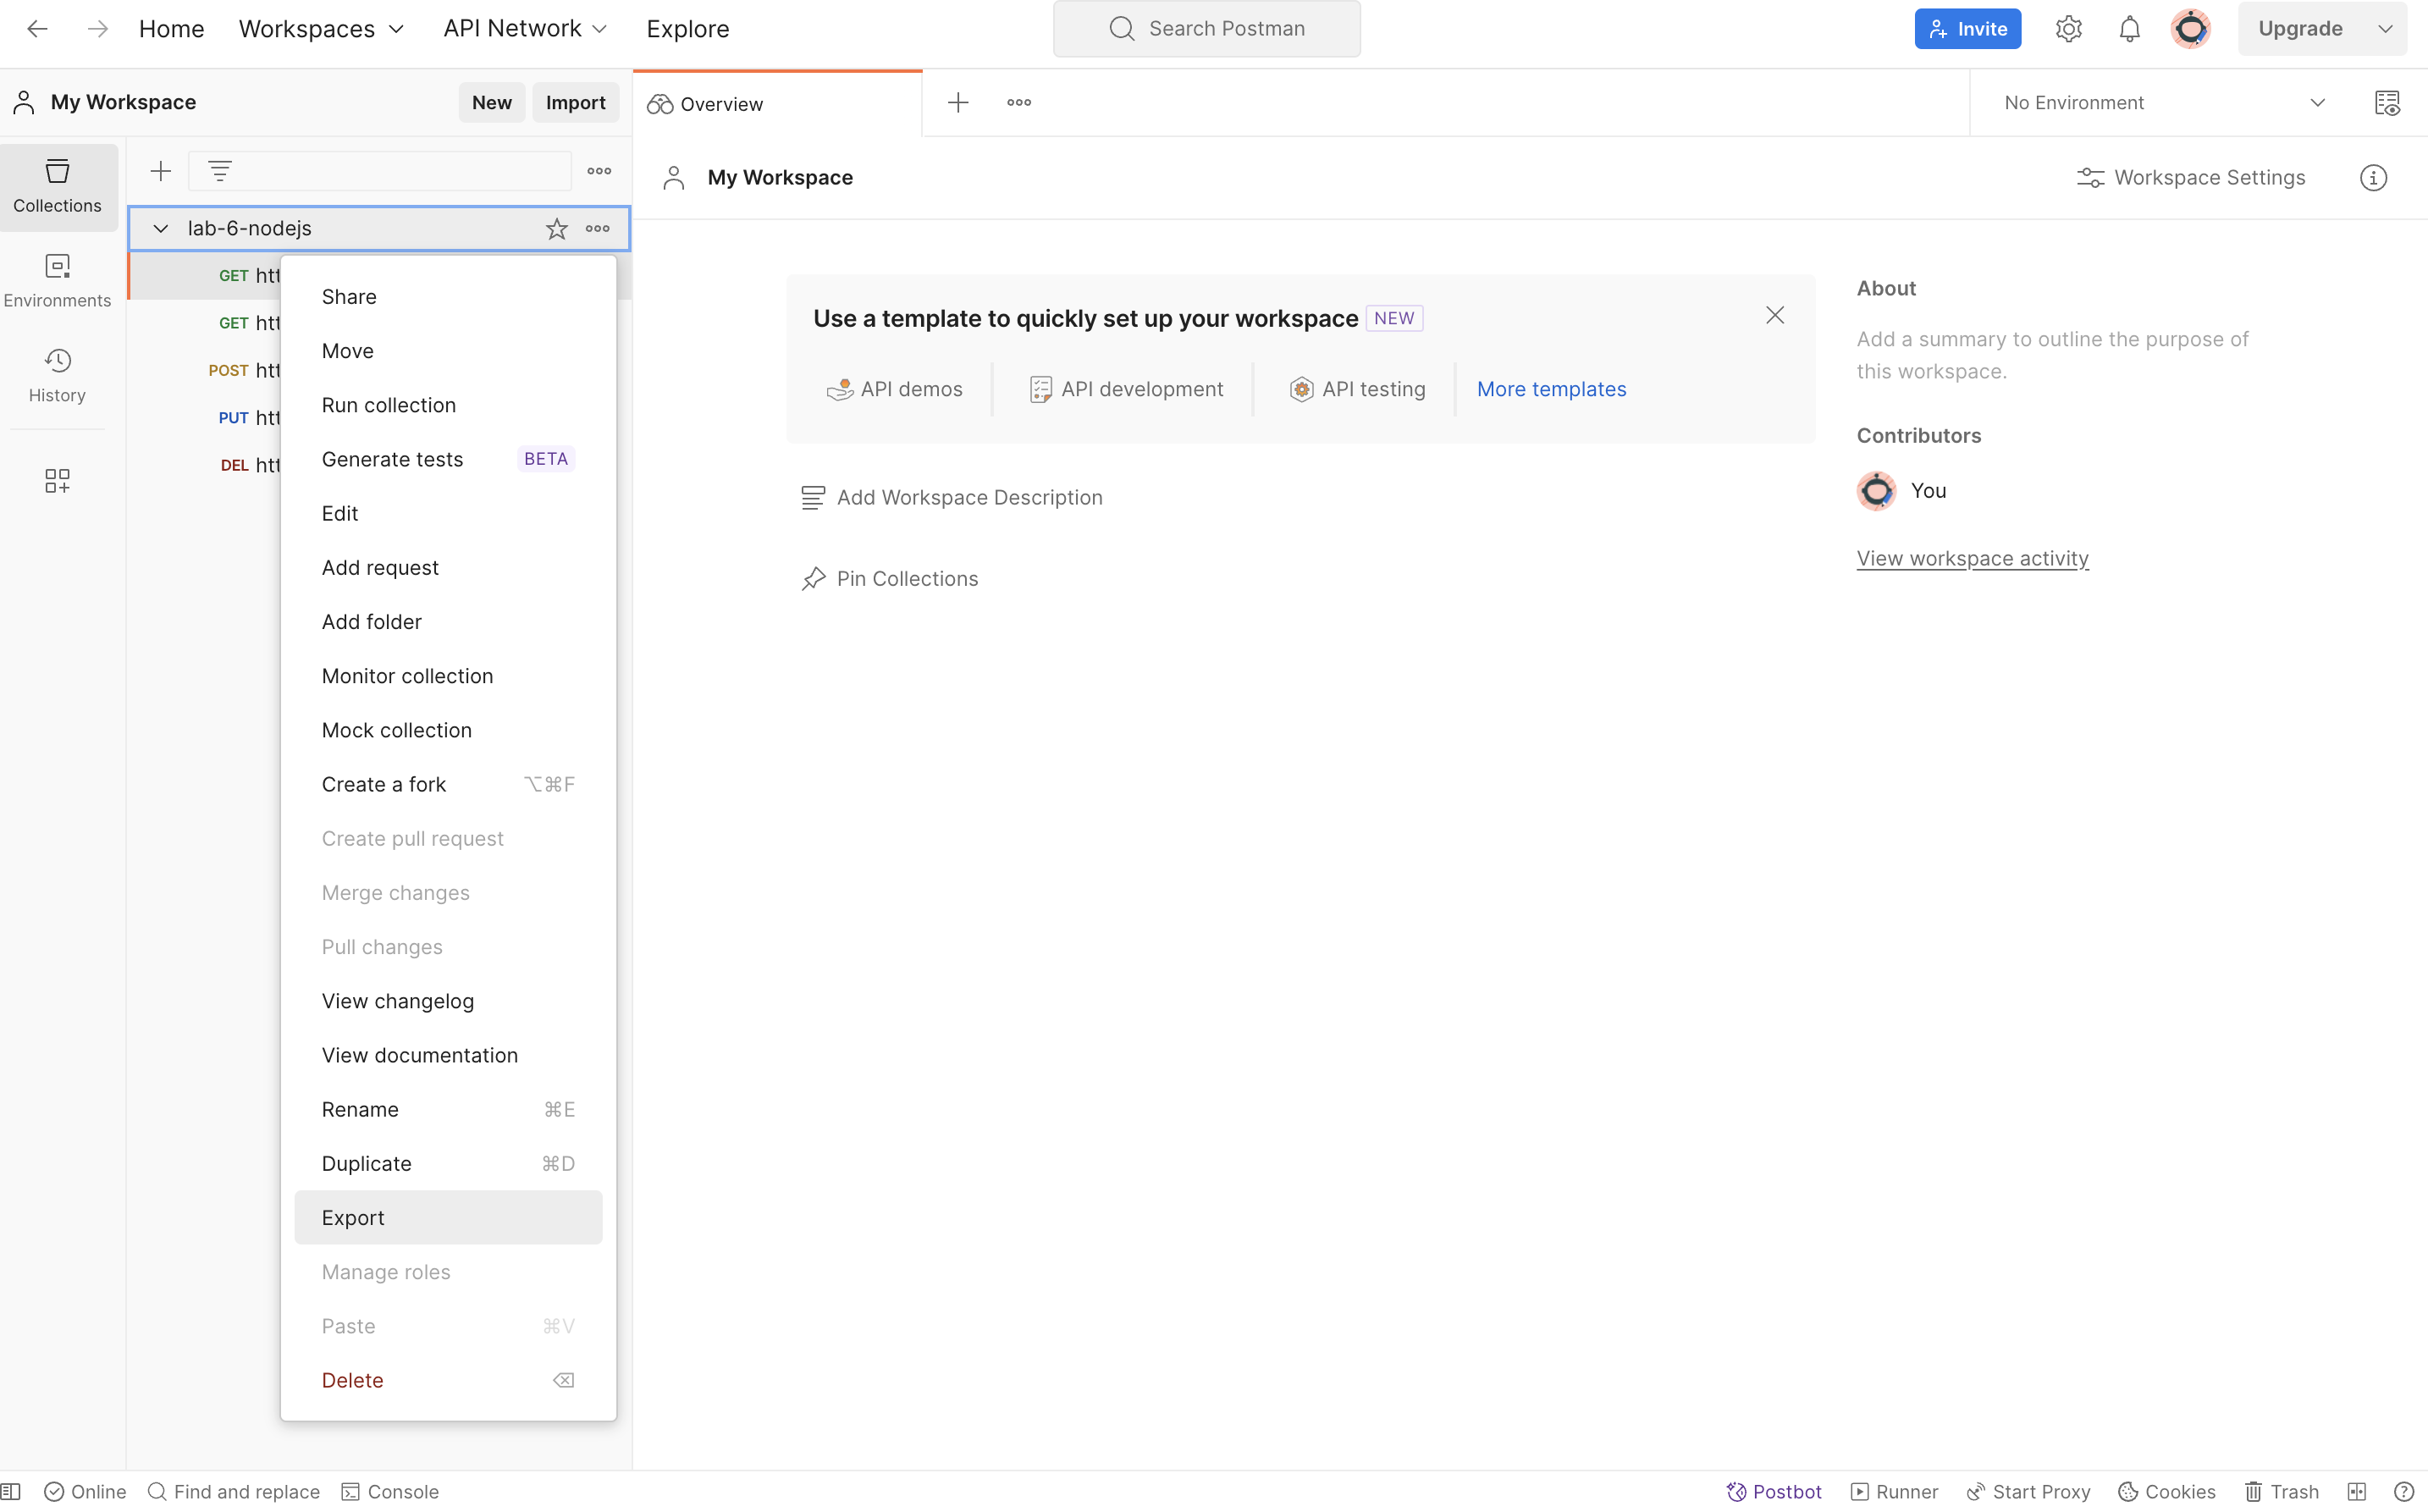
Select Collection: In the sidebar on the left-hand side, click on the collection you want to export.
Click on the Three Dots: In the top-right corner of the Postman window, you'll see three dots (ellipsis) indicating more options. Click on these dots.
Choose "Export": From the dropdown menu that appears, select "Export".
Select Export Format: Postman allows you to export collections in various formats. Choose "Collection v2".
Save the File: After selecting the format as JSON, Postman will prompt you to save the exported collection file. Choose a location on your computer and save the file.