Lab 7: Web Services
Overview
In this lab, we will use REST APIs to create a web application to display data from the ticketmaster using handlebars.
To receive credit for this lab, you MUST show your work to the TA during the lab, and push it to the github before the deadline. Please note that submissions will be due on Wednesday at 11:59 p.m. in the following week.
Learning Objectives
L01. Understand basic authentication and session management in Node.jsLO2. Setup Environments for Templating
L03. Learn about routing and navigation between pages
L04. Learn to use external APIs to fetch data and populate your web application
L05. Combine your knowledge of Handlebars, Node.js, and Postgres to build your first functional web app from scratch
Part A
Pre-Lab Quiz
Complete Pre-Lab quiz on Canvas before your section's lab time.
Part B
External APIs (Application Programming Interfaces) allow applications to interact with third-party services, enabling them to access data or functionalities provided by external systems. These APIs act as a bridge between applications, facilitating communication without the need for internal code or resources. For example, an API like Ticketmaster's lets developers fetch event data without building their own ticketing infrastructure. External APIs are helpful because they save time, reduce development effort, and enable integration with widely-used services like social media platforms, payment gateways, or data providers.
Create a Ticketmaster Developer Account
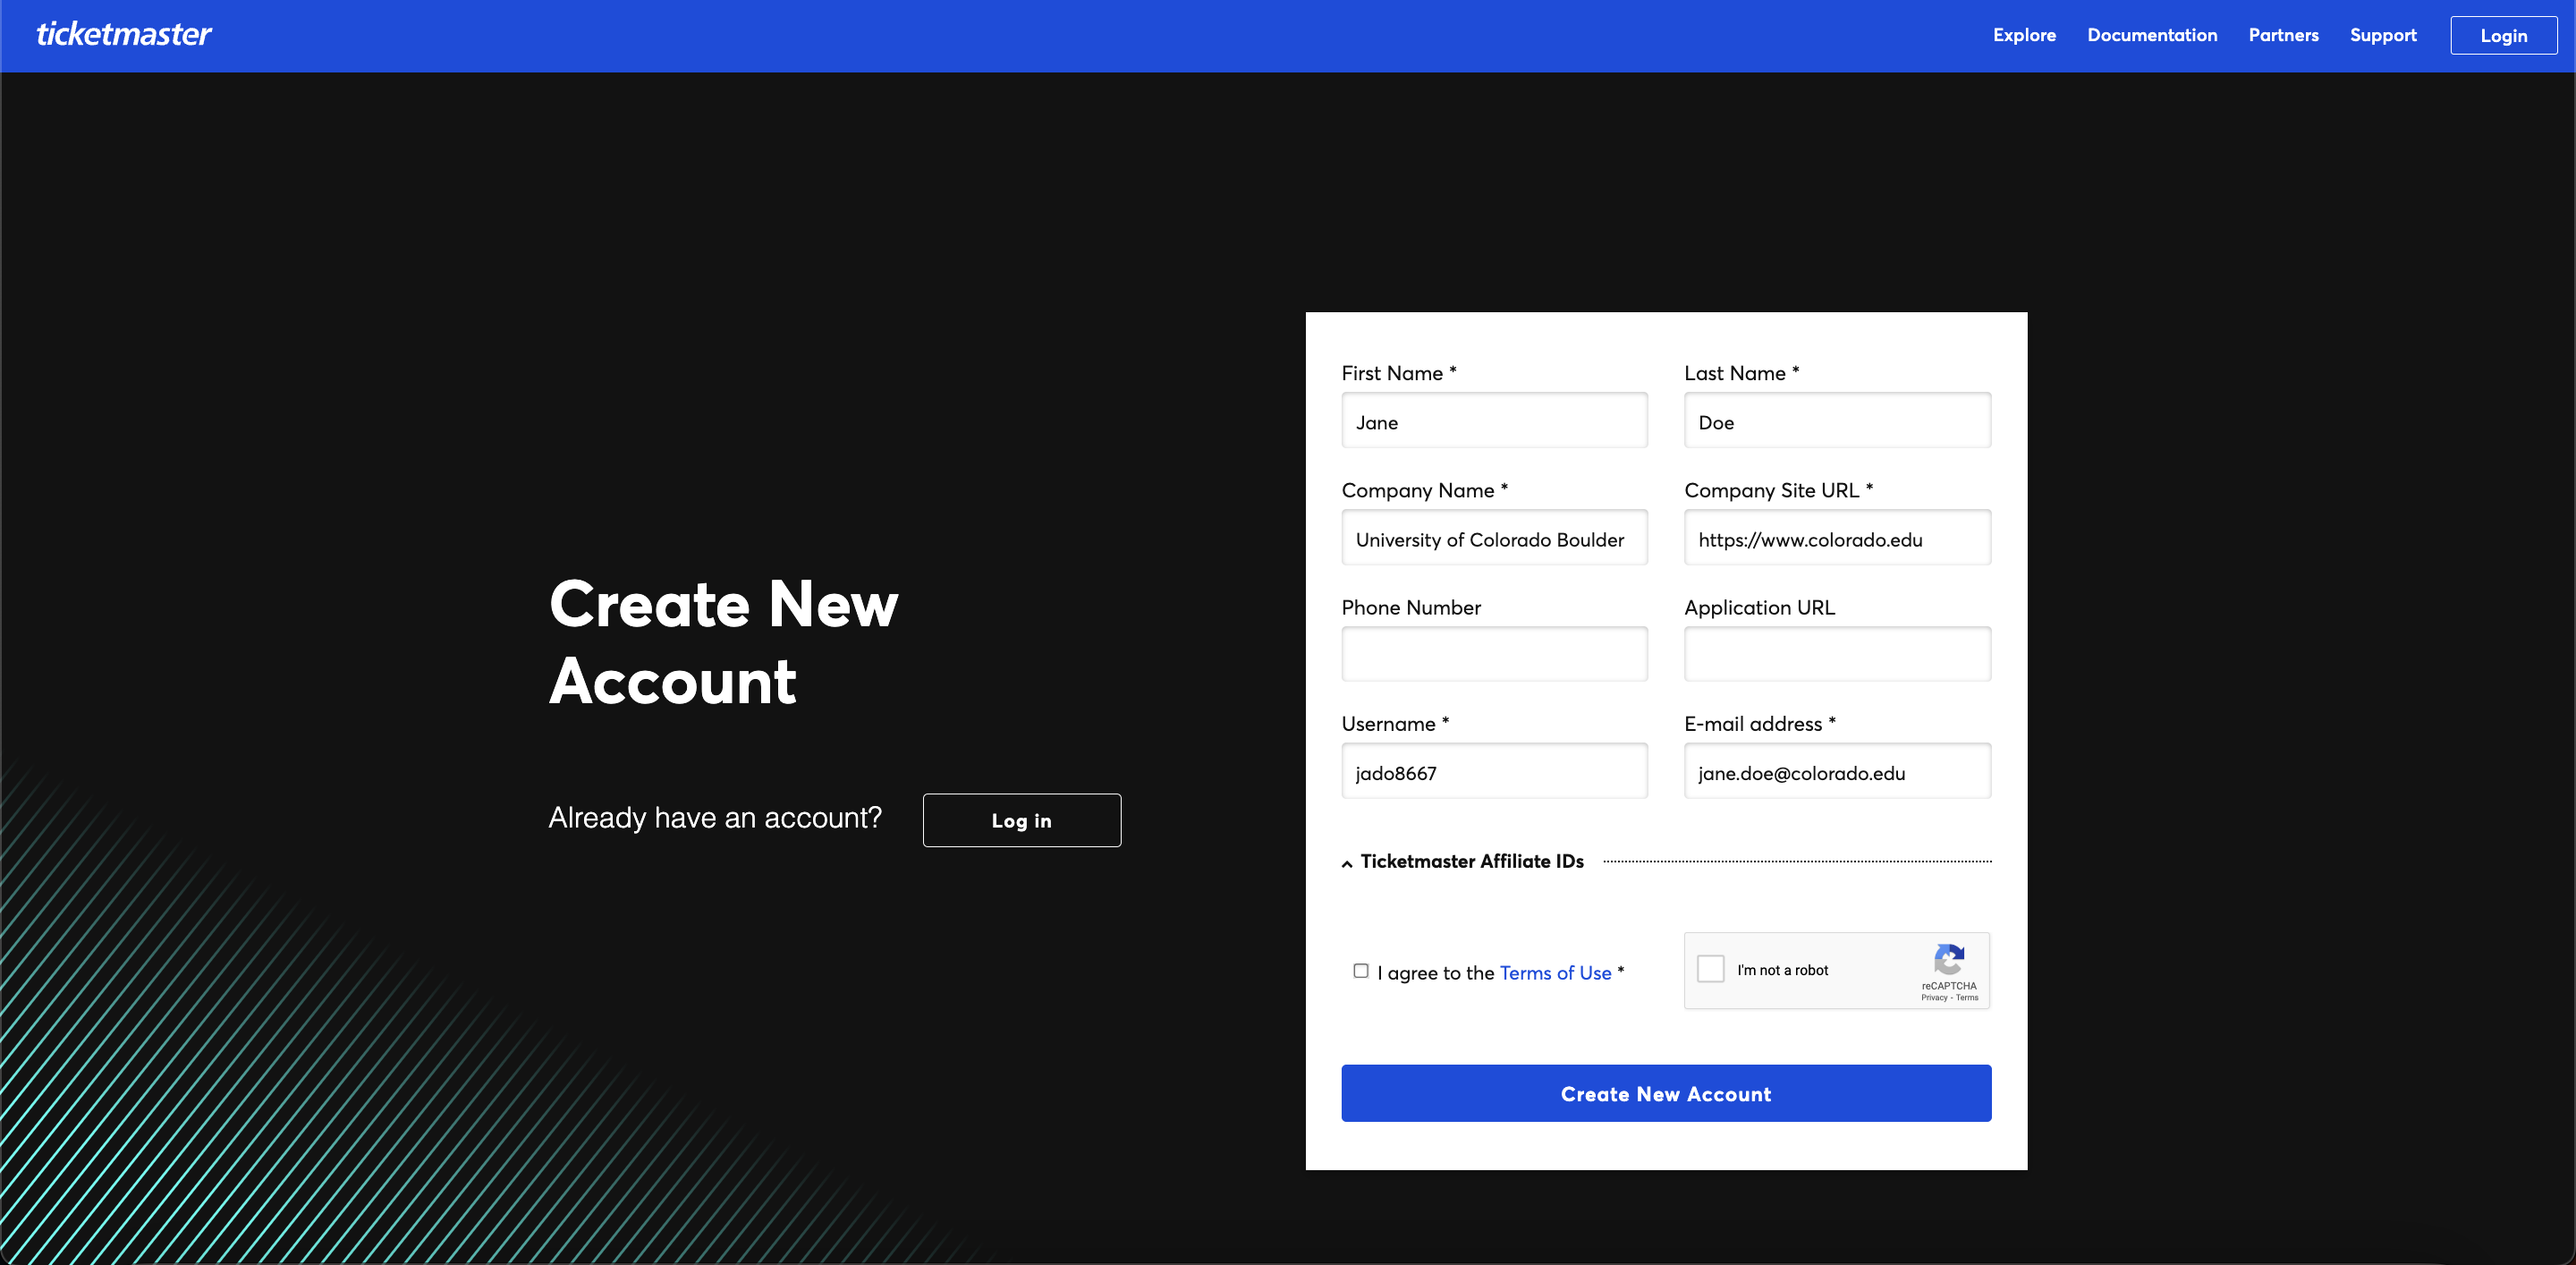
a. Create an account on Ticketmaster.
Fill out the form by entering your First Name, Last Name, Username. For the Company Name field, you can enter "University of Colorado Boulder". For Company Site URL, you can enter https://www.colorado.edu. For E-mail address use your colorado.edu account. You can leave the Application URL and Phone Number fields empty.
Once you submit the form, you will receive a verification email in the colorado.edu inbox that includes a link that will allow you to set the password for your account.
 |
|---|
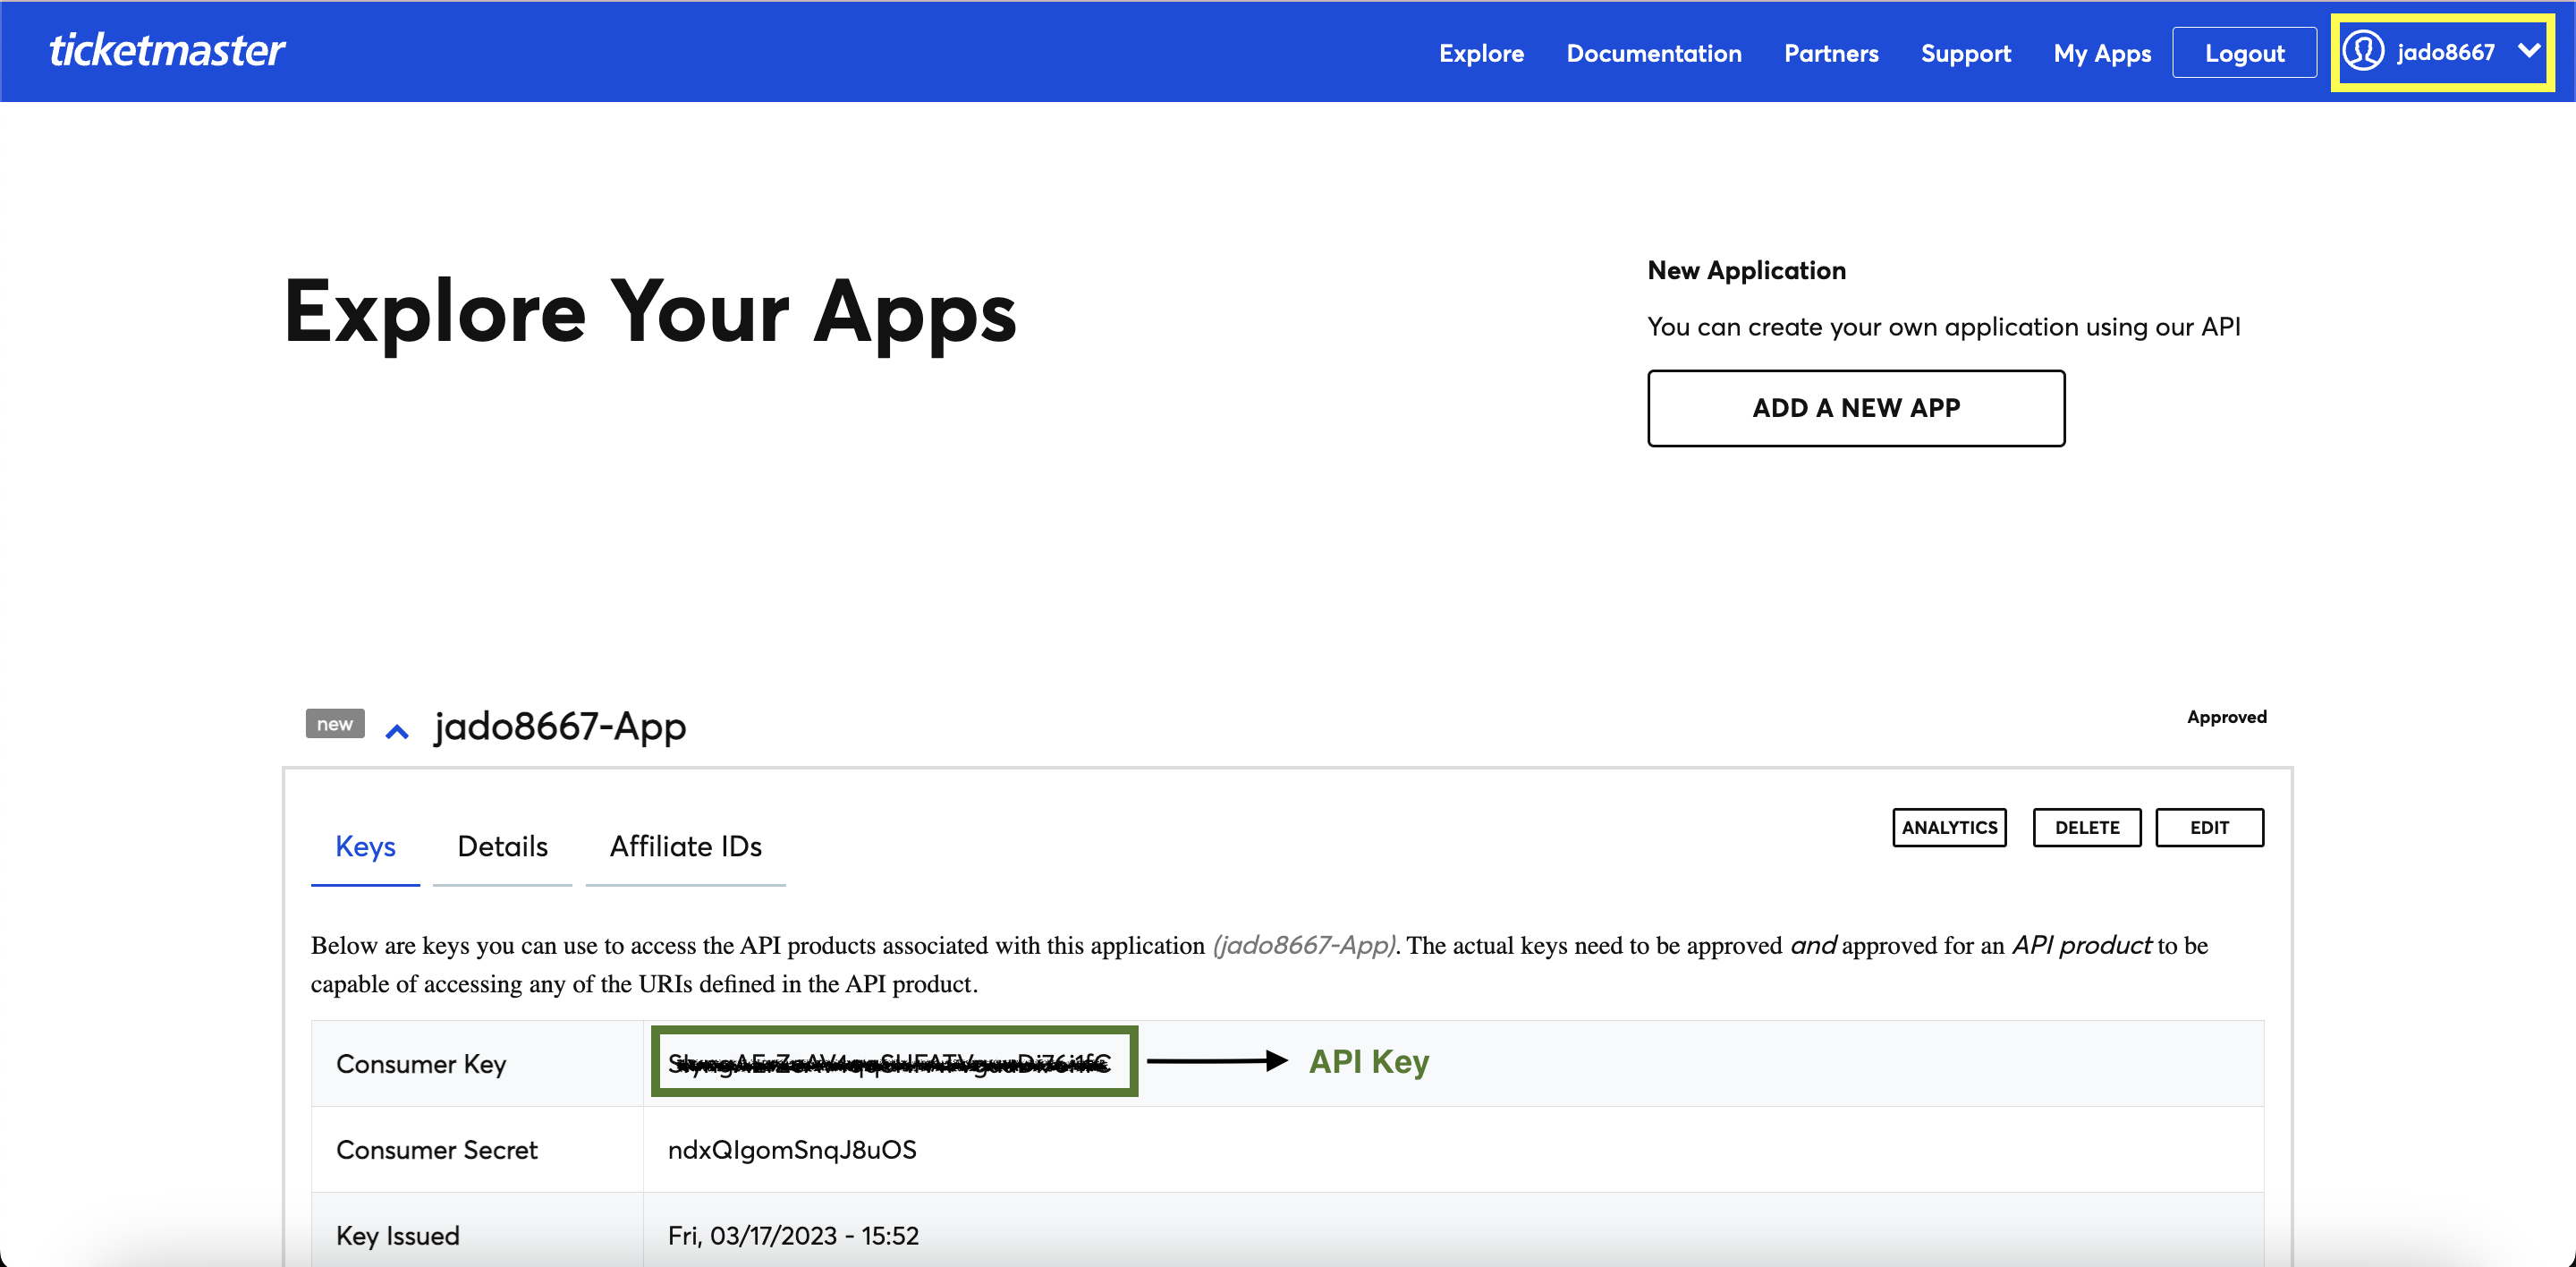
b. Once that is successful, you can log into your account and you will be directed to your profile page. If you are revisiting this website later, and are already logged in, you can click on the profile icon on the top right, as shown below, to view this page.
 |
|---|
c. Click on My Apps. You can see that there is an app created for you with a name "\<your_username>-App". When you click on that, you can find the API key in the 'Consumer Key' field. We'll be using that key to make calls to the Ticketmaster API.
 |
|---|
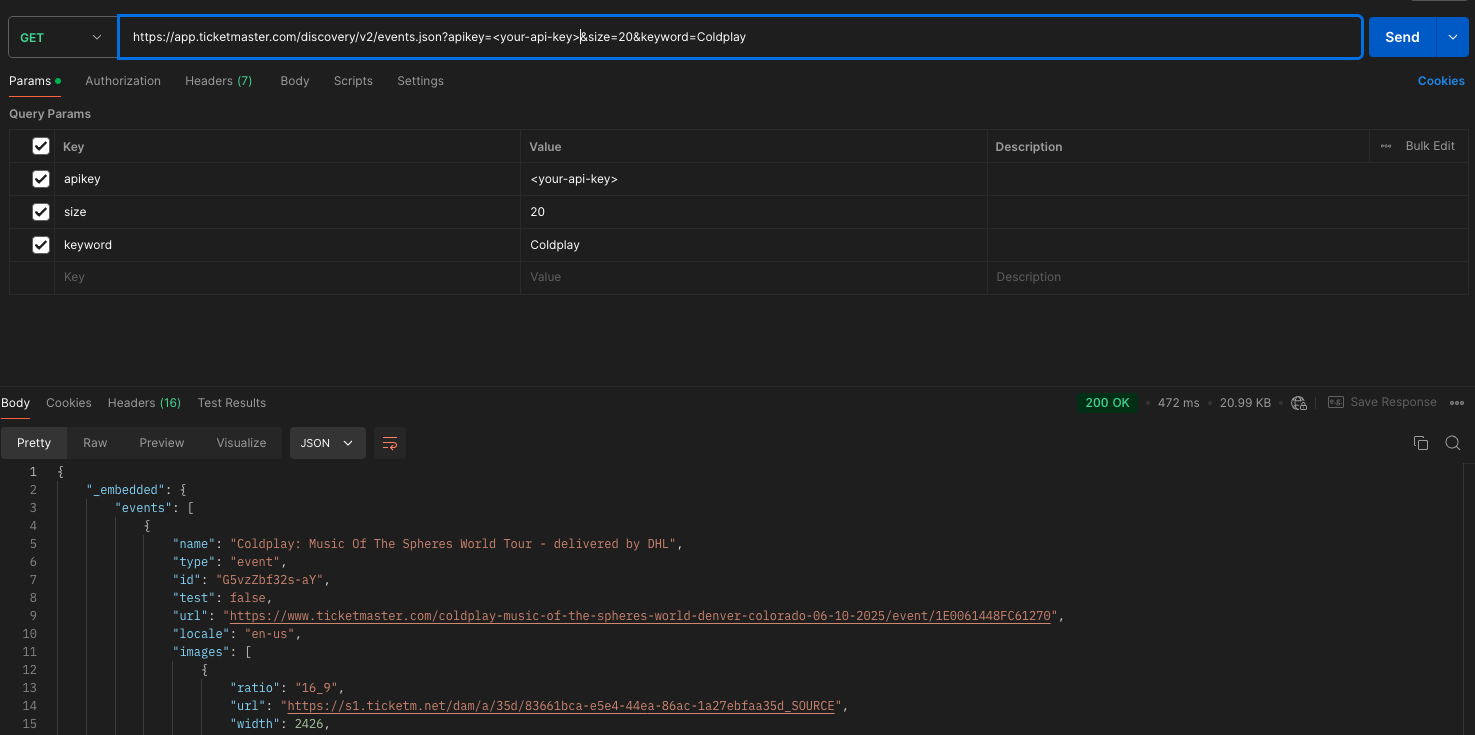
d. Once you have your API key, convince yourself that you are able to use this key to get data from the ticketmaster server. Open up your postman and make a GET request to the appropriate URL.
 |
|---|
Clone your GitHub repository
Github Classroom Assignment
- Using an SSH key
- Using a Personal Access Token (PAT)
git clone git@github.com:CU-CSCI3308-Fall2025/lab-7-web-services-<YOUR_USER_NAME>.git
git clone https://github.com/CU-CSCI3308-Fall2025/lab-7-web-services-<YOUR_USER_NAME>.git
Navigate to the repository on your system.
cd lab-7-web-services-<YOUR_USER_NAME>
Directory structure
At the end of this lab, your directory structure should be as follows:
|--init_data
    |--create.sql
|--node_modules
    |--express/
    |--express-handlebars/
    |--handlebars/
    |--pg-promise/
    |--<...other packages>
|--views
    |--layouts
        |--main.hbs
    |--pages
        |--discover.hbs
        |--login.hbs
        |--logout.hbs
        |--register.hbs
    |--partials
        |--footer.hbs
        |--head.hbs
        |--message.hbs
        |--nav.hbs
        |--title.hbs
|--.env
|--.gitignore
|--docker-compose.yaml
|--package.json
|--index.js
You don't need to create node_modules package, it'll be created once you start the docker containers.
Initializing Database
We'll now initialize the database for this project. This database will contain only one table.
Update the create.sql file in the init_data folder with a create query to create a users table with the following column names and datatypes:
| Column Names | Datatypes |
|---|---|
| username | VARCHAR(50) PRIMARY KEY |
| password | VARCHAR(60) NOT NULL |
When you initialize the db docker container, the tables in the users_db database will be created from this file. For reference, you can take a look at how the tables were initialized in lab-7-templating create.sql file.
Setting up your environment
In this lab, like in the previous lab, we will be using 2 containers, one for PostgreSQL and one for Node.js. If you need a refresher on the details of Docker Compose, please refer to lab 1.
1. Navigate to the lab-7-web-services folder
We have updated the configuration of the db container for this lab. Navigate to the lab-7-web-services folder in the terminal. Copy the configuration shown in the code block into your docker-compose.yaml file within that folder.
services:
  db:
    image: postgres:14
    env_file: .env
    expose:
      - '5432'
    volumes:
      - lab-07-web-services:/var/lib/postgresql/data
      - ./init_data:/docker-entrypoint-initdb.d
  web:
    image: node:lts
    user: 'node' #you can remove this if you are facing access issues when installing node packages
    working_dir: /home/node/app
    env_file: .env
    environment:
      - NODE_ENV=development
    depends_on:
      - db
    ports:
      - '3000:3000'
    volumes:
      - ./:/home/node/app
    command: 'npm start'
# This defines our volume(s), which will persist throughout startups.
# If you want to get rid of a hanging volume, e.g. to test your database init,
# run `docker-compose rm -v`. Note that this will remove ALL of your data, so
# be extra sure you've made a stable backup somewhere.
volumes:
  lab-07-web-services:
2. Set up .env file
We have provided to you an .env file with the following configuration. Make sure to replace the value for the API_KEY with the key that was generated at the end of creating your Ticketmaster developer account. Refer to that section if you need a reminder on where within the Ticketmaster website you can locate the API key.
# database credentials
POSTGRES_USER="postgres"
POSTGRES_PASSWORD="pwd"
POSTGRES_DB="users_db"

# Node vars
SESSION_SECRET="super duper secret!"
API_KEY="<ticketmaster key you just created>"
3. Starting Docker Compose
Now that we've configured the docker-compose.yaml and .env files, starting docker compose is quite simple.
docker compose up
We have included nodemon in the package.json.
"scripts": {
  "start": "nodemon index.js"
}
If you are using a Windows/Linux OS and you see the following error:
nodemon: command not found
Then replace the "start" script in the package.json as shown below. Remember to replace <Github_Username> with your Username.
"scripts": {
  "start": "./node_modules/nodemon/bin/nodemon.js lab-7-web-services-<Github_Username>"
}
If you find that nodemon is not able to detect your changes, add -L option to the the "start" script in the package.json as shown below.
"scripts": {
  "start": "./node_modules/nodemon/bin/nodemon.js -L lab-7-web-services-<Github_Username>"
}

or

"scripts": {
  "start": "nodemon -L index.js"
}
4. Shutting down containers
Now that we've learned how to start docker compose, let's cover how to shutdown the running containers. As long as you're still in the same directory, the command is as shown below. The -v flag ensures that the volume(s) that are created for the containers are removed along with the containers. In this lab, you need to use the -v flag only if you want to reinitialize your database with an updated create.sql. Otherwise, you are not required to do so.
docker compose down --volumes
5. Restarting Containers
For development purposes, it's often required to restart the containers, especially if you make changes to your initialization files. In this lab, we will be making changes to the index.js file and each time you make a change, you should restart your containers so the updates in the index.js is reflected in the web container.
docker compose down
docker compose up
How to check your docker logs?
Check this guide out to debug your docker.
Session variables
Before we get into the routes provided for this lab, it is VERY important to understand session variables.
When the client makes a login request to the server, the server will create a session and store it on the server-side. When the server responds to the client, it sends a cookie. This cookie will contain the session’s unique id stored on the server, which will now be stored on the client. This cookie will be sent on every request to the server.
The difference between session and cookie
A cookie is a key-value pair that is stored in the browser. The browser attaches cookies to every HTTP request that is sent to the server.
In a cookie, you can’t store a lot of data. A cookie cannot store any sort of user credentials or secret information. If we did that, someone could easily get hold of that information and steal personal data for malicious activities.
On the other hand, the session data is stored on the server-side, i.e., a database or a session store. Hence, it can accommodate larger amounts of data. To access data from the server-side, a session is authenticated with a secret key or a session id that we get from the cookie on every request.
In index.js ...
We are using express-session package to set the session object. To store or access session data, simply use the request property req.session, which is (generally) serialized as JSON by the store, so nested objects are typically fine.
Code Skeleton
For this lab, we do not prescribe the usage of Gen AI tools. Please attempt this lab by yourself as you will be able to see how all the pieces finally fit together. If you choose to use Gen AI, follow the guidelines in the syllabus or from the GenAI section in Lab 1 to appropriately cite your usage. Failure to do so will result in a 0 on the entire lab.
We have provided to you an index.js file in your directory. Update it with the following code skeleton. The code is partitioned into 5 sections.
- Section 1: Import the necessary dependencies. Remember to check what each dependency does.
- Section 2: Connect to DB: Initialize a
dbConfigvariable that specifies the connection information for the database. The variables in the .env file can be accessed by usingprocess.env.POSTGRES_DB,process.env.POSTGRES_USER,process.env.POSTGRES_PASSWORDandprocess.env.API_KEY. - Section 3: App Settings
- Section 4: This is where you will add the implementation for all your API routes
- Section 5: Starting the server and keeping it active.
// *****************************************************
// <!-- Section 1 : Import Dependencies -->
// *****************************************************

const express = require('express'); // To build an application server or API
const app = express();
const handlebars = require('express-handlebars');
const Handlebars = require('handlebars');
const path = require('path');
const pgp = require('pg-promise')(); // To connect to the Postgres DB from the node server
const bodyParser = require('body-parser');
const session = require('express-session'); // To set the session object. To store or access session data, use the `req.session`, which is (generally) serialized as JSON by the store.
const bcrypt = require('bcryptjs'); //  To hash passwords
const axios = require('axios'); // To make HTTP requests from our server. We'll learn more about it in Part C.

// *****************************************************
// <!-- Section 2 : Connect to DB -->
// *****************************************************

// create `ExpressHandlebars` instance and configure the layouts and partials dir.
const hbs = handlebars.create({
  extname: 'hbs',
  layoutsDir: __dirname + '/views/layouts',
  partialsDir: __dirname + '/views/partials',
});

// database configuration
const dbConfig = {
  host: 'db', // the database server
  port: 5432, // the database port
  database: process.env.POSTGRES_DB, // the database name
  user: process.env.POSTGRES_USER, // the user account to connect with
  password: process.env.POSTGRES_PASSWORD, // the password of the user account
};

const db = pgp(dbConfig);

// test your database
db.connect()
  .then(obj => {
    console.log('Database connection successful'); // you can view this message in the docker compose logs
    obj.done(); // success, release the connection;
  })
  .catch(error => {
    console.log('ERROR:', error.message || error);
  });

// *****************************************************
// <!-- Section 3 : App Settings -->
// *****************************************************

// Register `hbs` as our view engine using its bound `engine()` function.
app.engine('hbs', hbs.engine);
app.set('view engine', 'hbs');
app.set('views', path.join(__dirname, 'views'));
app.use(bodyParser.json()); // specify the usage of JSON for parsing request body.

// initialize session variables
app.use(
  session({
    secret: process.env.SESSION_SECRET,
    saveUninitialized: false,
    resave: false,
  })
);

app.use(
  bodyParser.urlencoded({
    extended: true,
  })
);

// *****************************************************
// <!-- Section 4 : API Routes -->
// *****************************************************

// TODO - Include your API routes here

// *****************************************************
// <!-- Section 5 : Start Server-->
// *****************************************************
// starting the server and keeping the connection open to listen for more requests
app.listen(3000);
console.log('Server is listening on port 3000');
Let's add our first route.
Route: /
- Method:
GET - API Route:
/ - Response: The
/API should redirect to/loginendpoint. This route should ideally render a home page. However, since we are not expecting you to create one for this lab, you can redirect the request to/login. To redirect to another route in the API you can useres.redirect().
Example:
app.get('/', (req, res) => {
  res.redirect('/anotherRoute'); //this will call the /anotherRoute route in the API
});

app.get('/anotherRoute', (req, res) => {
  //do something
});
Get Started with Handlebars
On the webpage, we will use Handlebars as the template engine to render pages. It dynamically updates the webpage content based on predefined logic, allowing us to retrieve and display different information from the database for different users.
Handlebars Syntax
Check out the tags section of the Handlebars documentation. It covers the notations listed below.
| Symbol | Description |
|---|---|
{{ }} | Used for evaluating variables, helpers, and expressions. |
{{#if}} | Begins an if block for conditional rendering. |
{{else}} | Denotes the alternative content in an if block. |
{{unless}} | Begins a block that renders its contents if the expression evaluates to false. |
{{#each}} | Begins an iteration block for iterating over arrays or objects. |
{{{html}}} | Renders raw HTML content (triple curly braces). |
{{! comment }} | Allows adding comments within the template. |
Partials
A partial is a fragment of a webpage's html, meaning it is not a complete webpage that could be rendered by a browser. Instead, we create re-usable components of our webpage which makes it easier to maintain our website's code. Updating a partial like one that has the markup for a navigation bar will update it across your entire website without having to update each individual page.
Recall that in handlebars, we include partial in a .hbs file using the syntax:
{{> myPartial}}
For this lab, we will create five partials. We will be re-using these partials to create our web pages.
A. title.hbs (TODO)
Copy the markup as shown in the code block below to /views/partials/title.hbs.
{{#if first_name}}
  <title> {{first_name}} - CSCI 3308 Lab 7 </title>
  {{else}}
  <title> CSCI 3308 Lab 7 </title>
{{/if}}
B. head.hbs (TODO)
The head will include all of the markup that is placed at the top of a HTML webpage. These would be the css references, metadata and title.
To-Do:
- Copy the markup as shown in the code block below to
/views/partials/head.hbs. - Complete the TODOs in the code. Checkout Handlebars Partials
<!DOCTYPE html>
<html lang="en" class="h-100">
<head>
  <meta charset="UTF-8" />
  <meta
    name="viewport"
    content="width=device-width, initial-scale=1, shrink-to-fit=no"
  />
  <meta name="description" content="" />

  <!-- TODO: Include the `title` partial here -->

  <link href="https://cdn.jsdelivr.net/npm/bootstrap@5.3.3/dist/css/bootstrap.min.css" rel="stylesheet" integrity="sha384-QWTKZyjpPEjISv5WaRU9OFeRpok6YctnYmDr5pNlyT2bRjXh0JMhjY6hW+ALEwIH" crossorigin="anonymous">

</head>
<body class="h-100 d-flex flex-column">
C. nav.hbs (TODO)
The menu will include the navigation bar. This will contain the links to all the pages.
To-Do:
- Copy the markup as shown in the code block below to
/views/partials/nav.hbs. - Discover - Add a
<a>tag withclassattribute set tonav-linkand thehrefattribute set to call the/discoverAPI. This API navigates to the ‘Discover’ page if logged in. - Logout - Add a
<a>tag withclassattribute set tonav-linkand thehrefattribute set to call the/logoutAPI that navigates to the login page.
<header>
 <nav class="navbar navbar-expand-sm border-bottom">
   <div class="container">
     <button
       class="navbar-toggler ms-auto"
       type="button"
       data-bs-toggle="collapse"
       data-bs-target="#navbar-collapse"
       aria-controls="navbar"
       aria-expanded="false"
       aria-label="Toggle navigation">
       <span class="navbar-toggler-icon"></span>
     </button>
     <div class="collapse navbar-collapse" id="navbar-collapse">
       <ul class="navbar-nav me-auto">
         <li class="nav-item">
           <!-- TODO: For Discover, add a <a> tag with an attribute href to call the '/discover' API -->
         </li>
       </ul>
       <div class="nav-item me-1">
         <!-- TODO: For Logout, add a <a> tag with an attribute href to call the '/logout API -->
       </div>
     </div>
   </div>
 </nav>
</header>
D. footer.hbs (TODO)
The footer partial includes all the javascript files & the closing code for our webpage's HTML.
To-Do:
- Copy the markup as shown in the code block below.
- Add the
<script>tag to include the bootstrap javascript library.
<footer class="text-center text-muted w-100 mt-auto fixed-bottom">
<!-- TODO: Add the <script><script /> tag to include bootstrap javascript -->
<p>
© Copyright 2024 : CSCI 3308 - Lab 7 Web Services
</p>
</footer>
</body>
</html>
E. message.hbs (TODO)
In the previous lab, we added the message component in our website to view the errors/warnings/info/success messages. Here, let's create a partial to include that in the hbs pages.
To-Do:
- Copy the markup as shown in the code block below to
/views/partials/message.hbs. - This will be used in
login.hbsanddiscover.hbs. Make sure to include this partial in these pages to send messages to the users. - This will be used in
login.hbs,discover.hbsandlogout.hbs. Make sure to include this partial in these pages to send messages to the users.
{{#if message}}
  <div class="alert alert-{{#if error}}danger{{else}}success{{/if}}" role="alert">
    {{ message }}
  </div>
{{/if}}
Layouts
Now lets tie these pieces to the actual webpages, in the views/layouts/main.hbs which will import the above partials ( head, nav, footer ) and help build a complete webpage.
main.hbs (TODO)
For this lab, we will include the partials in the main.hbs pages and we will use this outline for the pages that we will create for this lab. The main content of the upcoming webpages will be rendered by the {{body}}
<!-- TODO: Add the head.hbs partial here -->
<!-- TODO: Add the nav.hbs partial here -->
{{{body}}}
<!-- TODO: Add the footer.hbs partial here -->
Refer to B.6 to see how to include partials in a page.
Now its time to create the webpages and the API routes. In class, we will be implementing the registration and login functionalities for our website.
Registration
A. UI - register.hbs
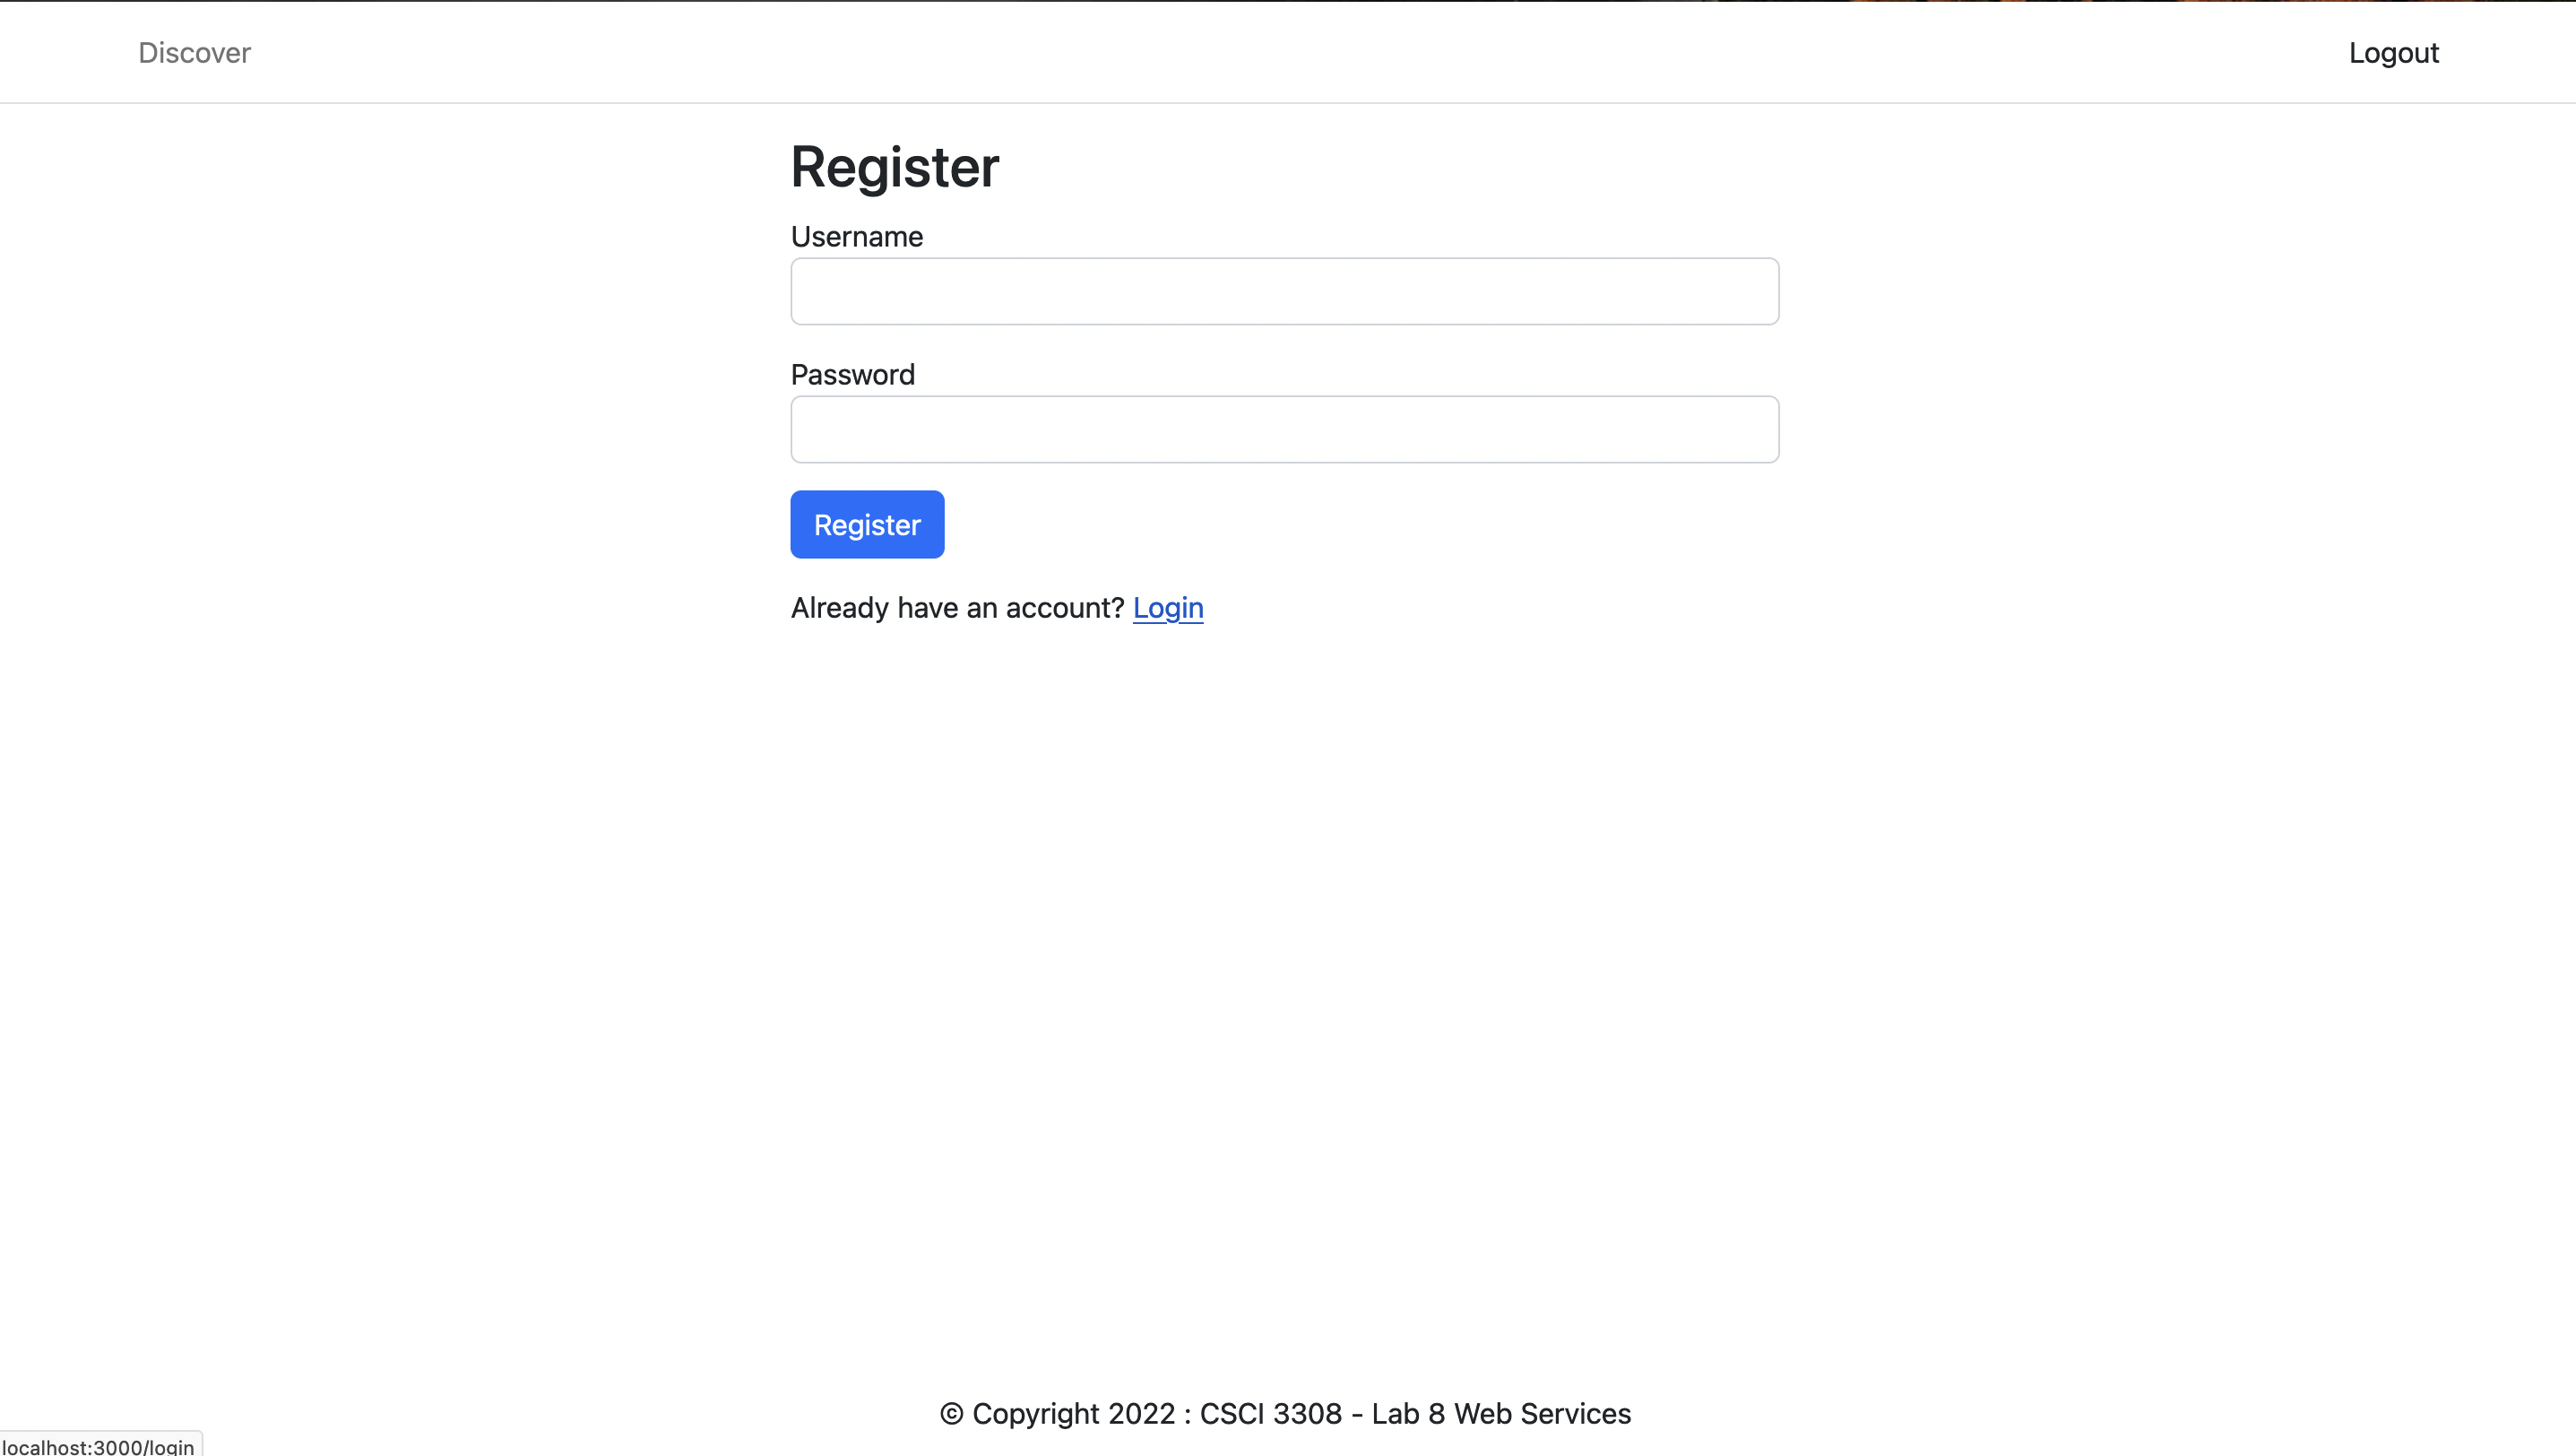
We're recommending a simple registration form with only 2 fields since we do not intend to use the additional information a user may enter in a registration form. If you choose to add more fields in this form, you can. Make sure to update the schema for the users table and the insert statement when registering users.
To Do: In this page you will be creating a HTML form that takes two input fields: username and password.
i. For username input field, set the name attribute to be username, and for the password input field, set the name attribute to be password. The input fields are identified by their name attribute in the request object sent to the server.
ii. In the form element, set the action attribute to be /register and method attribute to be POST. When the form is submitted by clicking the submit button, it will trigger a call to the POST /register route.
The register page would resemble:
B. Javascript - API Routes for Register in index.js
In your index.js file, create the following routes.
a. Route: /register
- Method:
GET - API Route:
/register - Response: Render
register.hbspage.
Here is an example of how you can render hbs pages from the server:
app.get('/', (req, res) => {
  res.render('pages/home',{<JSON data required to render the page, if applicable>})
});
Note: To render the register page, you will not need to send any JSON data.
b. Route: /register
Before we get into building this route, let's look at what async/await one more time.
Async/Await
Why do we use async/await?
Node.js is an asynchronous event-driven JavaScript runtime and is the most effective when building scalable network applications. Node.js is free of locks, so there’s no chance to dead-lock any process.
Async
Asynchrony, in software programming, refers to events that occur outside of the primary program flow and methods for dealing with them. External events such as signals or activities prompted by a program that occur at the same time as program execution without causing the program to block and wait for results are examples of this category. Asynchronous input/output is an example of the latter case, and allows programs to issue commands to storage or network devices that can process these requests while the processor continues executing.
Await
In an async, you can await any Promise or catch its rejection cause. In ECMAScript 2017, the async and await keywords were introduced. These features make writing asynchronous code easier and more readable in the long run. They aid in the transition from asynchronicity to synchronism by making it appear more like classic synchronous code, so they’re well worth learning.

To get more information on different syntax and applications of async/await, you can reference this article
Example:
Lets take the following code snippet to understand aync/await.
const foo = async (req, res) => {
  let response = await request.get('http://localhost:3000');
  if (response.err) {
    console.log('error');
  } else {
    console.log('fetched response');
  }
};
Here, the await keyword waits for the asynchronous action(request.get()) to finish before continuing the function. It’s like a ‘pause until done’ keyword. The await keyword is used to get a value from a function where you would normally use .then(). Instead of calling .then() after the asynchronous function, you would simply assign a variable to the result using await. Then you can use the result in your code as you would in your synchronous code.
Now that we understand how async and await works, let's build the route.
- Method:
POST - API Route:
/register - Input:
username,password - Functionality:
- Hash the password
- Insert username and the hashed password into the
userstable.
- Response:
- Redirect to GET
/loginroute page after data has been inserted successfully. - If the insert fails, redirect to GET
/registerroute.
- Redirect to GET
Notice how the following creates an async function.
// Register
app.post('/register', async (req, res) => {
  //hash the password using bcrypt library
  const hash = await bcrypt.hash(req.body.password, 10);

  // To-DO: Insert username and hashed password into the 'users' table
});
Login
A. UI - login.hbs
To Do:
- In this
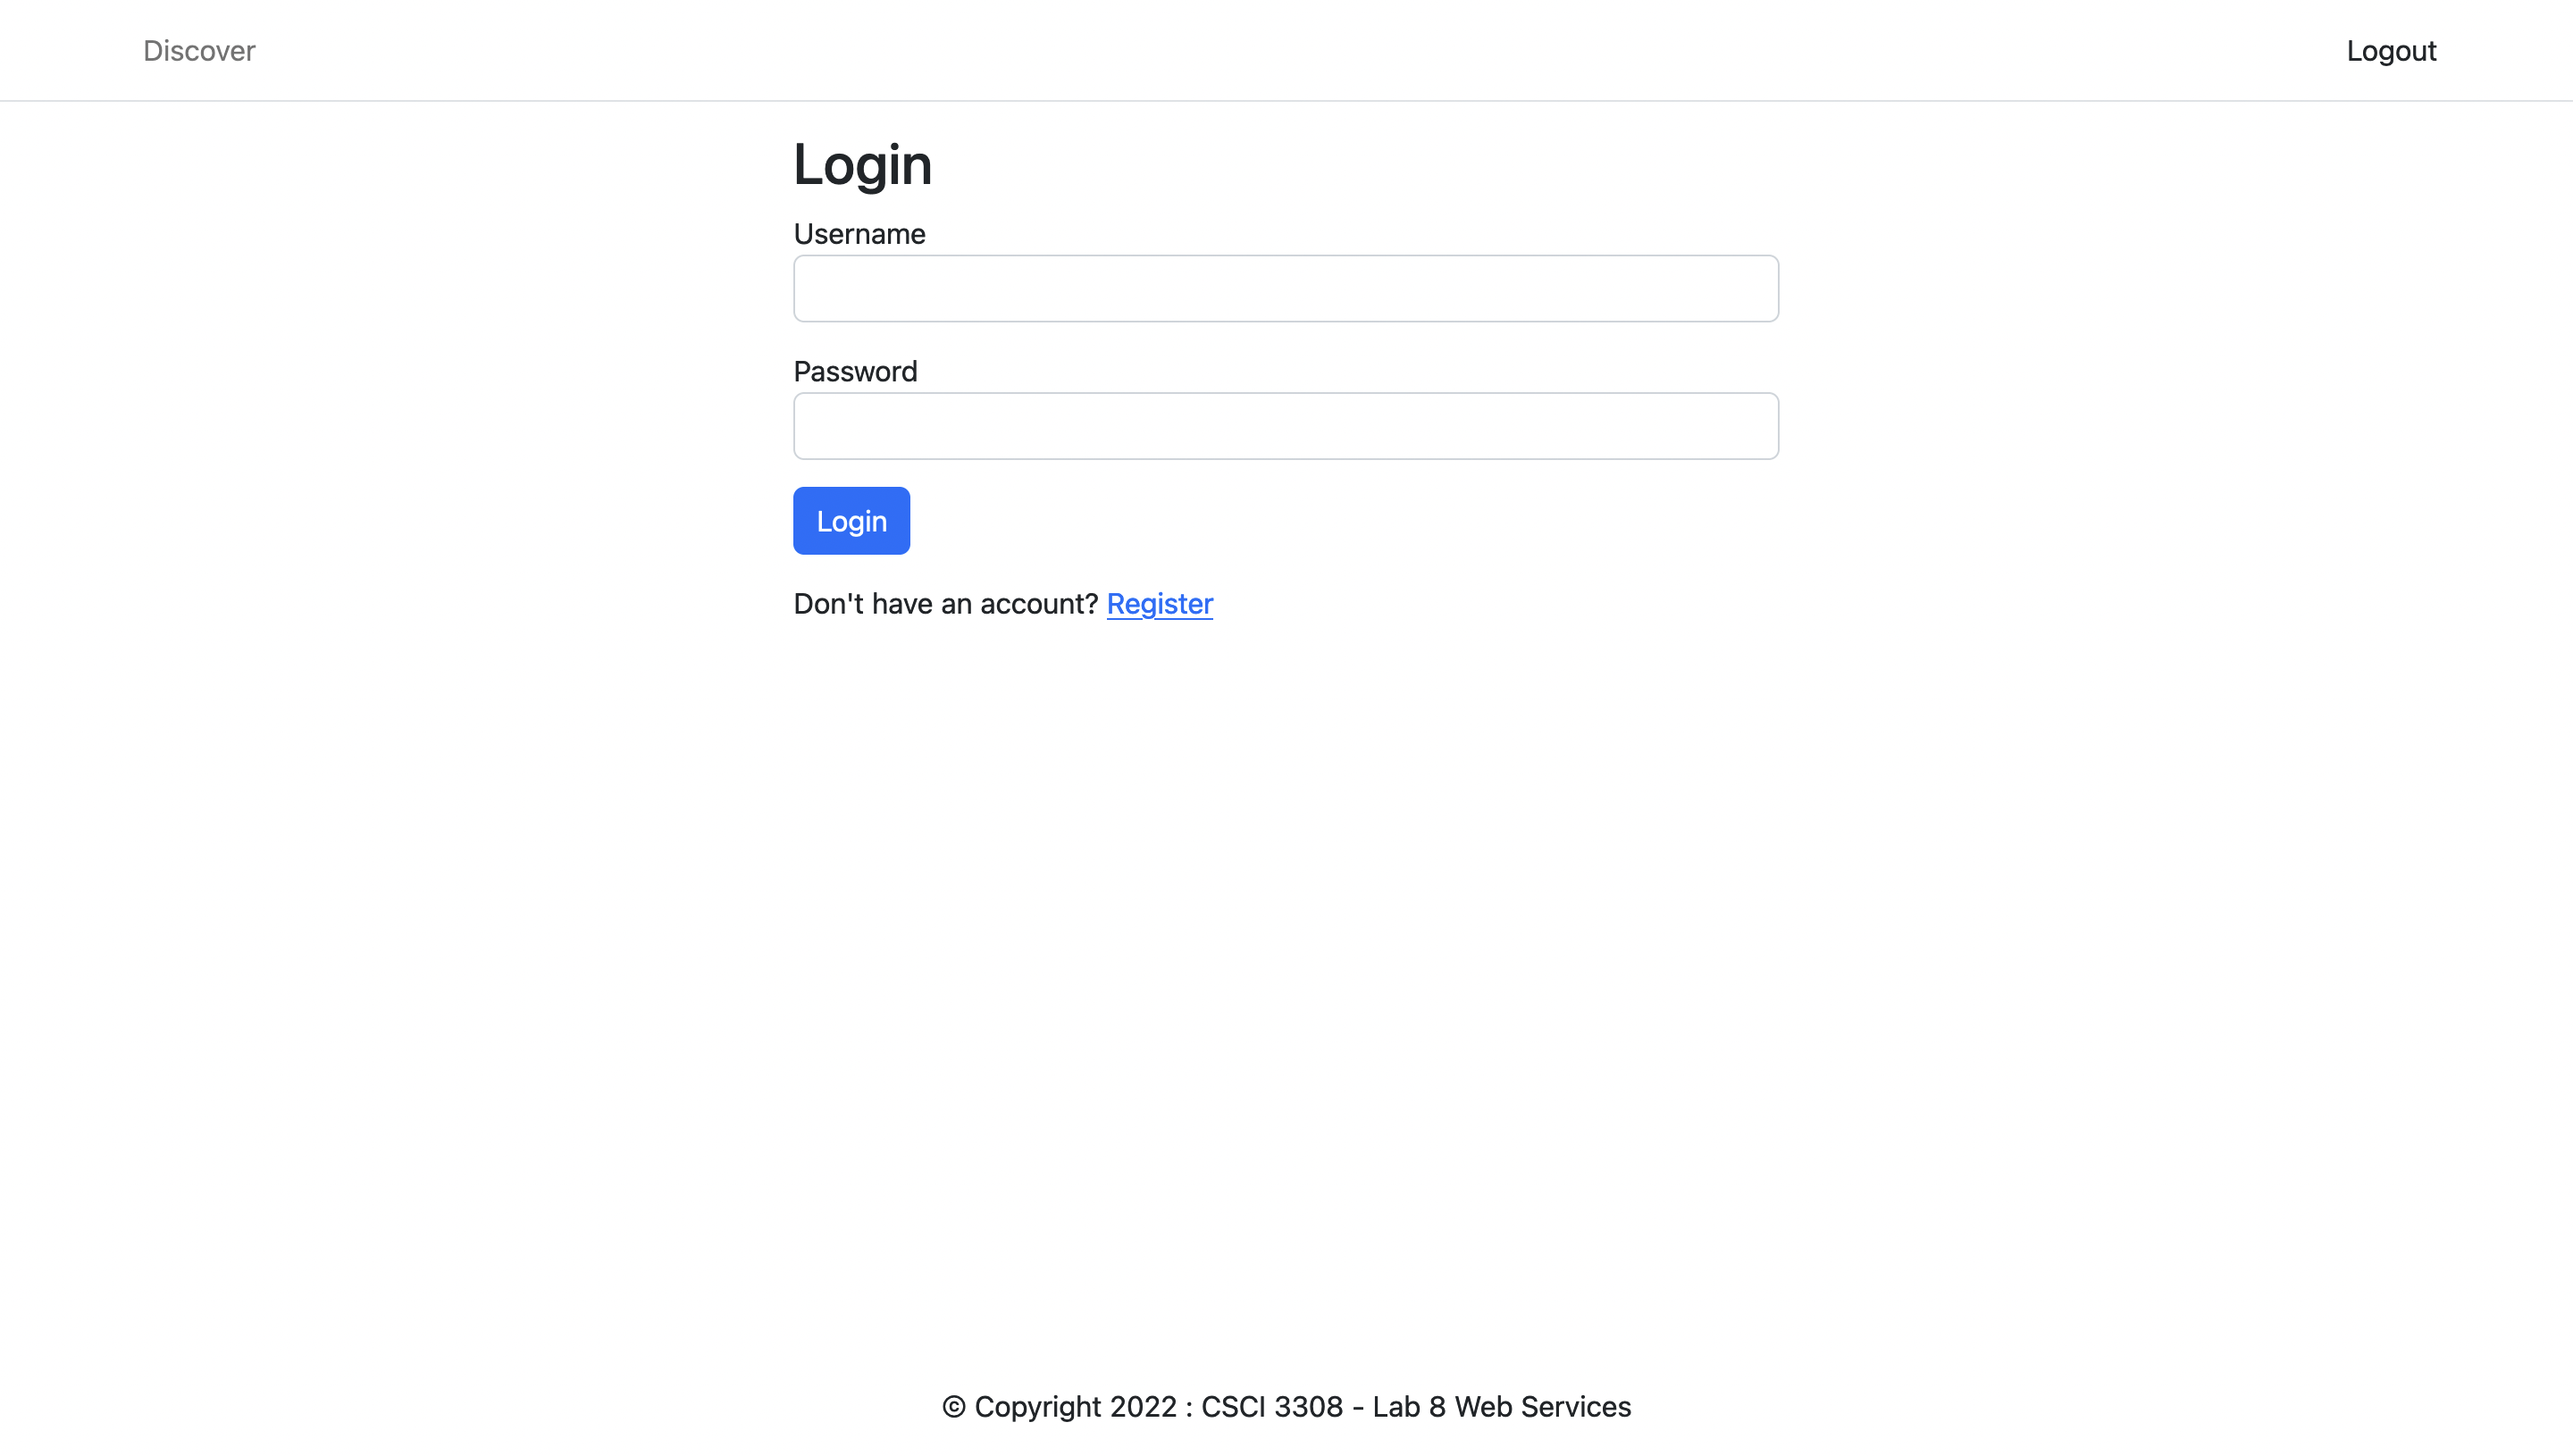
login.hbspage you will be creating a HTML form that takes two input fields:usernameandpassword. Forusernameinput field, set the name attribute to beusername, and for thepasswordinput field, set the name attribute to bepassword. The input fields are identified by their name attribute in the request object sent to the server. In theformelement, set the action attribute to be/loginand method attribute to bePOST. When the form is submitted by clicking the submit button, it will trigger a call to thePOST /loginroute. - Add a button of the type submit. The text on the button should be 'Login'.
- Additionally, if you would like to, you can add text to redirect unregistered users to the registration page. This is NOT required.
The login page would resemble the following:
B. Javascript - API routes for Login in index.js
In your index.js file, create the following routes.
a. Route: /login
- Method:
GET - API Route:
/login - Response: Render
login.hbspage.
b. Route: /login
Method:
POSTAPI Route:
/loginInput:
usernameandpasswordfrom the UI form.Functionality:
- Find the user from the
userstable where the username is the same as the one entered by the user. - Use
bcrypt.compareto encrypt the password entered from the user and compare if the entered password is the same as the registered one. This function returns a boolean value.
// check if password from request matches with password in DB
const match = await bcrypt.compare(req.body.password, user.password);- If the password is incorrect, render the login page and send a message to the user stating "Incorrect username or password.".
- Else, save the user in the session variable.
//save user details in session like in lab 7
req.session.user = user;
req.session.save();- Find the user from the
Response:
- If the user is found, redirect to
/discoverroute after setting the session. - If the user is not found in the table, redirect to GET
/registerroute. - If the user exists and the password doesn't match in the database, send an appropriate message to the user and render the
login.hbspage.
- If the user is found, redirect to
You would need to include the message.hbs partial in the login.hbs page to send messages.
Authentication middleware
To view the Discover page which you will be building in Part C, the session variable should have been set. In the below code block, we're setting a middleware to authenticate. This will bring up the login page if the session variable isn't set.
// Authentication Middleware.
const auth = (req, res, next) => {
  if (!req.session.user) {
    // Default to login page.
    return res.redirect('/login');
  }
  next();
};

// Authentication Required
app.use(auth);
If the middleware is not set before the discover and logout APIs are implemented, the session variables won't be set correctly. Please make sure to implement the middleware before moving on to the implementation of discover and logout APIs.
Part C
Discover
A. UI - discover.hbs
To Do:
- In the
discover.hbspage, use a grid to display at least 10 events on the page. These events can be displayed as rows in a table OR as a row of cards. If you like, you can use your Lab 3 - Hobbies page as reference.tipIf you choose to use bootstrap cards to display the events, you could use
rowandcolsbootstrap classes and implement iterative logic to display multiple cards across multiple rows. - Each event should have - Name, image (if it doesn't have the image in the response, use a default image of your choice), date and time and a 'Book Now' button that has an anchor tag to the booking url.
B. Javascript - API route for Discover in index.js
a. Route: /discover
- Method:
GET - API Route:
/discover - Functionality: Within this route, we will make an API call with
axiosto the Ticketmaster API using the API_KEY added in the session variable and store the data received inresultsvariable. You can decide on akeywordof your choosing to filter the search and test if the API is working. Note: You are not required to take this as a user input. - Response:
- Render
discover.hbswith the results from the API. - If the API call fails, render
pages/discoverwith an empty results arrayresults: []and the error message.
- Render
You would need to include the message.hbs partial in the discover.hbs page to send messages.
Axios:
Axios is a promise-based lightweight HTTP client that enables us to make GET and POST requests to different web services, given a URL. It offers different ways of making requests such as GET, POST, PUT/PATCH, and DELETE. By default, Axios transforms the response object to JSON. You can find out more about axios.
There is a limit of 5000 requests that you can make to the Ticketmaster. So please use them carefully.
To make an axios call, here's the syntax:
axios({
  url: `https://app.ticketmaster.com/discovery/v2/events.json`,
  method: 'GET',
  dataType: 'json',
  headers: {
    'Accept-Encoding': 'application/json',
  },
  params: {
    apikey: process.env.API_KEY,
    keyword: '<any artist>', //you can choose any artist/event here
    size: <number of search results> // you can choose the number of events you would like to return
  },
})
  .then(results => {
    console.log(results.data); // the results will be displayed on the terminal if the docker containers are running // Send some parameters
  })
  .catch(error => {
    // Handle errors
  });
Ticketmaster API Response
For explanation on the response object, visit this link.
You can also view the response object on your terminal if you have run docker-compose up. Spend some time exploring the response object as you will need to access the data from there to display to the users on the UI.
Logout
A. UI - logout.hbs
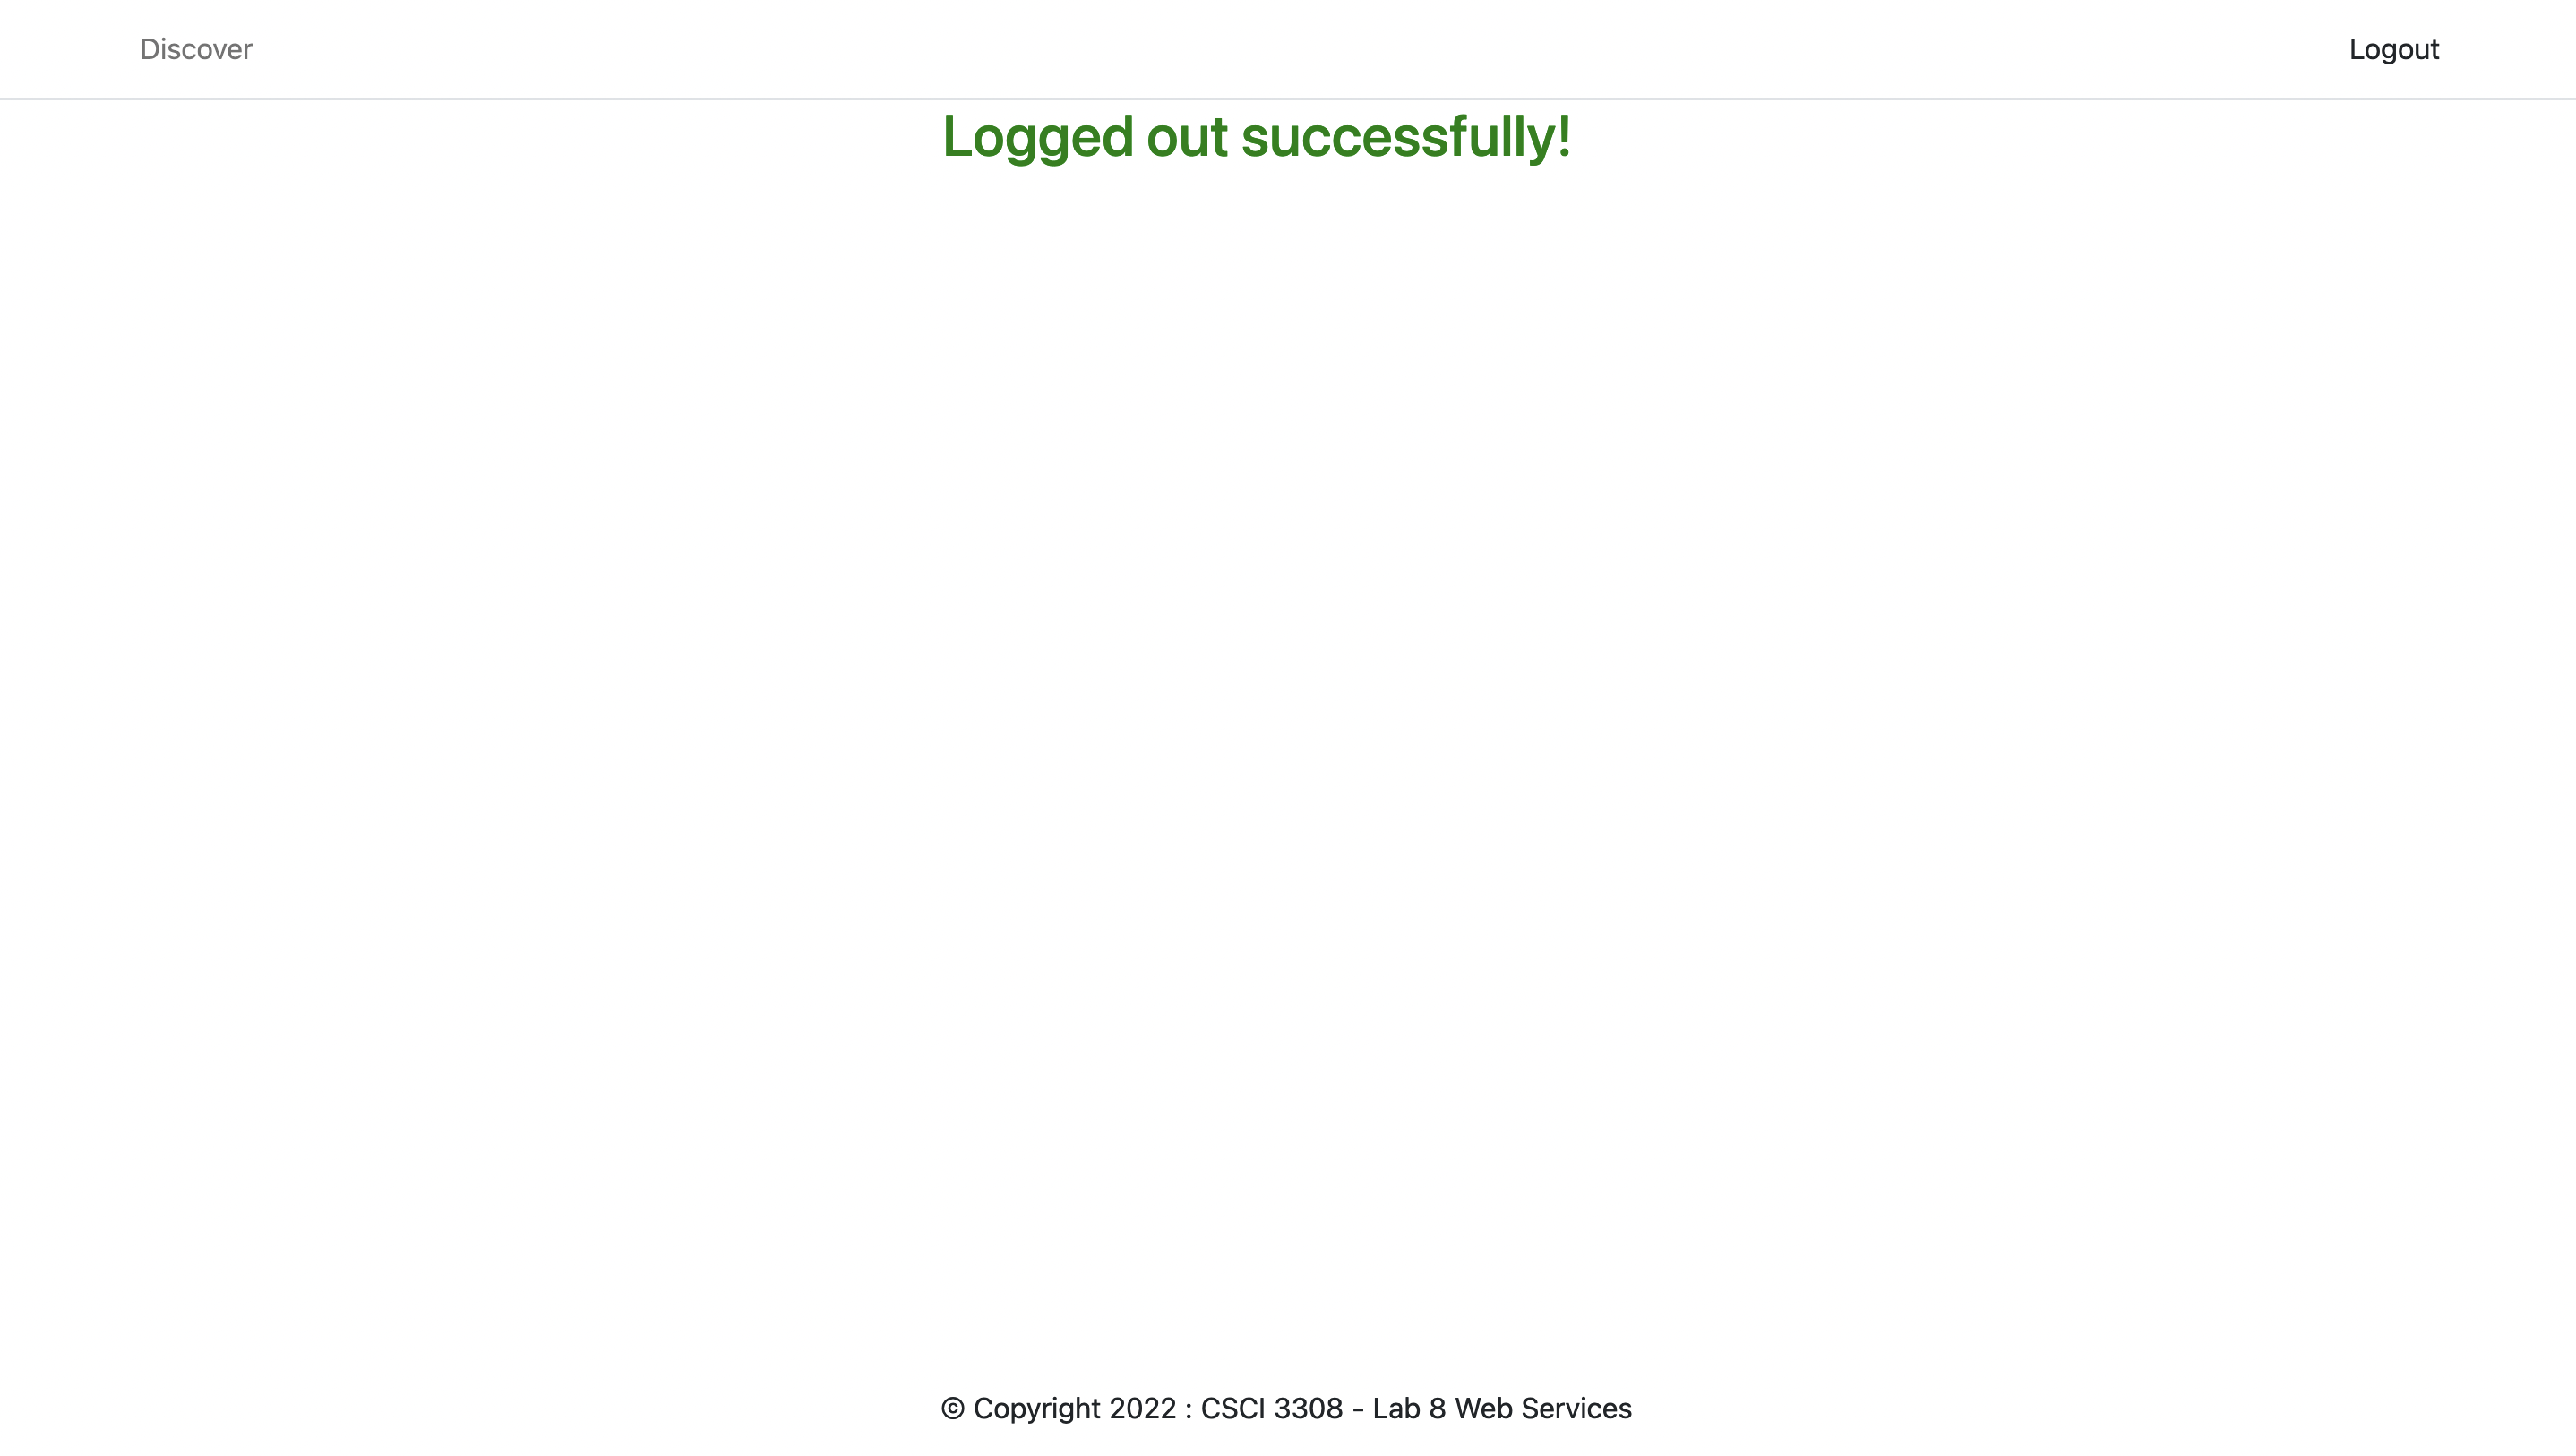
This page should show up when logout on the navbar is clicked. This page would have a simple HTML container with a heading stating that the logout was successful.
Output: Here is what your Logout page would look like:
B. Javascript - API route for Logout in index.js
a. Route: /logout
- Method:
GET - API Route:
/logout - Functionality: Destroys the session.
- Response: Render
pages/logoutand send a 'Logged out Successfully' message.infoYou would need to include the
message.hbspartial in thelogout.hbspage to send messages. You can use req.session.destroy() to destroy a session variable.
Extra Credit
There is no extra credit in this lab.
Submission Guidelines
Commit and upload your changes
git add .
git commit -m "Updated all files for lab 7"
git push
After you have run the commands given above, please navigate to your GitHub remote repository (on the browser) and check if the changes have been reflected. Once that is done, please submit a link to your repository on Canvas.
You will be graded on the files that were present before the deadline.
Regrade Requests
Please use this link to raise a regrade request if you think you didn't receive a correct grade.
Grading Specifications
Not attempted
- Student has not attempted the lab OR
- Student has not attended the lab without prior approval
Below Expectations - If any of the following conditions are met
Part A
- Quiz has not been attempted OR
- Quiz has been attempted, but
- The answer to the questions are partially correct
Part B
- DB
create.sqlfile in theinit_datafolder is missing or does not define the correct schema for theuserstable
- Login and Registration
- Login or Register pages are missing
- Visiting
localhost:3000/,localhost:3000/login, orlocalhost:3000/registerdoes not redirect to the correct pages - New user registration does not insert data into the database
- Login does not work with proper credentials or works with incorrect credentials
- DB
Part C
- Discover and Logout
- Discover page is missing or not linked correctly in the navbar
- Visiting
localhost:3000/discoverdoes not display API results - Discover page renders incorrectly
- Logout link is missing from the navbar
- Redirects after logout are not functional
- In-class check in
- Student did not show progress to the TA during lab
- Discover and Logout
Meets Expectations – if all of the specified conditions are met
- Part A
- Quiz has been completed
- Student has demonstrated understanding by answering all the questions correctly
- Part B
- DB
create.sqlfile in theinit_datafolder correctly defines theuserstable schema
- Login and Registration
- Login and Register pages are present and render correctly
- Visiting
localhost:3000/orlocalhost:3000/logindisplays the login page - Visiting
localhost:3000/registerdisplays the registration page - Users can log in with valid credentials and are redirected appropriately
- New user registration correctly inserts data into the database
- DB
- Part C
- Discover and Logout
- Discover page is linked correctly in the navbar
- Visiting
localhost:3000/discoversuccessfully makes API calls and displays appropriate results - Discover page renders correctly without broken components
- Logout link is present in the navbar
- Logout correctly redirects to the login page
- In-class check in
- Student showed progress to the TA during lab and attendance was marked on Canvas
- Discover and Logout
- Part A