Lab 4: Client Side Javascript
Overview
In this lab, we will learn how to use Javascript to add interactions to a website.
To receive credit for this lab, you MUST show your work to the TA during the lab, and push it to the github before the deadline. Please note that submissions will be due on Wednesday at 11:59 p.m. in the following week.
Learning Objectives
LO1. Understand the concept of Client side scripting using JavascriptL02. Organize Project Directory and Resources in JS project
L03. Debug JavaScript in the Browser
L04. Put together few features using JavaScript, HTML, and CSS(Bootstrap)
Part A
Clone your GitHub repository
Github Classroom Assignment
- Using an SSH key
- Using a Personal Access Token (PAT)
git clone git@github.com:CU-CSCI3308-Spring2026/lab-4-client-side-scripting-<YOUR_USER_NAME>.git
git clone https://github.com/CU-CSCI3308-Spring2026/lab-4-client-side-scripting-<YOUR_USER_NAME>.git
Navigate to the repository on your system.
cd lab-4-client-side-scripting-<YOUR_USER_NAME>
Directory Structure and Website Overview
The website directory structure contains the HTML, CSS and javascript files for this lab.
├─Calendar/
│  ├─index.html
│  └─resources/
│    ├─js/
│       ├─ script.js
│    ├─css/
│       ├─ style.css
├─Demo/
│  ├─test.html
|  ├─test.js
Debugging Javascript in the browser
Before we start the lab, let's do an activity on Debugging code in the browser.
A. Using console.log()
Step 1. In your repository, you will find a folder called test. Within that folder you will find a test.html, that you will open within your browser by double-clicking on the file.
Step 2. Now, follow the steps as shown in the gif below to access the Developer Pane in a Google Chrom browser. Developer panes are available in other browsers as well. You may need to enable the option to access Developer Tools.
Step 3. Click on the button on the HTML page. It will cause a prompt to appear. Enter your name and click "OK". You will see your name show up in the "Console" tab of the Developer pane.
Step 4. Go ahead and open the test.js file and add another console.log() statement and test it out in the browser.
You can view the output from console.log(), in the developer pane. You can also view any errors, that your program may be throwing, in this tab. Please read the errors attentively. The file and line number at which the error is occuring shows up on the right hand side of that row.
It is okay to look up the errors online to find ways to resolve them.
B. (recommended). Using the debugger in the browser
Watch this video to see how you can debug using the developer tools in your browser:

What are we creating today?
In this week's lab we'll build a calendar that allows the addition (and modification) of events.
Create and Initialize required files
Starting here we'll be creating and editing files within the Calendar folder of the repository.
A. Javascript - script.js
To ensure appropriate responses to user events, we will write javascript code. For reusability and maintainability purposes, it would be ideal to house all the javascript code in an external javascript file, in this case, script.js.
In your repository, you should find script.js file under resources/js.
B. CSS - style.css
In resources/css you will find a style.css file that has custom style rules for some of the HTML elements for the Calendar. You may edit this as needed to enhance the appearance or styling of the calendar website.
C. HTML - index.html
You should find index.html, with the starter code for the website, in the root of the Calendar folder. All the UI elements to be displayed will be included in this file. Before we start editing the file to add more functionality, let's link all the resources that we'll need for this webpage to function as needed.
Include project resources in your index.html -
You will notice that the Bootstrap library and the
style.cssfile have already been included in the head of theindex.html.Now, let's include the javascript file we created for this project. We will be adding this file in the
<body>of the HTML file at the very end.
Please make sure to use Relative paths
<!-- Replace `file.js` with the appropriate path to script.js. Use relative paths -->
<script src="file.js"></script>
Implement Features
Remember to document all prompts used with any generative AI tool for any part of this lab in a text file named genAI_usage.txt. Reference Lab 1 for the correct steps to be followed for this documentation. This file must be submitted along with the rest of your lab files.
Failure to properly disclose and submit your GenAI usage will result in a NOT ATTEMPTED for the lab.
Preview the provided code
Open index.html file in a browser of your choice. It should look like the image below.
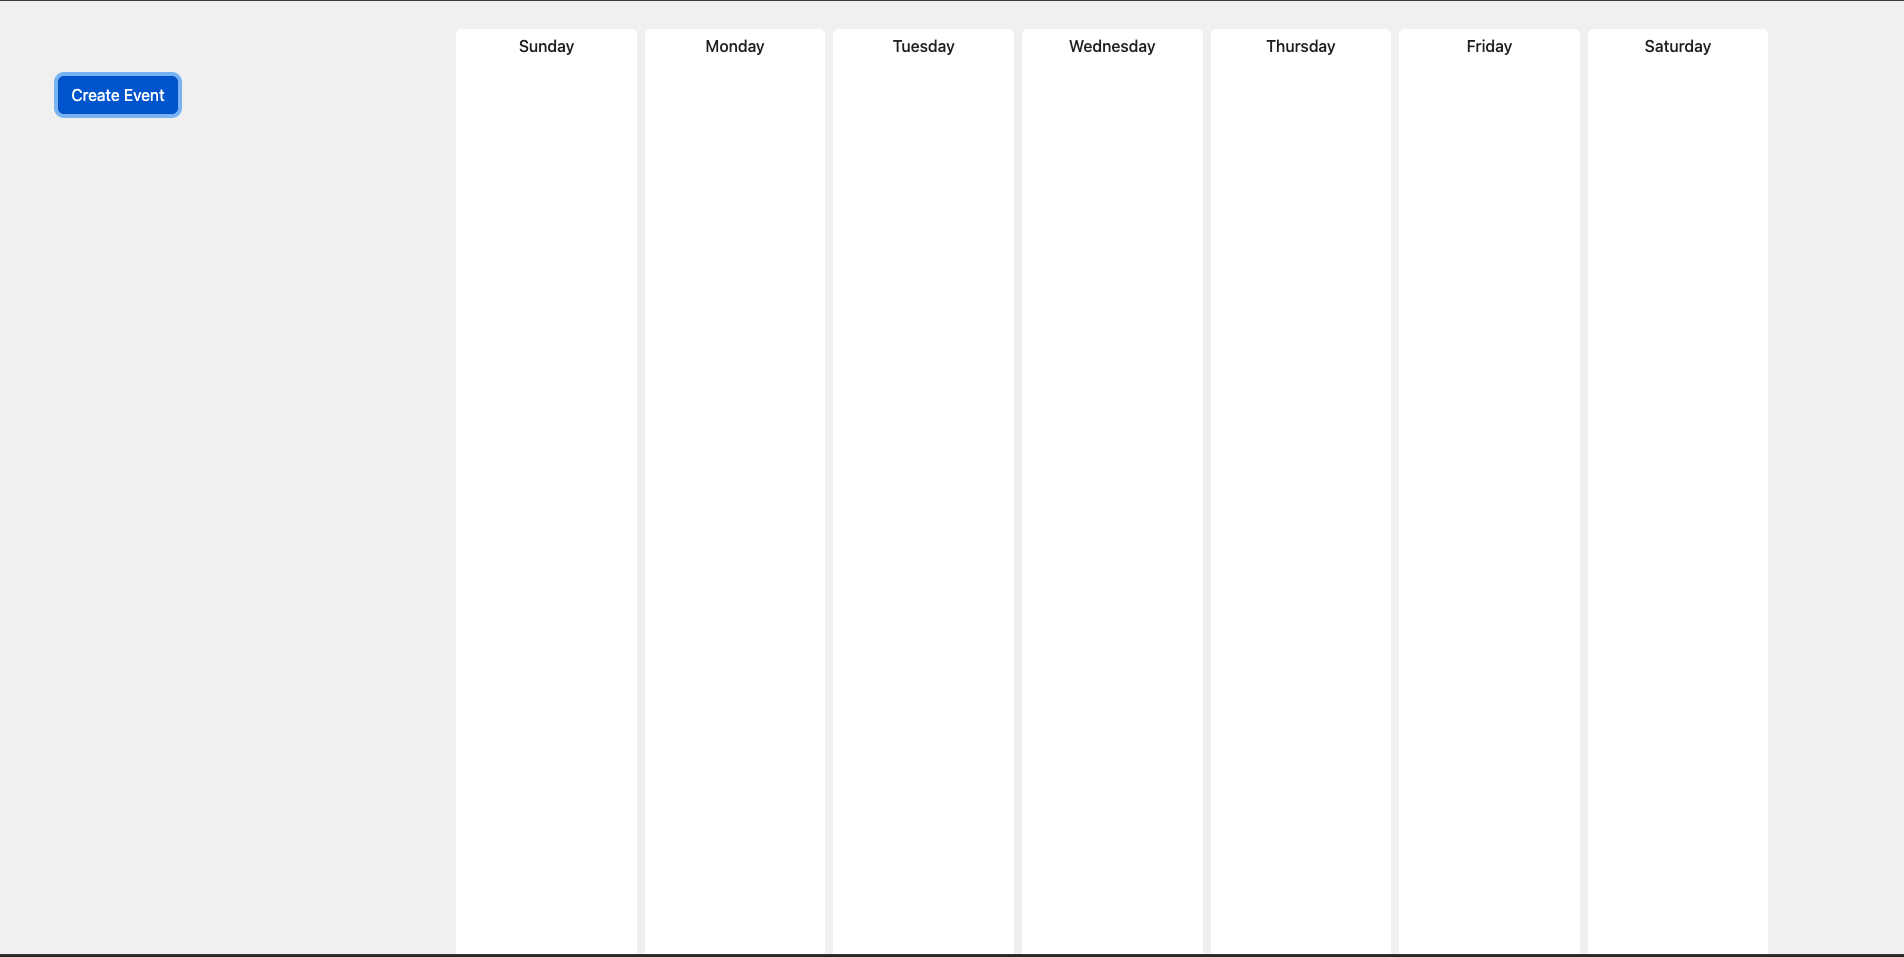
Currently the Create Event button is not be functional since we haven't added any function to react to the button click event.
Create Modal
- A Modal component is a dialog box/popup window that appears on top of the currently displayed page.
- We will create and use the same Modal for the purpose of Creating and Updating an event on the calendar.
- You can refer to this resource for more information on modal.
- In future steps, the Modal title and Modal body shown in the image below will be updated.
In this section, we will initialize the modal with primitive functionalities.
Step 1: Include the HTML for a Bootstrap Modal in index.html
You can use any GenAI tool to generate the HTML for the Modal. Make sure to meet the requirements as mentioned below. Also, you are required to document the prompts used as mentioned above in the writeup.
1: Include Modal starter code:
The modal should look similar to the modal shown at this link
Set the id of the Modal to be "event_modal"
2: Form:
Now, let's modify the Modal body to include a form with the fields listed below.
<div class="modal-body"> <form> <!-- Include form fields to gather the information listed below. --> </form></div>- Event Name - A Textbox. Set the
idproperty to be "event_name". - Weekday - A Dropdown with Days of the week as options. Use
<select>element. Set theidproperty to be "event_weekday". - Time - A Time picker. Set the
idproperty to be "event_time" andtypeproperty to be "time". - Event Modality - Use a dropdown with two options - "In-Person" or "Remote". If “In-person” option is selected, then the "Location" and "Attendees" fields should be shown. If “Remote” option is selected, then "Remote URL" and "Attendees" fields should be shown. Set the
idproperty to be "event_modality". - Location - A textbox. Set the
idproperty to be "event_location". - Remote URL - A textbox. User will enter a Meeting URL (Zoom, MS Teams etc.). Use appropriate text to make this apparent to users. Consider using the
placeholderattribute of the<input>tag. Set theidproperty to be "event_remote_url" . - Attendees - A textbox. User should enter the names of the attendees separated by commas. Use appropriate text to make this apparent to users. Consider using the
placeholderattribute of the<input>tag. Set theidproperty to be "event_attendees".
Make sure to use appropriate bootstrap classes with the HTML elements for the style rules to take effect.
3: Validation:
For each event that is created/updated, there should certain fields, like name of the event, time of the event etc., that should be filled for the event to make practical sense. You are required to add appropriate validations to all your event modal fields. Refer to this resource to learn about the various validations that are available.
One more validation that you MUST implement for this lab:
- The value entered in "Remote URL" field is actually a URL. This must be done by specifying a regular expression for URL in the the
patternattribute of theinputelement. Here is an example of how to use thepatternattribute:
<input type="text" pattern="^[A-Z].+" />
Before writing the regular expression, think about the expectations of a URL. You will need a protocol, like http or https followed by :// followed by a sub domain (www which could be optional), followed by the domain name (google in google.com) followed by a TLD (.com, .org etc.). You could devise a more complex RegEx as well if desired.
4: Update Location Options based on Modality:
Next, we need to conditionally display the "Location" or "Remote URL" fields, in the modal form, based on the selected option in event modality dropdown. To do so, we need to implement a function updateLocationOptions() in script.js. For now, assuming that the implementation of updateLocationOptions() function exists in the JS file, let's call it on the onchange event in the <select> element.
<!-- "this.value" passed to updateLocationOptions() refers to the text in the "value" attributeof the option that is chosen by the user --><select class="form-control" id="event_modality" required onchange="updateLocationOptions(this.value)"> <option value="in-person" default>In Person</option> <option value="remote">Remote</option></select>Javascript functions are always called on HTML elements that will trigger an event which will then lead to a response(s). In the example above, the visibility of certain form fields are determined based on the users selection of modality through the dropdown. Hence, the responding Javascript function needs to listen for changes to the value in the dropdown field of the form.
5: Submit Buttons: Add "Close" and "Save Event" buttons to the Modal. If you already have the buttons for the Modal, update them appropriately. The "Save Event" button should save the data from the form and close the Modal and the "Close" button should close the Modal. We will add an event to the Save Event button to call the saveEvent() function in the script.js file. saveEvent() is a function we will implement later in the lab.
You can copy over the below code to add a "Create Event" button.
<button class="btn btn-primary" type="button" onclick="saveEvent()">
  Save Event
</button>
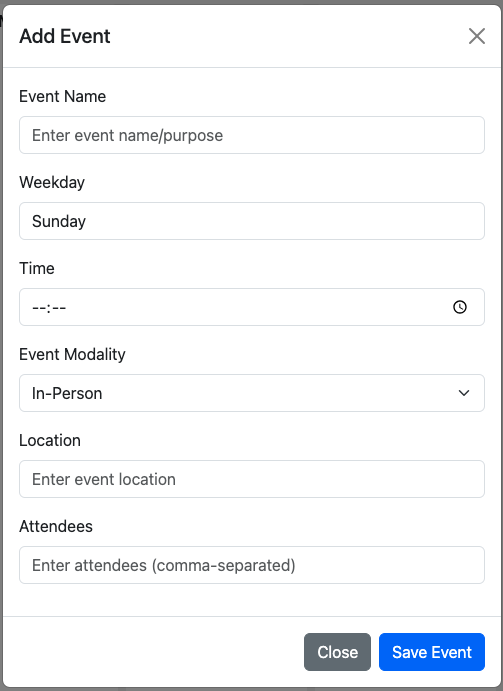
When creating an event, the modal should open and form fields should be empty.
New Calendar Event Form
When creating a new event, the modal should open with empty fields. You will notice that for the dropdowns, the values default to the first option in the dropdown.
Step 2: Opening Modal when the Create Event button is clicked
We will add two attributes to the Create Event button to enable it to launch the Modal when clicked. You will see below that we have added the data-bs-toggle and data-bs-target attributes for this purpose. Update this in your index.html file.
<button
  class="btn btn-primary mt-3"
  data-bs-toggle="modal"
  data-bs-target="#event_modal"
>
  Create Event
</button>
Step 3: Adding functions for interactions in Javascript - script.js
To understand how javascript interacts with HTML, you are encouraged to complete this portion on your own based on the instructions. Read the instructions and provided information carefully.
Toggling between Locations based on Modality
If the modality for an event is "in-person", then we show a location textbox, and if it's "remote", we should show a remote url textbox. When the event modality is selected, we are calling the function updateLocationOptions(). In your script.js file add a function as shown below:
function updateLocationOptions() {}
The function should do the following:
- Read the value of the event modality using the `document.getElementById()` function.
- Depending on the modality, the correct fields must be displayed. You can retrieve the elements using the
document.getElementById()and then set their<element>.style.displayattribute to display or hide them. You may use alternate techniques as well to fulfill this task.
Saving Events
When the user clicks on the Save Event button on the Modal, we are calling the saveEvent() function. In your script.js file add a function as shown below:
function saveEvent() {}
This function should do the following:
- Read the values from the form within the modal. You can use the `document.getElementById()` function to fetch these values.
- Save the values in an array, called
events, of JSON objects. Declare this array outside of the function.
Here is what each element of the array could look like:
  const eventDetails = {
        name: // name of the event from the form,
        weekday: //weekday of the event from the form,
        time: //time of the event from the form,
        modality: //modality of the event from the form,
        location: //if the modality is "In-person" then this has a value and remote_url is null,
        remote_url: //if the modality is "Remote" then this has a value location is null,
        attendees: //list of attendees from the form
    };
Check if the event details were stored correctly in the
Note: If any of the values show up as "undefined", you need to double check if you read the values from the form correctly.eventsarray.
i. Add aconsole.log()to print the contents of theeventsarray.
ii. Refresh yourindex.htmlpage in your browser.
iii. Create a new event through the modal and click on theSave Eventbutton.
iv. Now open the developer console and see if theeventsarray shows details of the event as you entered them.
If the browser refreshes the console after you hit submit on the form, you can add the following line of code to the saveEvent() function for debugging. We are assuming that the id for the form is event_form
document
  .getElementById('event_form')
  .addEventListener('submit', function (event) {
    event.preventDefault();
  });
Make sure to remove this line once you are done debugging the events array.
Add the event to the Calendar on the UI. We will call a function called
addEventToCalendarUI()for this purpose. You need to pass the event details for the current event to this function. We will add code to this function in the next section.Reset the form within the modal. You can do this by using the
reset()method of the form element. Below is an example:
//Assuming that the id of the form is "event_form"
document.getElementById('event_form').reset();
Displaying Events on the UI
- The
saveEvent()function will call this function to help display the event's details on the calendar UI. So let's declare this function:
function addEventToCalendarUI(eventInfo) {}
- Before we proceed, we will create one more helper function to build the HTML for each individual event card that should be displayed on the calendar UI.
a. Let's create the createEventCard(eventDetails) function
function createEventCard(eventDetails) {}
b. Within this function, create a div element using the document.createElement() function.
let event_element = document.createElement('div');
c. We will add some bootstrap classes to this to enhance it's appearance. You are also welcome to add your custom CSS style rules instead.
event_element.classList = 'event row border rounded m-1 py-1';
d. Let's create one more div, using the document.createElement(), as shown above in b.. Call this variable info
e. Add all the event details to the innerHTML of this element. Here is an example:
info.innerHTML = 'Event Details';
You are strongly encouraged to use templated strings to simplify appending data from variables with a string. Alternately, you can use standard string concatenation.
Parsing the eventDetails JSON object - When you want to read the data within the eventDetails here is how you can do it as shown in the example below:
let name = eventDetails.name;
f. We will now append the info div to the event_element div we declared above. Since the info div should be nested within the event-element div, we will employ the `appendChild()` function.
event_element.appendChild(info);
g. Finally, we will return event_element from this function.
return event_element;
- Coming back to the
addEventToCalendarUI()function, we will callcreateEventCard()function and pass to it theeventInforeceived and store the returned value to a variable.
let event_card = createEventCard(eventInfo);
Now, we need to add this event card to the appropriate day of the week on the Calendar. To do this, we will fetch the
divelement from the HTML for a given day using thedocument.getElementById(). Hint: you can use the weekday attribute of the event to fetch the correct divUse the
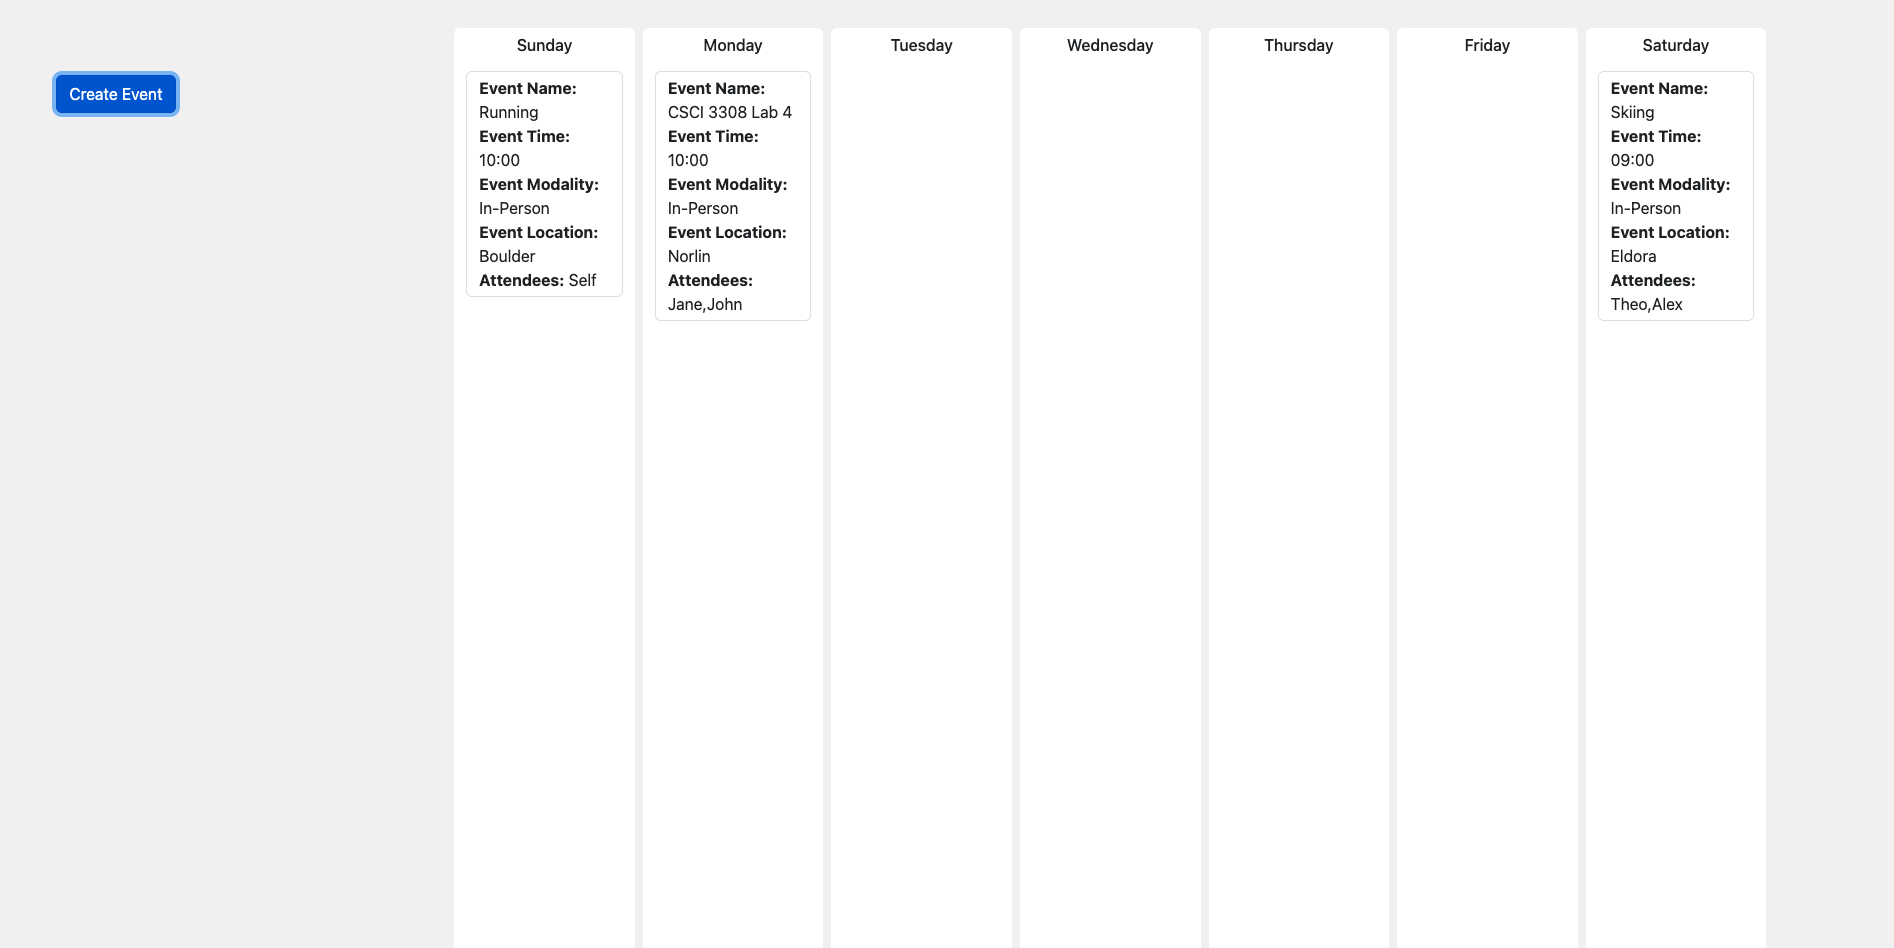
appendChild()similar to how it was used in thecreateEventCard()function to append thisevent_cardto thedivfetched in 4.Finally, check
index.htmlin your browser. With the added event(s) it should look something like the image below.Make sure that when you are done with the "Save Event" functionality, the Modal should also close. Below is the code you could use at the end of the
saveEvent()function.
const myModalElement = document.getElementById('event_modal');
const myModal = bootstrap.Modal.getOrCreateInstance(myModalElement);
myModal.hide();
If you refresh your browser window as you are testing these functions, the newly created calendar events(if any) will disappear, from the UI and the JS array because these changes to the HTML DOM are in-memory, which is cleared when you reload a page.
Part B
Add Colors to your event cards based on the category of events
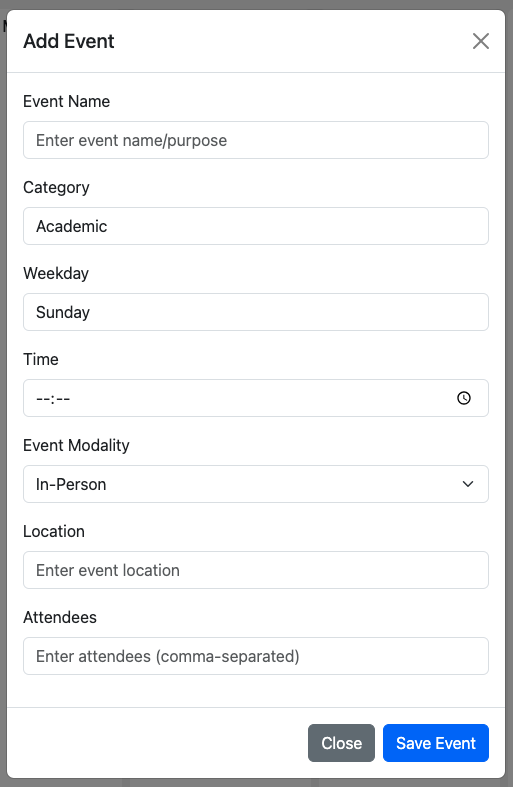
1. Add a category field to the modal form
You need to add an additional field to the modal form called "Category". You can pick any list of categories like, academic, work etc. Your form would now look as follows:
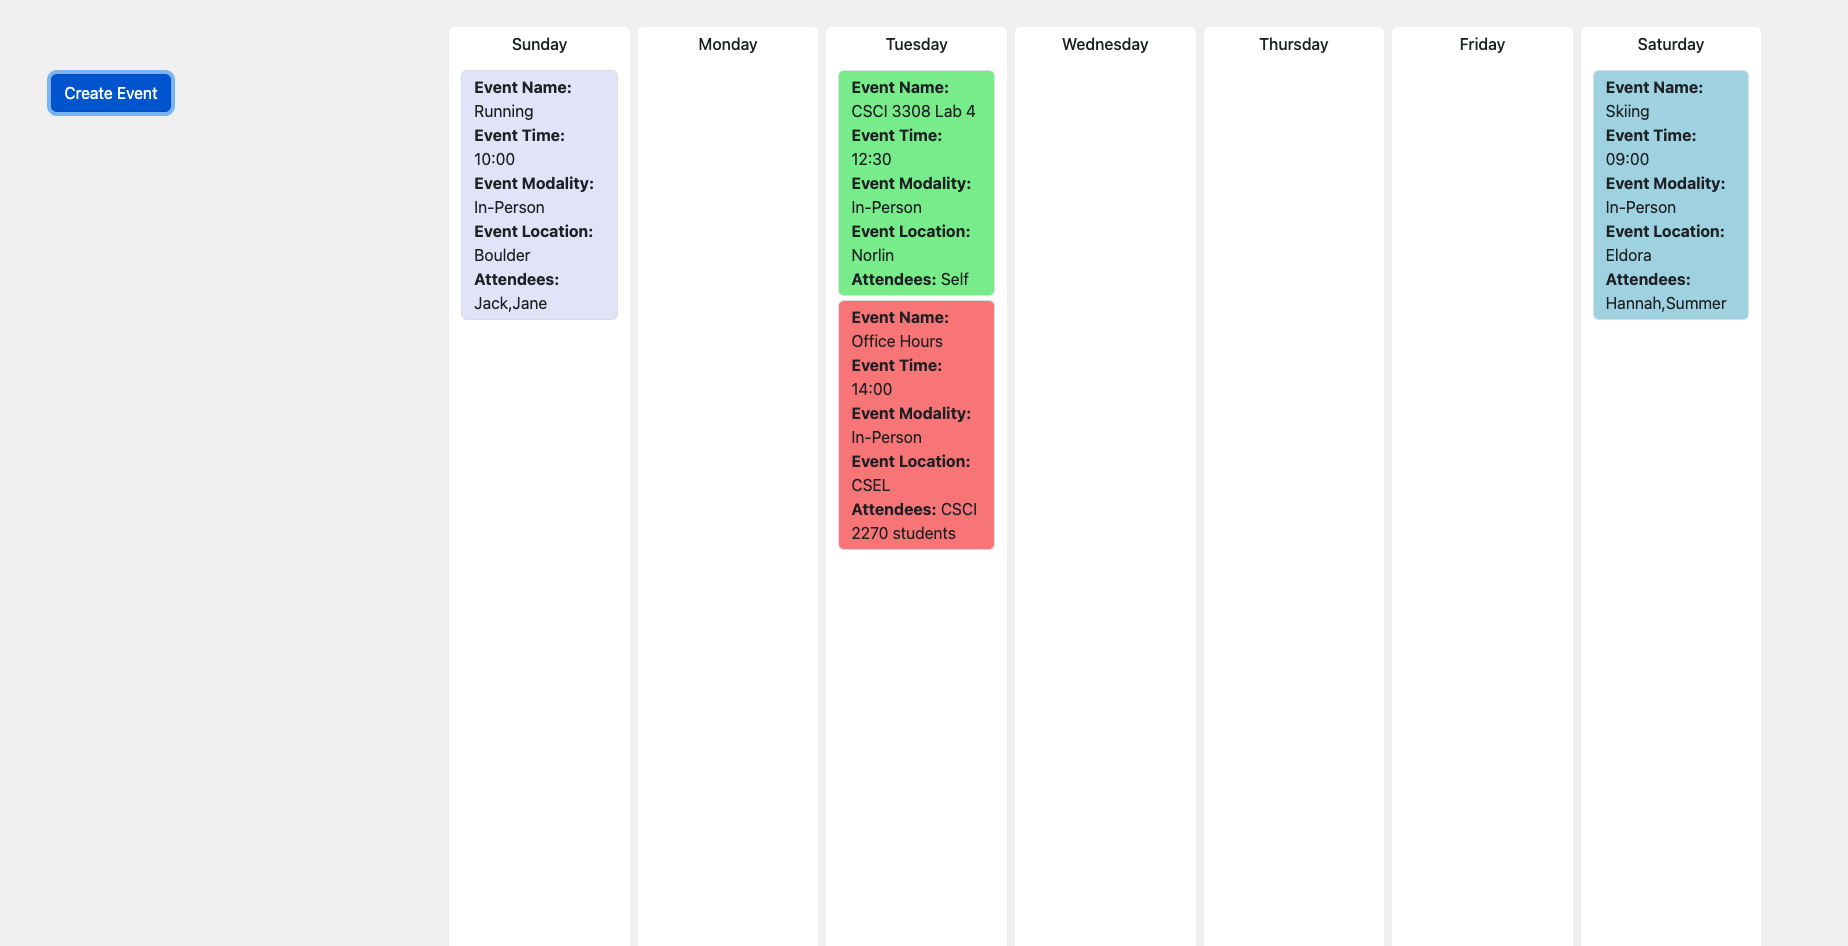
2. Change the background colors of the event cards based on the category
When you save the event, based on the category of the event, you should update the background color of the event. The final view of the calendar after these changes would look similar to what you see below. You have the creative freedom to choose any colors for the different categories.
Extra credit
1. Update Events
Add update event functionality such that:
- When you click on an event, it opens the modal with the values for the form fields pre-filled from the event that was clicked on.
- You are able to update all/any of the fields
- When you click on the
Save Eventbutton, the event card on the calendar reflects the updated values.
2. Link the Calendar to your personal website
Once you are done implementing all the features, link this calendar to your personal website and host it to GitHub Pages. Instructions on hosting your website can be found in the Extra Credit section of Lab 3.
Include a link to your hosted personal website in the personal_website_link.txt file in the submission folder.
Reflection
Please make sure that the answers to the following questions are YES before you assume you are done with your work for this lab. Go in the sequence as asked and, if applicable, fix errors in that order.
- Did you test all your work thoroughly?
- Are all the files you created for this lab in the
submissionfolder? - Is the
submissionfolder as directed at the beginning of this lab? - Move your lab 4 folder to a different location on your computer. Are all the pages still rendering correctly when you open them up in a browser? If not, you may be using absolute paths. You need to change them to relative paths.
- Did you grade your work against the specifications listed at the end of this writeup?
- Do you meet expectations for all criteria?
- If you attempted extra credit -
i. Did you check if the hosted website works correctly on GitHub pages?
ii. When you update the events are the changes saved and reflected on the cards on the Calendar?
iii. Did you include a link to your hosted website in a text file and add it to the submission folder as mentioned in the instructions?
iv. Did you check your work against the specifications provided below?
Submission Guidelines
Please remember to upload the genAI_usage.txt file as well in the submission folder.
Commit and upload your changes
1. Make sure you copy your files for submission into your local git directory for this lab, within a "submission" folder that you need to create.
2. Run the following commands at the root of your local git directory, i.e., outside of the "submission" folder.
git add .
git commit -m "add submission"
git push
You will be graded on the files that were present before the deadline. If the files are missing/not updated by the deadline, you could receive a grade as low as "Not attempted". This can be replaced by raising a regrade request once you successfully upload your work to Github.
Regrade Requests
Please use this link to raise a regrade request if you think you didn't receive a correct grade.Grading specifications
| Criteria | Not Attempted | Below Expectations | Meets Expectations | Exceeds Expectations |
|---|---|---|---|---|
| Overall Attempt | • Lab not attempted OR • Student did not attend the lab without prior approval | — | — | — |
| Attendance & TA Review | — | • Did not attend full duration of lab OR • Work not reviewed by TA OR • Attendance not marked on Canvas | • Attended full duration of lab AND • Work reviewed by TA AND • Attendance marked on Canvas | — |
| Submission Presence | — | • Work not uploaded to the submission folder | • All required work uploaded to the submission folder | — |
| Script Inclusion | — | • script.js not correctly included in index.html using a relative path | • script.js correctly included in index.html using a relative path | — |
| Modal Functionality | — | • Modal is missing required fields OR • Modal does not open or close correctly | • Modal implemented with all required fields and Bootstrap styling | — |
| Form Validation | — | • Validation incomplete OR • Incorrect or missing RegEx for Remote URL | • Form validation correctly checks for all empty fields and Remote URL pattern | — |
| Event Data Storage | — | • Events not saved into an array of JSON objects OR form is not reset OR modal does not close | • saveEvent() correctly saves events into the array, resets the form, and closes the Modal | — |
| Event Card Display | — | • Event cards not displayed OR • Missing styling or incorrect weekday placement | • createEventCard() displays events in the correct weekday column with Bootstrap styling | — |
| Location / Remote Logic | — | • Modal logic does not correctly toggle between “Location” and “Remote URL” | • updateLocationOptions() correctly toggles between “Location” and “Remote URL” fields | — |
| Category Styling | — | • Category field missing OR • Event cards not color-coded by category | • Category field present and event cards are correctly color-coded | — |
| Responsiveness | — | • Pages are not responsive | • All pages are responsive using Bootstrap classes | — |
| GenAI Documentation | — | • genAI_usage.txt missing OR• Prompts not properly documented | • genAI_usage.txt present and correctly documents GenAI prompts used | — |
| Extra Credit – Enhanced Functionality & Hosting | — | — | — | • Meets all Meets Expectations criteria AND • Clicking an event opens a pre-filled modal • Edits persist and update the calendar UI upon saving • Calendar linked to student’s personal website • Project hosted on GitHub Pages |