Lab 13: Project Deployment
Overview
In this lab, we will use Render to deploy a web application that interacts with a PostgreSQL database. Render is a cloud platform for web applications that makes it easy to deploy full-stack applications.
To receive credit for this lab, you MUST show your progress to the TA during the lab, and submit your work to Canvas by the deadline. There is a "NO LATE SUBMISSIONS" policy for labs.
Learning Objectives
L01. Understand cloud computing concepts and the different cloud service modelsL02. Develop deployment proficiency by deploying the group project on to Render
Part A
Pre-Lab Quiz
Complete this Pre-Lab quiz on Canvas before your section's lab.
Part B
Overview of Cloud computing
Lecture NotesSelecting an Application to Deploy
You are required to use your group project repository for this lab. Later, if would like to deploy another project for practice, you can use your solution from Lab 7 or 8.
Setup Render Account
- Create a Render Account
If you would like, you can create a different shared email address for your team. You can use this shared email address to create an account on Render. Only one of you needs to create this account and share the credentials with the rest of your team mates, so it is a good idea to not use a personal password.
- Visit Render.
- Click on
Sign Upand use any email and password. - Complete the sign-up process by verifying your email address if required.
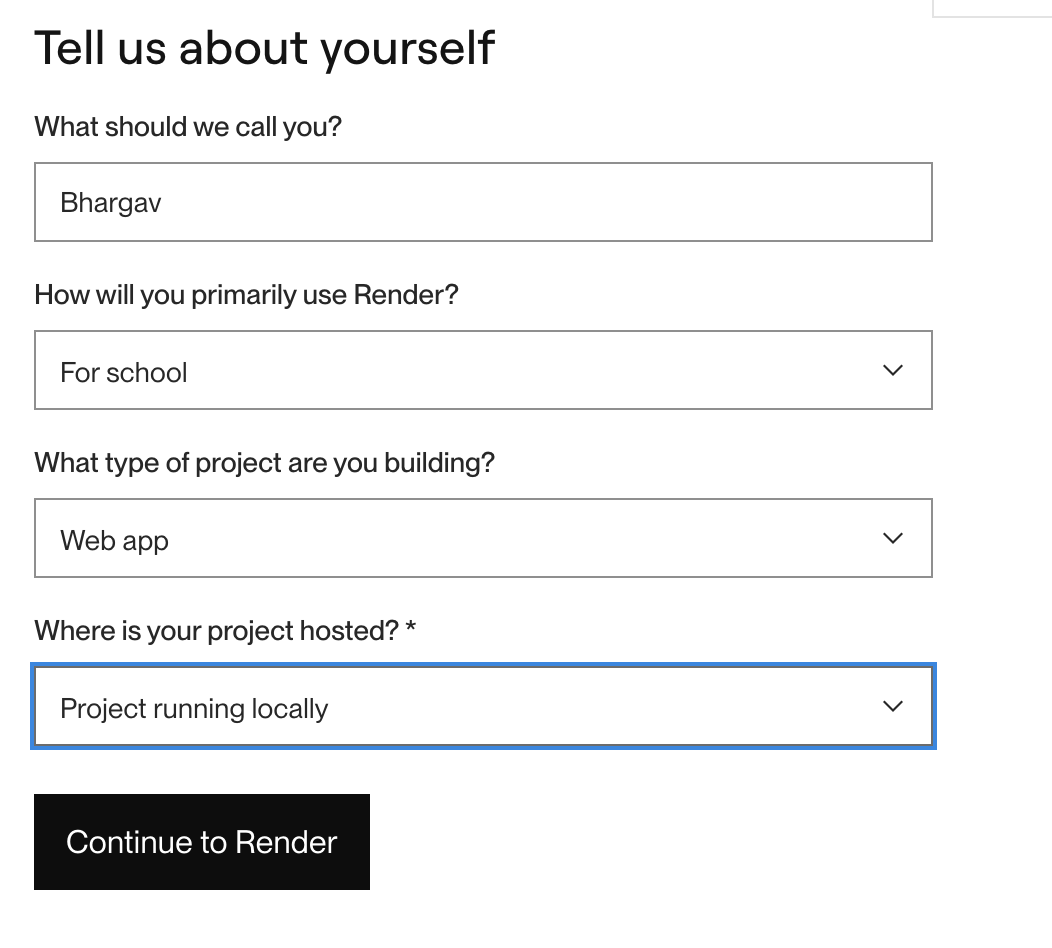
Once you have created and verified your account, log in to Render.
You will be directed to the Render dashboard. Before that, you might have to answer a few questions. Fill it out this way:
Directory Structure
At the end of this lab, your directory structure for the source code should be as follows:
├─ ProjectSourceCode
|   ├─ docker-compose.yaml
|   ├─ .gitignore
|   ├─ node_modules
|   ├─ package.json
|   ├─ src
|      ├─ views
|         ├─ pages
|             ├─ home.hbs
|             ├─ login.hbs
|             ├─ register.hbs
|         ├─ partials
|             ├─ header.hbs
|             ├─ footer.hbs
|         ├─ layouts
|             ├─ main.hbs
|      ├─ resources
|         ├─ css
|             ├─ style.css
|         ├─ js
|             ├─ script.js
|         ├─ img
|             ├─ home.png
|      ├─ index.js
|      ├─ init_data
|         ├─ create.sql
|         ├─ insert.sql
|   ├─ test
|         ├─ server.spec.js
|   ├─ init_db.sh
You don't need to create node_modules folder, it'll be created once you start the docker containers.
Database Initialization
Only if you do not have a database already set up, you need to complete the following steps. Else, you can move on to setting up your application on Render.
1. Create Database schema
We'll now create the schema for the database for this project. This database will contain only one table.
Update the 00_create.sql file in the init_data folder with a create query to create a users table with the following column names and datatypes:
| Column Names | Datatypes |
|---|---|
| username | VARCHAR(50) PRIMARY KEY |
| password | CHAR(60) NOT NULL |
2. Insert Data
Likewise you can add queries to the 01_insert.sql file - for this lab leave this file blank. In your group project prefix the filenames with a number to determine the order they are going to be executed in.
Setup Render
You are not required to pay for any of the services on Render. If you are asked for any sort of payment, please go back and check to ensure that you have selected the free tier of the respective service.
Render is a modern cloud platform that simplifies the process of deploying full-stack applications, databases, and static sites. It offers a user-friendly interface and powerful features like automatic deployments from GitHub, free SSL, and built-in support for popular programming languages and frameworks.
Render's key features include:
Automatic Deployments: With Render, you can connect your GitHub repository, and any push to the main branch will automatically trigger a deployment. This makes continuous integration and deployment seamless.
Managed Databases: Render provides managed PostgreSQL databases, handling backups, updates, and scaling automatically. This ensures that your database remains performant and secure without manual intervention.
Environment Variables: You can securely manage environment variables through the Render dashboard, making it easy to configure your applications without exposing sensitive information in your codebase.
Scalability: Render allows you to scale your services effortlessly, from small side projects to production-grade applications, with just a few clicks.
Free SSL and Custom Domains: Render provides free SSL certificates and support for custom domains, ensuring your application is secure and accessible.
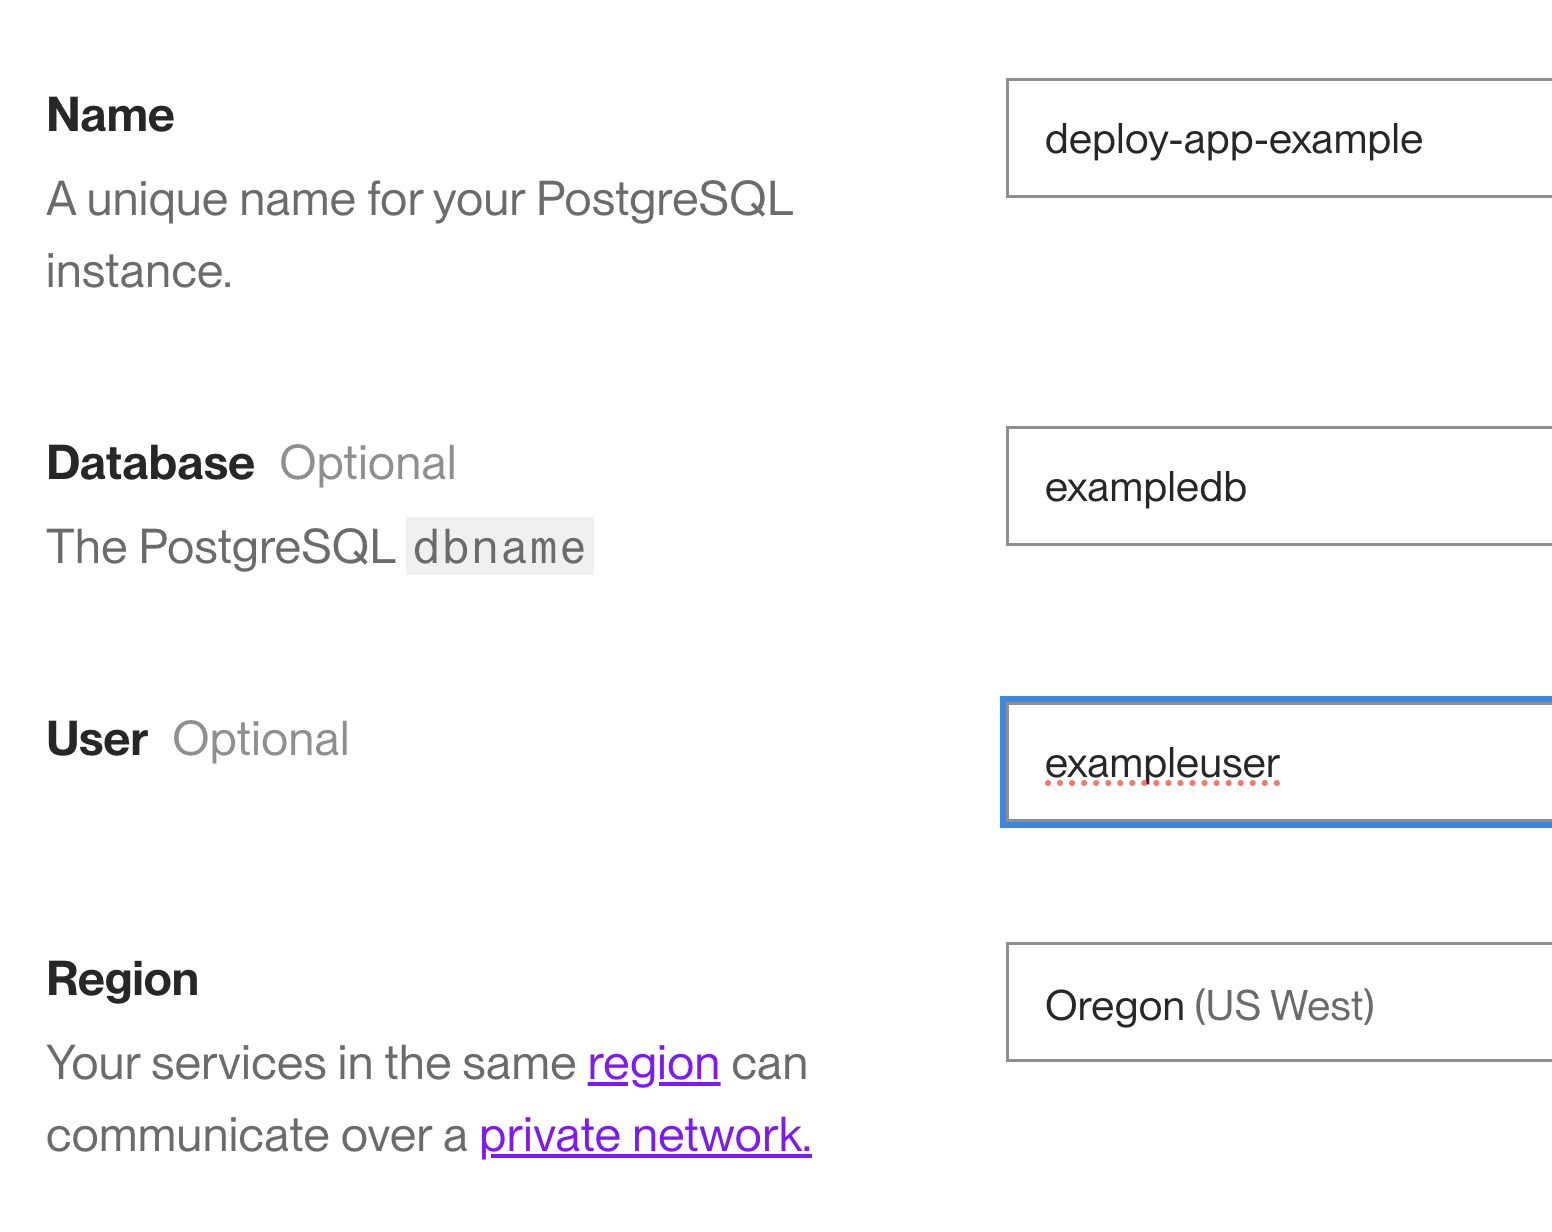
1. Create a PostgreSQL Database on Render
- Navigate to your Render dashboard and click on the
Newbutton. - Select
Database. - Choose
PostgreSQL. - Name your database
users_db. - Select PostgreSQL version as 14.
- Select the appropriate region and click
Create Database. - Render will provide you with the database connection details. Note these details as you will need them later.
- Remember to select only the
FREEinstance. - Make sure that the database and user names match your .env file. Leave the selected
RegionasOregon (US West).
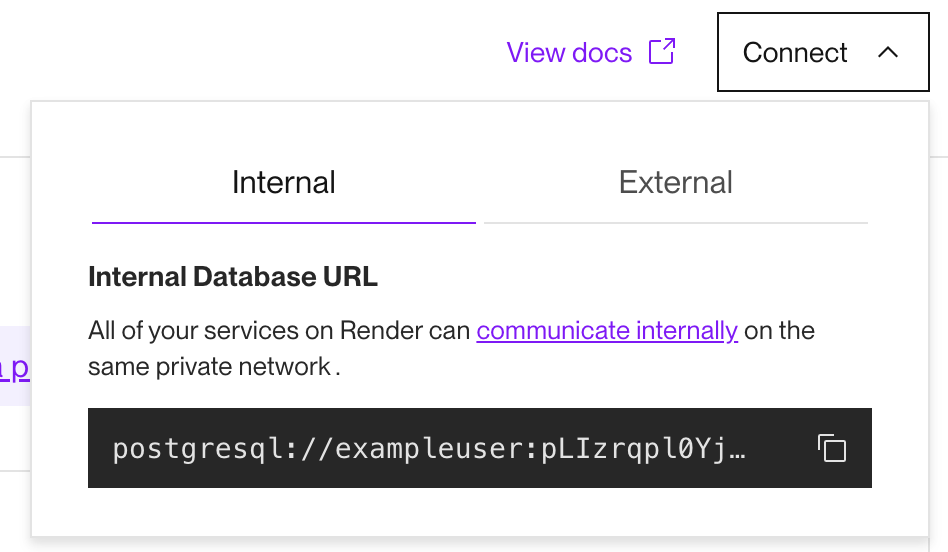
- You should now be able to find your db details along with an internal and external url to connect to your db. All of Render’s services are on the same internal private network and will have access to each other.
- Your instance should have some basic allotment of resources:

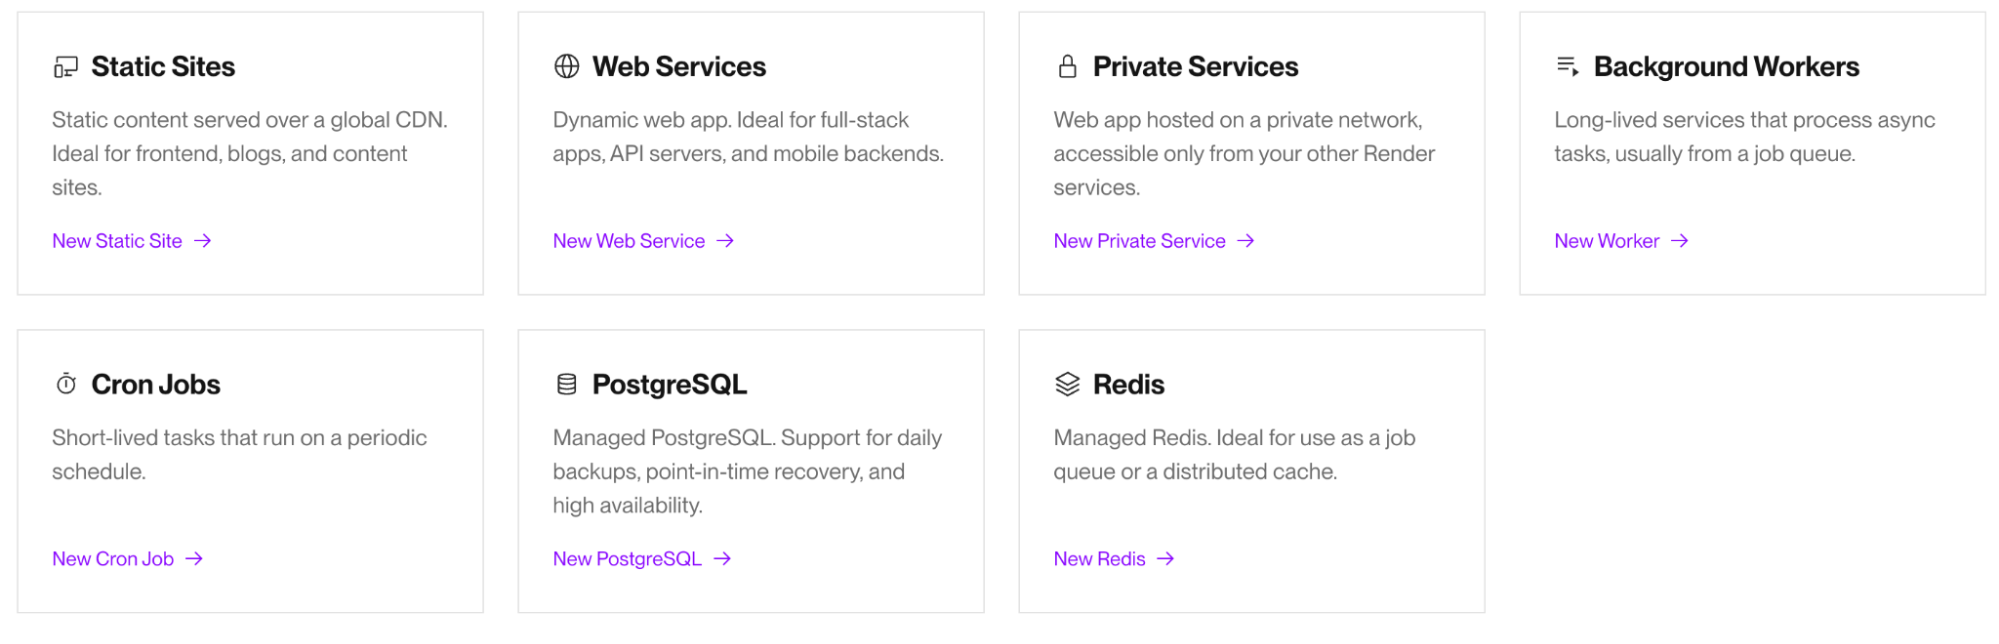
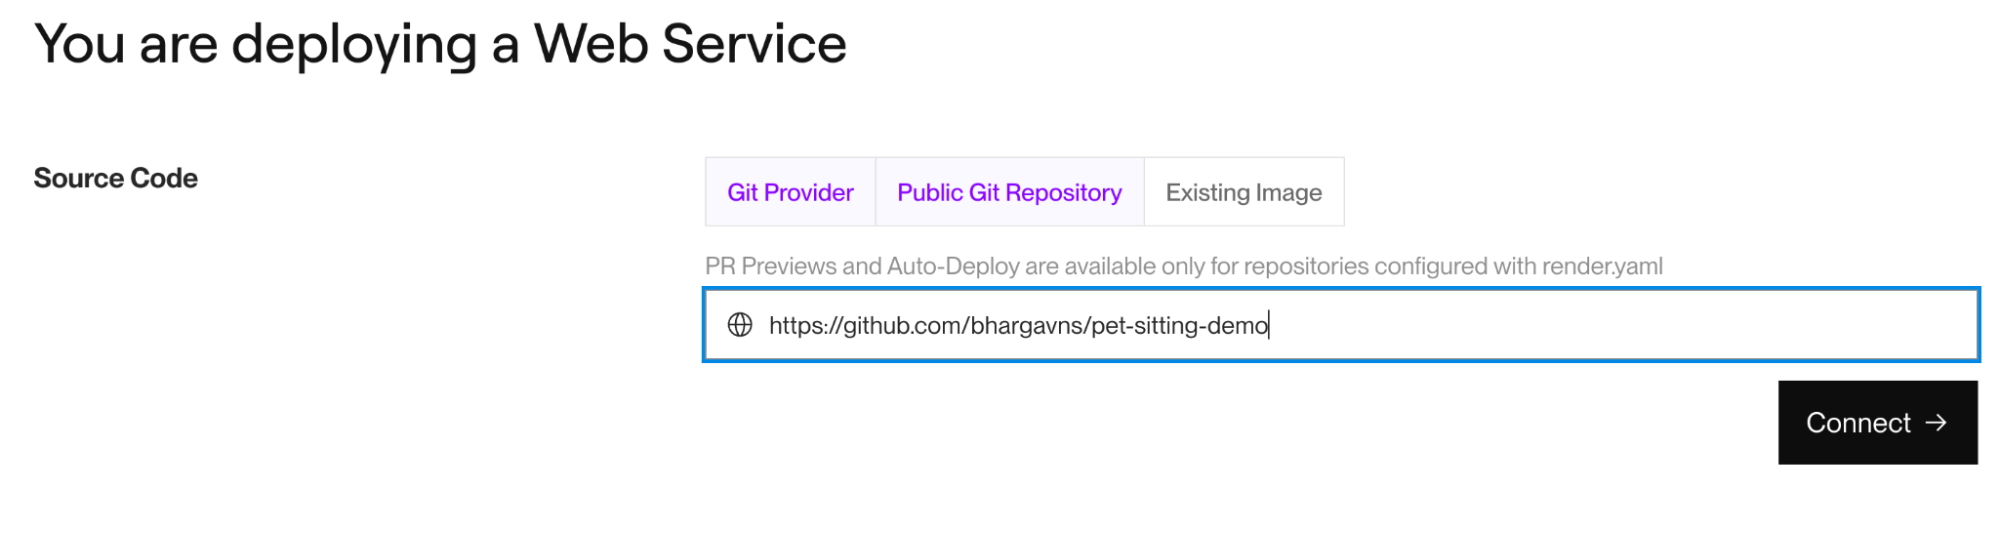
2. Create a Web Service on Render
- Navigate to your Render dashboard and click on the
Newbutton. - Select
Web Service. - Connect your GitHub account and select your repository. You can also make your repo public and use the
Public Git Repositoryoption. - Name your service and select
Nodefor the environment.
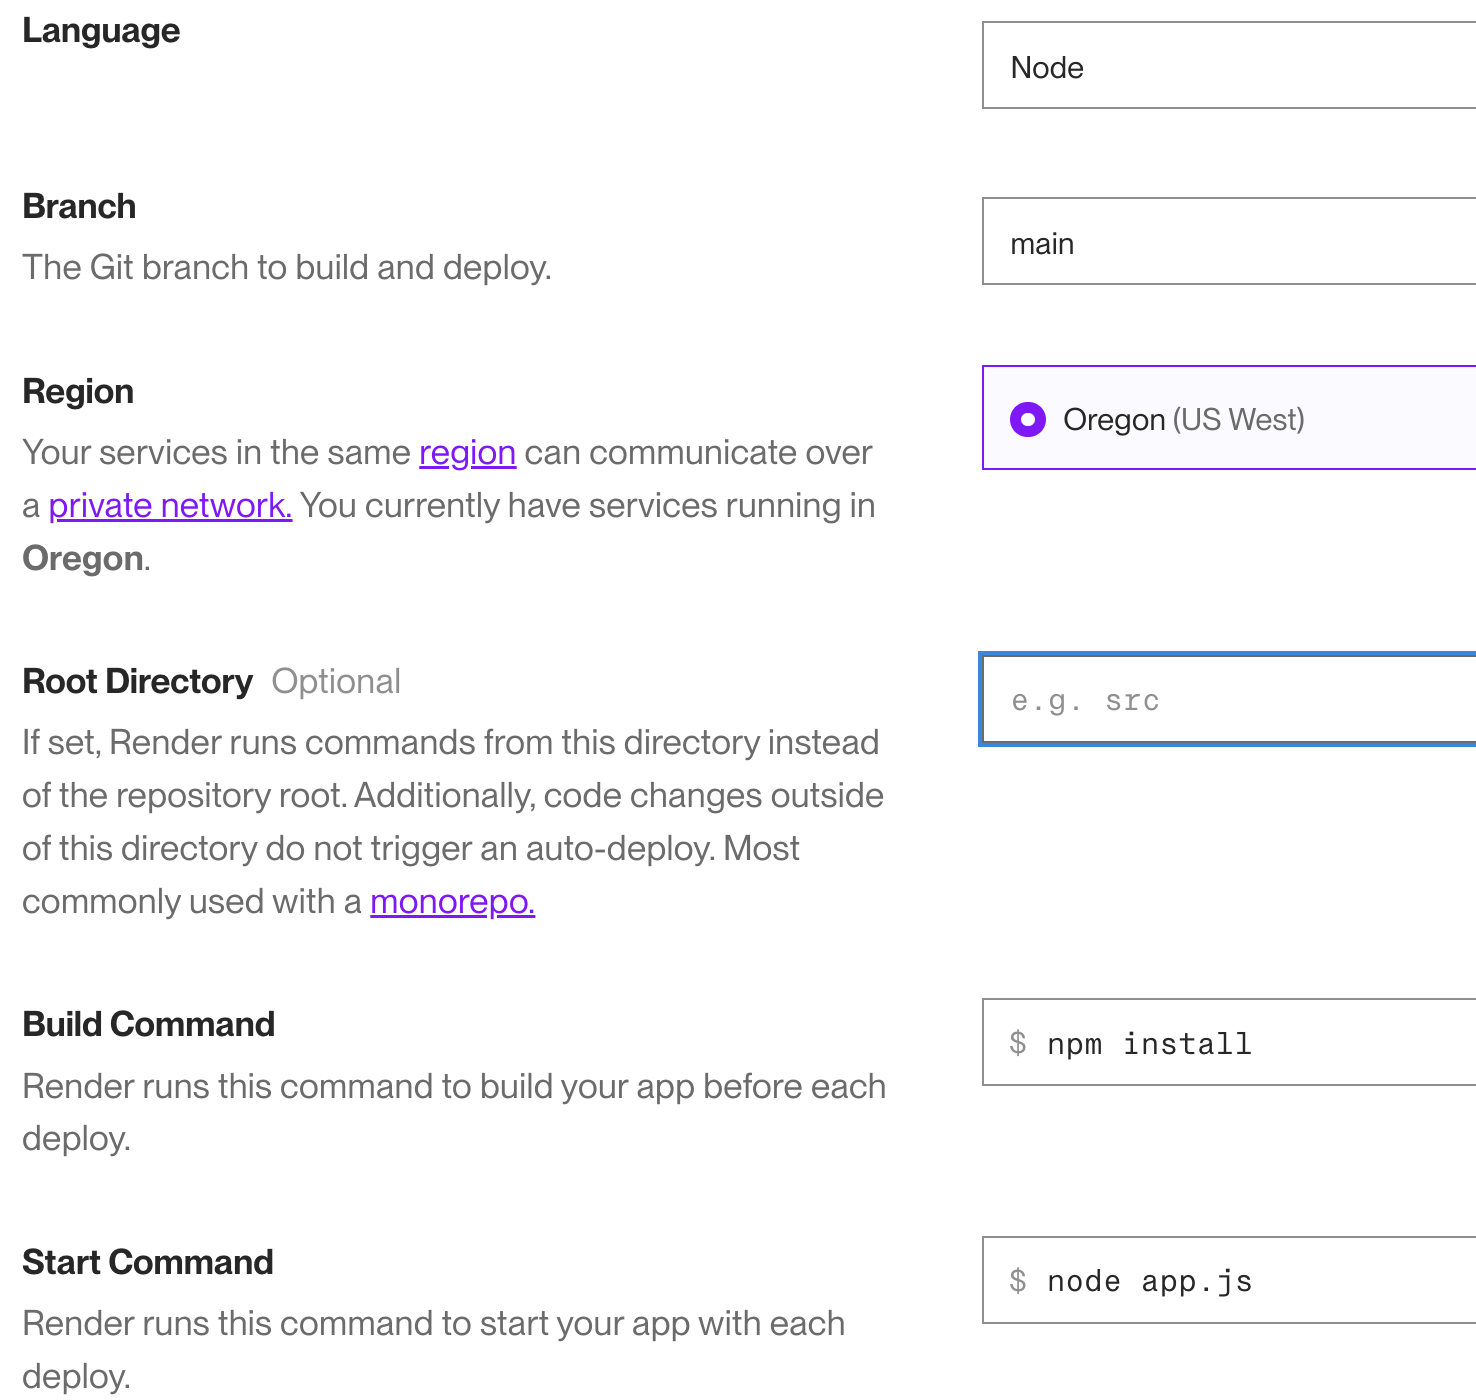
3. Configure the Web Service settings
- Root Directory:
ProjectSourceCode - Build Command:
npm install - Start Command:
node index.js - Remember to select a ‘FREE’ instance.
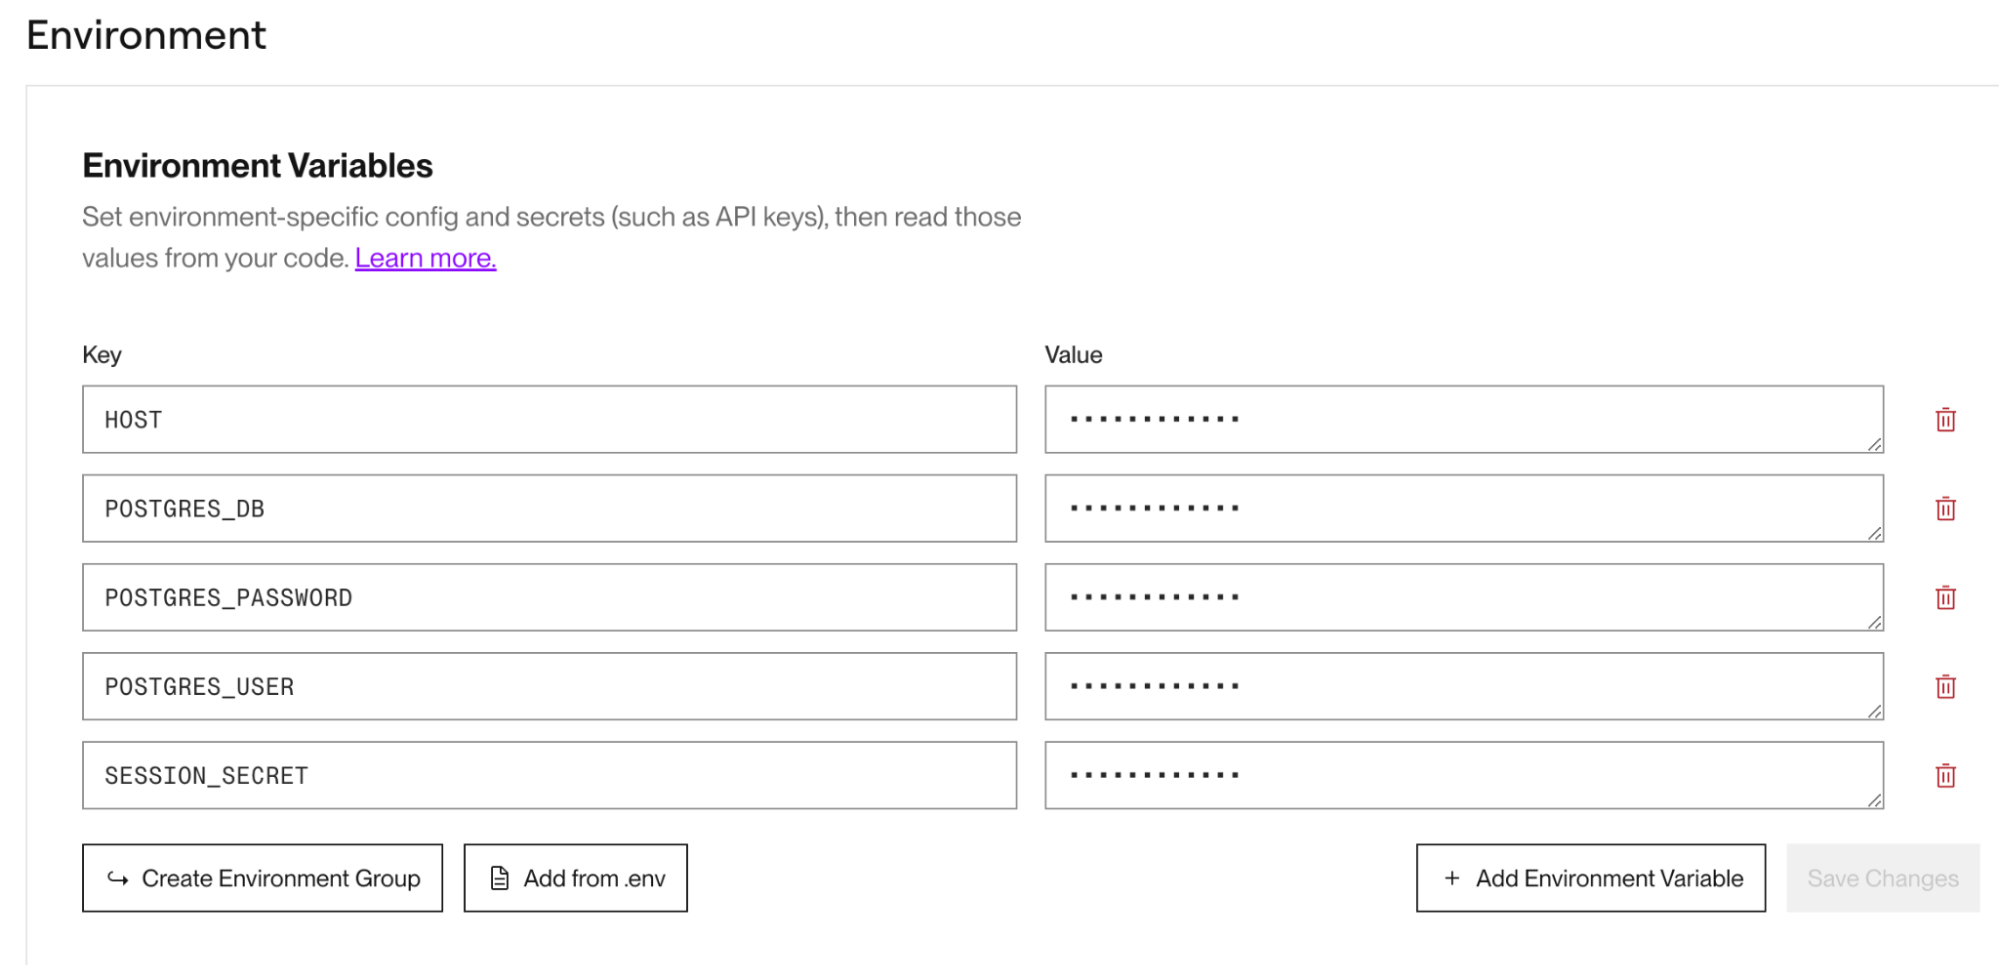
4. Setup Environment Variables
In the Render dashboard, go to the Environment tab for your web service and add the following environment variables:
- POSTGRES_USER: The username for your PostgreSQL database (e.g., db_admin)
- POSTGRES_PASSWORD: The password for your PostgreSQL database. You can use the password generated automatically by Render.
- POSTGRES_DB: The name of your PostgreSQL database (e.g., users_db). Verify the name on the Render Postgres instance dashboard.
- POSTGRES_HOST: The host provided by Render for your PostgreSQL database
- POSTGRES_PORT: The port for your PostgreSQL database (5432)
- SESSION_SECRET: A secret key for session management (e.g., super_duper_secret)
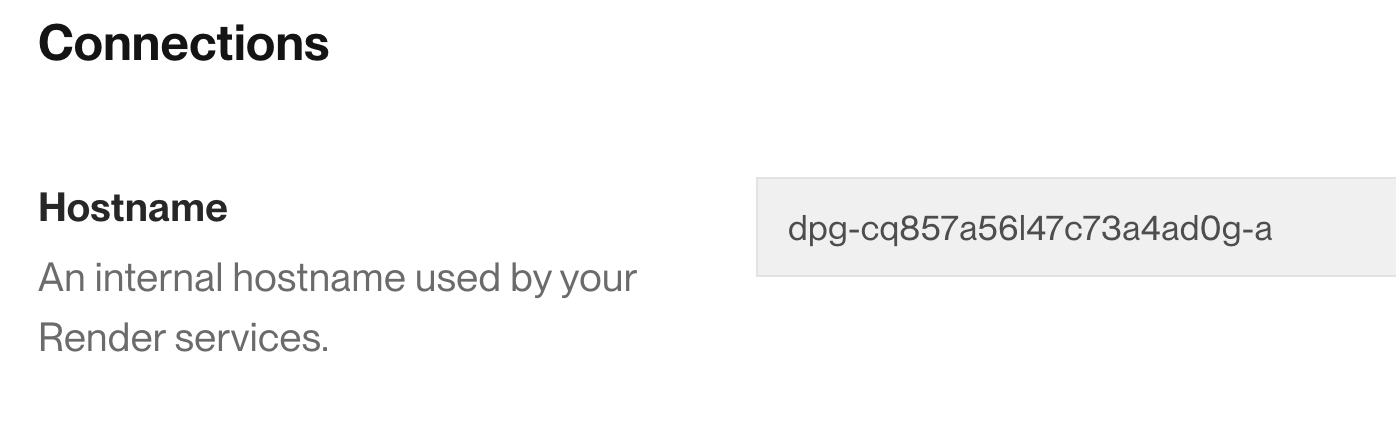
- You should be able to find the host name in the connection details of your
deployed db instance, which is what you will use to fill out the value for
the
HOSTkey. We will fill out the values for the remaining environment variables later in the lab.
5. Deploy application
- Push to GitHub
Commit and push your changes to GitHub.
git add .
git commit -m "Committing changes."
git push origin main
If there are no changes to commit, you can force an empty commit to trigger deployment as follows:
git commit --allow-empty -m "Trigger Deployment"
git push origin main
- Deploy on Render
Render will automatically detect the changes in your GitHub repository and start deploying your application. Monitor the deployment logs on the Render dashboard.

6. Initialize Database
Unlike docker-compose where we configure the container's init mechanism to initialize the database when it is first started up, we need to create a bash script to initialize our database that needs to be manually executed.
- Create an
init_db.shfile under root in your project directory, and copy over the following into the file:
#!/bin/bash# DO NOT PUSH THIS FILE TO GITHUB# This file contains sensitive information and should be kept private# TODO: Set your PostgreSQL URI - Use the External Database URL from the Render dashboardPG_URI="<DATABASE_EXTERNAL_URL>"# Execute each .sql file in the directoryfor file in init_data/*.sql; do echo "Executing $file..." psql $PG_URI -f "$file"doneUpdate the file to add the database external URL. You should be able to find the external URL in the connection details of your deployed db instance.

Install
PSQL clientlocally
This section is os-dependent, so only complete one of the panels!
- Linux/WSL
- MacOS
Run the following command on a Linux or a WSL terminal to install the PSQL Client
sudo apt-get update
sudo apt-get install postgresql-client
To verify installation run the following command
psql --version
- Run the
init_db.shscript to execute all theSQLfiles under theinit_datafolder to initialize the database.
sh init_db.sh
Executing init_data/00_create.sql...
DROP TABLE
CREATE TABLE
Executing init_data/01_insert.sql...
7. Verify Deployment
- Test the Application
Once the deployment is complete, navigate to the URL provided by Render for your web service. Verify that your application is running and can interact with the PostgreSQL database.
You can find the public URL for your web app on the upper left hand corner of the Render dashboard for the web service:
{' '}
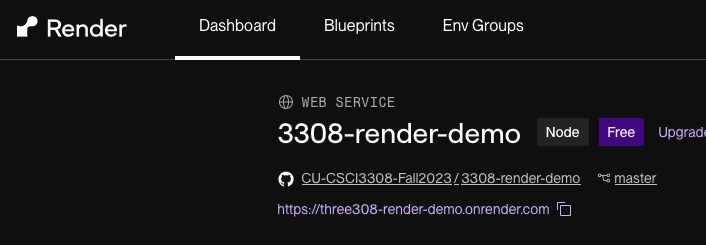 🎥Recording outputThis is the URL you will be submitting on Canvas.
- Debugging
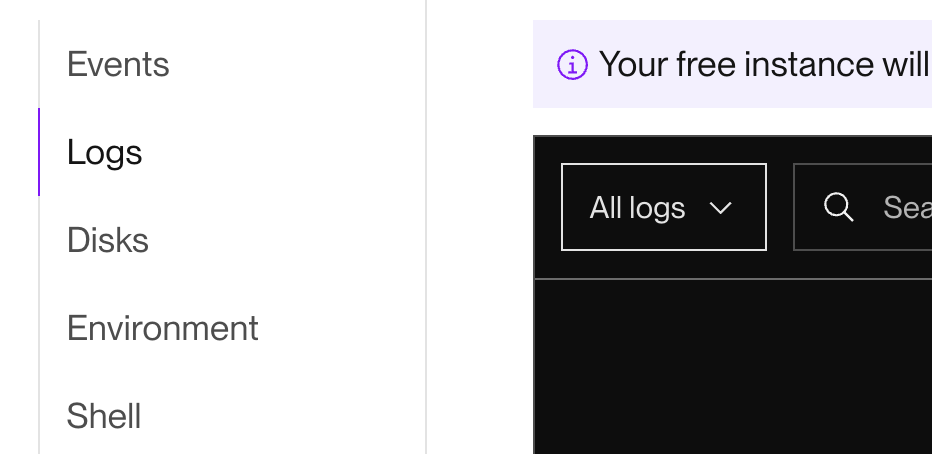
If you encounter issues, check the logs in the Render dashboard and ensure that all environment variables are correctly set.
{' '}
Remove Deployment - After posting of final grades
If you no longer need the deployment, you can remove the services from the Render dashboard.
Part C
There is no homework for this lab 🎉
Submission Guidelines
Submit the link to your deployed app to Canvas. One submission per group is sufficient.
You will be graded on the work that is present on Canvas before the deadline. If the submission is missing, you will receive a 0. This will not be replaced as any submissions after the deadline will be considered as a late submission and we do not accept late submissions.
Regrade Requests
Please use this link to raise a regrade request if you think you didn't receive a correct grade.
Rubric
| Description | Points | |
|---|---|---|
| PART A: Pre-Lab Quiz | Complete the Pre-Lab Quiz before your lab | 20 |
| Part B | The website is up and running on the cloud and completely functional, and the screenshot has a clear address bar. | 60 |
| Part C: N/A | There is no homework for this lab | 0 |
| In class check-in | You showed your work to the TA or CM. | 20 |
Please refer to the lab readme or individual sections for information on file names and content to be included in them.